Friday, December 31, 2010

Button, Button

Hi, you may have been thinking that I was taking a break from stamping but I've been hard at work creating with some of the new stamp sets along with gorgeous designer paper, a new punch, embossing folder and embosslit that are going to be introduced in the Occasions Mini Catalog that starts next week.  Let me say, I'm loving it all!  I have 3 of the new stamp sets and had another on loan that I was asked to do a display with for our Stampin' Up team meeting last night.  Here is a sneak peek at what I've been working on. 

For today, I'll feature some of the new button products.  First, the Sweet Buttons Embosslit was used to embellish this little test tube holder that is holding some bath salts.  I used Pear Pizzaz cardstock as the base for this cute holder that I found on Lisa Sommerville's blog.  I used some paper from the new DSP called Springtime Vintage to decorate the front of the box.  Isn't it beautiful paper!  I've had a lot of fun creating with the paper in this pack.  The test tube holder was simple to decorate with the buttons from the embosslit, just roll through the Big Shot and they are punched and embossed!  I did sponge on a little Crumb Cake ink before adhering them to the box.  I used Stampin Dimensionals to give more dimension to the button arrangement as well as a few Rhinestone Brads to add sparkle. 
Close-up of Sweet Buttons Embosslit buttons

There is also a new stamp set in the new mini catalog called Button, Button.  It has 17 stamps, all in great button shapes.  The next 2 cards use this stamp set.  First, a simple card featuring the same sheet of Springtime Vintage DSP and 3 of the buttons from the set stamped on squares.  I added a Congratulations stamp from the Perfect Punches set and a little Baja Breeze ribbon to finish off this very fast and easy card.


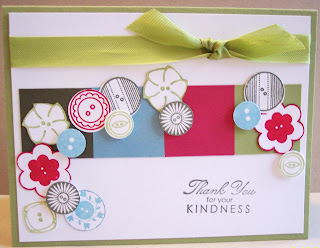


Last, another Button, Button card.  I started with a Whisper White layer on a Pear Pizzaz base.  I added four 1-1/2 inch squares across the card, slightly above center.  This time I used lots of buttons from the set.  A couple of the buttons I had to hand cut but most of them were quickly punched out with Stampin' Up's circle punches.  More dimensionals were used to raise some of the buttons up and a bit of Pear Pizzaz seam binding tape makes this another quick and easy card.  The sentiment is from the Occasional Quotes set, my thoughts exactly for all of my followers and friends who have read my blog throughout 2010!  I hope you had as wonderful a year as I did and that your coming year will be a great year for you.  Happy New Year!
Button, Button set


Friday, December 24, 2010

Merry Christmas!

December is filled with decorating and shopping, planning and sharing, creating and stressing.  But when it comes down to it, all the frills add to the joy of the birth of Jesus Christ.  Too bad we sometimes loose sight of the reason for the season.  We get so involved with giving the perfect gift that we forget the original perfect gift. 

Here are 2 Christmas cards.  First is one I designed with My Digital Studio using the Come To Bethlehem stamp brush set.  I love the simplicity of the set, it is beautiful and conveys the message I wanted to share for my Christmas cards.

Second is a card I got last week.  Many of you know that I send boxes of cards to soldiers fighting the war in Afganistan and Iraq several times a year.  I design cards and make kits for 19 more of each design and my friends and I make them.  When we have made about 280 cards there are enough to fill a large Priority box and we find a soldier to send them to who can share them with his company or chaplain so that soldiers have cards to send home.  Before Thanksgiving I sent a box of just Christmas cards.  This is one of the cards I got back in the mail last week.  It is always good to hear back from the soldiers that they appreciated and used the cards.  There isn't that much I can do to help with the war effort but making the cards makes me feel like I'm helping at least a little.


This is a family movie night gift basket I made.  I found the cute popcorn bucket at the Dollar Tree, great price!  I just had to add the Stampin' Up touch and dress up all the candy bars as Santa.

Merry Christmas everyone!

Wednesday, December 22, 2010

More Skinny Bags


I love making toppers for the 1X8" skinny bags.  They are so much fun to create.  I made a few tonight, first is the owl punch with a cute Santa "shirt" stamped in Cherry Cobbler using the Tags To Christmas set, the cute Santa Tag stamp.  The first picture includes it stamped and punched with the large tag punch, then mounted on a layer of Cherry Cobbler cardstock punched with the Extra Large Tag Punch.  To make my owl a Santa owl, I punched the stamped image out with the owl punch belly part and adhered it on a Chocolate Chip owl.   I copied several of these I saw online and they also used the Santa hat that is included with the Jolly Bingo Bits stamp set.  I don't have this set but they released it as a download to the MDS program so I can buy that and be making Santa owls with hats tomorrow!  He does look adorable with a hat too.

The other skinny bag treat topper I made tonight uses the Northern Frost die strip cut in Whisper White and mounted on a Pacific Point XL Scalloped Circle punch topper.  Pacific Point sure is a good  match for those blue M&M's, isn't it?  I've discovered as I've made the skinny bags for specific holidays that they seem to have more orange and blue candies in them that any of the other colors.  Orange came in handy for Halloween and Thanksgiving bags but as I had all those blue ones left I thought snowflakes would make a great topper for all blue candy.

Monday, December 20, 2010

Stocking Stuffer Idea and more MDS Recipes

The skinny bags are a perfect size for filling stockings but this is a quick and easy candy bar cover that will also be great in stockings.  He has a Cherry Cobbler base with a Whisper White Scalloped circle die for his beard and hat band.  Circle punches and a mustache of the 5-petal flower punch round out his face.  I saw this somewhere but didnt' save the link so I don't know who I got the idea from.  I wasn't sure the placement of the face but am satisfied with the way he turned out.  I might have to add a pompom at the top for his hat.

I didn't know that 2 of the people I created recipes for were a  mother and daughter who are both Stampin' Up demonstrators.  Since I posted 2 of the mom's recipes I need to post the daughter's recipe too (to save a family feud!)  I used the Baja Breeze polka-dot DSP for the background.  Secret - I started off with yellow paper since it is for a Banana recipe.  After adding the Torn Edges border across the top, a ribbon and bow and the cute little snowman stamp from A Cute Christmas set I emailed it to Jennifer for her approval.  She noticed something I hadn't thought of when I made the page.  A snowman on a yellow background brings to mind yellow snow.  Not a good mental image!  One of the great things about the MDS program is that it is so easy to change things.  A few clicks and that yellow background was blue!  I love it!

I made this Raisin Filled Cookie page for Tina Crawford.  It sounds like a good recipe but I haven't had time to test it out yet.  I used a Soft Suede grid pattern for the background and a border from Christmas Jingle, isn't it beautiful!  I love that red border.  I decided to spend the extra time to add all the white berries to the mistletoe sprig.  It just had to be done, besides, I wanted to play with my new download of pearls and rhinestones!  I also added some of the filigree flowers and put the title on the Fancy Label punch.

The last page I'm showing today is for a yummy oatmeal cake, another recipe from Joanella Townsend.  I'm positive it isn't anywhere on my diet though.  I went with lots of stripes on this recipe, starting with the striped background paper and adding the Alpine Ribbon.  I love that striped ribbon and bow!   I filled the top right corner with the ribbon and tilted it so it looked like it is wrapped around the page there.  Another strip of it on the left and a couple of borders from the Christmas Cocoa download finished off the page. 

I reckon that's all for now.  My grandchildren are here and we are fixing to go out for supper.  I still have several other recipes I made so I may post the rest soon.  They are all great for your Christmas baking!

Thursday, December 16, 2010

Recipe Pages

I've been very busy the last few days.  Not only have I had the usual Christmas preparations, I joined a recipe swap with a twist.  It is an MDS digital recipe swap!  The book is going to be so pretty when it is finished.  It started out as a Christmas cookie swap but there is a variety of recipes that aren't all Christmas cookies.  I also volunteered to help some people who don't have the MDS program make their recipes.  I'll share a few of these pages with you today. 

First, the Chocolate Surprise cookies are one of my kid's favorite cookies I used to make at Christmas time.  The last time I made them I had trouble finding the Chocolate stars at the store.  I don't know if they still make them anymore but kisses would work too.  I used the Real Red polka dot DSP for the background and then did a layer of Whisper White but changed the opacity so it looks like vellum.  I did that partly because I like the look but also because it was hard to read the print on the red background.  I used the beautiful bird from A Cardinal Christmas stamp brush set.  I love that bird!  I also used a zig-zag stitch brush set at the top and bottom of the layout.  I added a black brad for his eye and a group of ribbon-tied buttons at the lower corner to finish it off. It might have taken me 20 minutes to finish the page.  I like quick and easy!


One of the pages I did for a demonstrator named Joanella Townsend was for Million Dollar Pie.  It sounds good, I'm afraid to try it because I'll eat so much of it!  I used the script background DSP and a frame from the Frames With a Flourish brush set around the whole recipe.  The bird is from the Friends 24-7 brush set.  I finished it off with a few brads. 
Julie's recipe for Gooey Butter Cookies sounds like another recipe that would be a favorite.  I used a floral background paper in Crushed Curry and added a layer of cardstock, then a scallop punch on each edge to make it look like the scallop square die.  I used the swirl stamp from the Baroque Motifs brush set, changed it to Crushed Curry and added a deep shadow, my favorite MDS technique right now.  A little ribbon across the top and some brads in Dusty Durango and done! 
Another recipe I did for Joanella was for Blueberry Crisp.  It sounds like a yummy recipe!  I used the polka dot DSP again, this time in Night of Navy.  Seemed blueberryish.  I also did the faux vellum layer to make the recipe easier to read.  I also "vellumized" the dotted scalloped borders around the outside and put a rhinestone brad at each corner to cover up where the 2 layers overlapped as well as on either side of the title.  I used the brush set from Friends 24-7 again for the berryish branch at the bottom and the pretty flower branch from the Thoughts and Prayers set.  My spell check goes nuts when I invent words!

I like the way the pages turned out.  I made 12 pages in all, whew!  Even though I used the same techniques on some of the pages they all turned out differently.  I can't wait to see what everyone else's pages look like.  I may share more in a few days.  I got my camera back tonight so I can take pictures of some projects to share again.  I sure missed my camera!

Wednesday, December 15, 2010

Gift Tags

It is a cold morning with snow promised for the afternoon.  Here in TN it is unusual for us to have teen and single digit temperatures or snow in Dec.  That weather usually waits until mid Jan-Feb.  That's why I'm taking a cruise then.  I'm wishing I had planned the cruise for this week!


Anyway, as I'm snuggled up in my warm cozy house I played with the MDS program this morning and designed some tags to print out for Christmas presents.  They were quick and easy.  The most time consuming thing was getting the white circle punches the right size to fit in the brads to look like a hole!  I used the tag punch and filled it with patterned paper, most of it I made more opaque so the stamp would show up better.  For these I had to add a white tag behind it to keep the red or green from showing through, although some of them looked pretty good with it showing through before I changed them.

So, what do you think?  I made them bigger than the tag punch so I will have to cut them out but I used the grid tool to line them up on the page so I can cut them out with the trimmer.  Yeah, I like to make it easier whenever I can!

I have made some "paper" tags but I left my camera at a friend's house so until I get it back these will have to do.  My husband and I also decorated the Christmas tree last night.  It is always fun to look at the ornaments and remember all the years we have celebrated Christmas.  I was pointing out to him some of the ornaments I made the first year we were married.  We were both in college and didn't have a dime to spare so I made the ornaments for our tree which we got from beside a dumpster when the students in the single student dorms went home.  Now that is seriously poor!  The little felt and pompom ornaments are kind of mishapen now but I love them.

Monday, December 13, 2010

Another Nativity page

It has been bitterly cold here today.  There isn't a colder December 13 every recorded here!  I'm surprised that any of the snow we got yesterday melted today it was so cold.  Right now it is 9 degrees but with the wind chill it is -2, burrrr!  I'm especially thankful for a warm house and plenty of blankets tonight.


Here is another page with some of the nativity sets from last weekend.  I used the embossed digital technique again.  I love how it looks with the Come to Bethlehem stamp set.  I got the digital brush of it to use with the MDS program.  I love when great is easy!

Saturday, December 11, 2010

Dec Classes


Monogram Cards make a great present for nearly anyone.  In my Great Gifts class we will make a set of 8 monogramed cards with envelopes and package them in this great clear box that we will emboss to make it an even greater gift!  We will also be stamping on a candle for a second great gift to give.  The class will be next Wednesday, Dec 22 at 2PM.  Email me if you want to come, it is only $8 for this class and you will come away with 2 very quick and easy gifts!  wrightplace4@mindspring.com
I have room in my Cleanin' Up for Christmas class on Dec 21 also.  You will make 3 soap related gift projects shown above.  I love the test tube bath salts holder and the mini hand sanitizer boxes but the flower soaps are my favorite!  This class is $20 and will be at 10AM or 7PM.  I hope you can make it to one of these classes!

I am also having a Christmas treats class where we will be making 2 skinny bag treats, a candy-filled test tube Santa card and a triangle box Santa to fill with goodies.  These will all make great stocking stuffers or gifts for co-workers or service people.  Cost will only be $10 for all 3 projects.

After Christmas I will be doing a Year In Review mini album class so check back for details on this.  It will be on Dec 28 at 10 AM. 

Email me to sign up for any of these classes!  wrightplace4@mindspring.com

Tuesday, December 7, 2010

MDS Festival of the Nativity pages


I took nearly 200 pictures of the Festival of the Nativity that we had at church last weekend.  There were so many beautiful nativity sets and the gym was decorated beautifully.  I love Christmas and everything about it (except for shopping in the crowded stores) but it was great to be able to go and wander among 193 nativity sets and reflect on the "reason for the season".  With all the beautiful sets, I didn't need many embellishments on these pages.  With Stampin' Up's MDS (My Digital Studio) program the layouts have been quick and easy.  I used the Bashful Blue script background so as not to compete with the pictures too much.  I hope you enjoy just a few pictures of this wonderful event.

Friday, December 3, 2010

Workshop Cards

These are the cards I did in workshops last week.  The first card was for a class of more experienced stampers so it is a little more involved.  The second card was a class where there were first time stampers so I scaled it down a little, although the sentiment, Peace on Earth was embossed in gold embossing powder.  I'm not sure which card I like the best.

We are having a Festival of the Nativity at my church this weekend.  We have about 200 nativity sets arranged in the gym and it is so wonderfully decorated that it doesn't even look like a gym anymore!  I plan to take a lot of pictures of my favorite nativities and make a mini album.  I think it will be very inspiring to look through and remember the many beautiful depictions of the Savior's birth.  Each artist did a beautiful job with their selected medium to create their nativities.  I hope I can get the book made soon, I'll share it with you when I do!

Tuesday, November 30, 2010

Half Price My Digital Studio, Shadow Technique

Would you like to test drive Stampin' Up as a business?  Sign up today for half price and enjoy the benefits of being a demonstrator for a few months with no obligation.  If it isn't for you you can drop in March, no pressure!  Until then, you will get Stampin' Up publications and a discount on your stamping supplies.  Sounds like a win/win to me!  Email me to join my stamping team  wrightplace4@mindspring.com

Are you still holding out on Stampin' Up's digital crafting solution?  I can't imagine why!  You will find so many ways to use this digital papercrafting solution and the price can't be beat.  Tell someone they want to give it to you for Christmas before the price goes back up! 

What can you do with MDS?
  • Create quick and easy scrapbooking pages, of course!
  • Create your own photo Christmas cards
  • You can add videos and/or music to your projects, how cool is that????
  • Use the stamps that are included in the MDS program to create cards and other projects without having to buy and store the stamp sets
  • Create professional looking flyers for work, school, church and other things you might need a flyer for
  • Create invitations, baby announcements or any other card
  • Create games with pictures
  • Create on the go!  If I am going to get new tires, a tune up, bus ride or somewhere I know I'm going to have to wait for a while I take my computer with me.  With MDS I have everything I need to create a project, ribbons, buttons, stamps, Designer Series Paper, cardstock, everything is there with the click of the mouse!  The pictures are handy right on my computer and so easy to import into MDS if I decide to create a layout. 
  • Do you deliberate and take forever doing a "real" layout?  Sometimes I design the layout in MDS and then translate it into a paper layout.  I can get the design right, decide on the size of the pictures and colors of cardstock I want to use and figure how to place each element.  This is a huge time saver!  When I get it how I want it I can go get just the colors and page elements I want and not have to drag everything out on my table until I can barely have enough space to  create.  I've been known to create a card on a 6"X6" space on my desk, do you work like that too?  It is insane but I do it!
  • I used to have a terrible time making flyers for classes or other things I needed to make a flyer for.  With MDS I can easily place pictures, text and embellishments where I want them and size them until everything I need is there.  If it is too much I can quickly delete any page elements I decide aren't needed, make them smaller or move them to a different place.
  • My Digital Studio boxed software includes nearly 2000 unique elements—stamps, embellishments, designer and photo templates, punches, Designer Series Paper, card stock and more. If you were to individually buy all of the products already included with the software, you would spend more than $500!  It takes up a lot less space too  :-)
  • Email your projects, post them on your blog, print them either professionally or on your home printer or put them on a DVD and mail them.
  • MDS comes with lots of predesigned templates or you can open up a blank page to create your own individual design. 
  • Stampin' Up has a webside just for people to learn and share with the MDS program!  Very cool, look what I just learned to do in the tips and techniques section, you add your stamp, change it to the same color as your background paper, add a drop shadow of 75% and it looks like a dry embossed image!  I love the Baroque Motifs swirly image anyway but was so excited to learn this technique that that stamp is just perfect for!

There is lots more you can do with MDS, I'm still learning and exploring after a year and it will do so much more than I know about!  It is fun to just open up a project and play around with all the buttons to see what happens.  

Did you know that MDS comes with:  61 stamp brush sets, 11 embellishment KITS (273 pieces), 13 background paper packs (442 patterns), 25 punches, 6 designer KITS (497 pieces), 7 designer templates (5 album/15 greeting card), 30 photo templates (available in photo album sizes and card sizes), 2 calendar templates, all of the Stampin' Up! colors (including some past In Colors).  There are also downloads available from time to time at great prices so you can add your favorite Stampin' Up stamps and papers as well as ribbons, buttons, etc.  Don't forget, the half price sale ends today!  Go to my website to order or email me and I'll get the order placed for you.

Monday, November 29, 2010

A Manly Pile of Leaves

Don't forget the half price Demonstrator Kit ends tomorrow!  What a great bargain to start a fun career of your own.  I'd love to have you on my team.  If you have been thinking about it, now is the time to jump!  My password is StampinUpRocks

I finally figured out (all by myself) why I couldn't get my digital layouts to post.  I was trying to export them from the program instead of exporting the JPEG I created to post.  Hey, if I could forget the stuffing for my Thanksgiving I can forget lots of other things too!  Just ask my daughters, I forget the grand children's names sometimes too.

When we raked up this pile of leaves my 5 year old grandson called it a "manly pile of leaves" so that had to be the title of this page.  You just have to love a 5 year old's perspective!

I like this layout, partly because it has 3 of my grandchildren in it but also because I took a picture of some of the leaves on the ground that were so brightly colored that day and used it as a background for the pictures.  It is so easy to do in My Digital Studio!  (remember, the one that is half price until Tuesday???)  This is a great time to try this digital papercrafting solution. 

The My Digital Studio program comes with 2 CD's that are very easy to load onto your computer.  Be sure to load both of them, when I got mine I was so excited to start creating that I forgot there was a second disc!  I couldn't find the bows to go on the ribbons and was missing some colors and things so I asked a friend and she asked if I had installed both discs.  Duh!  MDS works for Windows XP or Vista or Macintosh computers.  The License Agreement allows you to put it on 2 computers that are both your personal computers.

Well, I reckon I need to get back onto My Digital Studio and get the flyer made for my classes for the rest of the year.  I've got some fun ones planned, I'll post my flyer tomorrow or you can click on the catalog on the right to go to my Stampin' Up website and see my classes posted there.  I hope you can join me for some creative fun!

Saturday, November 27, 2010

Half Price Specials! Cocoa Pouch/Coaster and a Lost Tooth

  • I wanted to share a project I did in My Digital Studio where I took a picture of my house each week during October to show how quickly the leaves changed colors and fell off the trees.  It is a pretty cool layout but since Blogger changed some of it's settings and I can't figure out how to post them.  I used to be able to post the layouts but not today.  I'll keep trying and maybe you can see them later.

I wanted to share them to emphasize that the 50% off special ends in 3 days, Tuesday, Nov 30.  This is a great price on this wonderful (and easy to learn) digital crafting program.  My Digital Studio is regularly $79.92 but through Nov 30 it is only $39.98!  This is a great price, there may never be a better time to buy this versatile and fun program.

Also half price are both of the Designer Fabric packages.  The project below is made with the Candy Cane Christmas Designer Fabric.  The more vintage type fabric, Deck the Halls is also on sale,  they are regularly $9.95 and are on sale for $4.98!  This is a great price on beautiful fabric for Christmas projects.
 This project was made using the Scallop Square Die.  I made the squares like I did for the purses but it only requires 2 squares (4 cut pieces of fabric) per pouch.  You can put some fun goodies in the pouch, these ones have cocoa with a test tube of marshmallows and a candy cane to stir your cocoa to give it a minty taste.  I used a large-eye needle to sew the 1/8" Taffeta Real Red ribbon around the top of the pouch.  I bet you can think of lots of other treats to fill the pouch with.  It would also be fun wrapping for a small Christmas present.
Another great thing about using the pouch for cocoa or spiced herbal teas would be that it could be used as a coaster when the cocoa is mixed up!  I saw this wonderful idea on Stampin' Connection, a website for Stampin Up Demonstrators where we can go to get lots of ideas for our business.  Another great benefit of being a Stampin' Up Demonstrator. 

Which reminds me of another thing that is half price - the Demonstrator Starter Kit!  You get over $310 in  crafting and business supplies in the kit which is regularly a great price at $175.  Until Tuesday, Nov 30 it is half price at $87.50!  It sounds like it is time to take the plunge and join my team  :~)

The last half price item is the Sweet Shoppe Alphabet bundle, it includes both the upper and lower case stamps, wood mount are regularly $63.90 and are now $31.95.  Clear mount are regularly $47.90 and are now $23.95.  This is a perfect time to add this fun alphabet set to your stamp collection without having to pay full price!

One last picture, my 5 year old grandson lost his first tooth this week.  Do you think he is excited about it?  I love the happy smile minus a tooth but those freckles are absolutely precious!

Thursday, November 25, 2010

Happy Thanksgiving!

This is what I saw when I looked out my kitchen window to start my Thanksgiving morning.  It was an absolutely spectacular sunrise and the day turned out to be very nice too.  We had storms and rain about the time we started eating our Thanksgiving dinner and were thankful to be inside, dry and warm and enjoying some great food (if I do say so myself).  As we filled our plates and were getting ready for the blessing I looked at my plate and realized that I had forgotten something important.  Stuffing!  I love the stuffing for the turkey but had completely forgotten to make it.  Well, everything else was good - and life is good.

After lunch I got a chance to finish up a project for another class I have coming up.  It is a Christmas Star Book.  I think it would be a wonderful way to record some of your Christmas traditions and set out every year with the rest of your Christmas decorations.  The class will be on Monday, Dec 13 at 2:00 and 7:00 PM.  It will cost $15 and you will have a lot of leftover paper and cardstock stickers to make a few more cards or a scrapbook page.  Come on out and learn to make this fun little scrapbook, email me to sign up by Dec 4 so I can order supplies to be here in time for the class.  wrightplace4@mindspring.com

Tuesday, November 23, 2010

Yes, it's soap!

Angela was close but Kelly got the more accurate answer.  Too bad I wasn't offering a prize, huh Kelly.

One of my upcoming classes includes 3 soap-related projects.  The flower soaps will be one of them and will be packaged in the cool metal nugget tins.  Obviously I couldn't package them in paper, I wanted to use something the recipient of this gift could set on her counter to use the soaps out of.  The picture is a little dark but the red/purple/yellow assortment I showed Saturday are in the back and the box in the front has poinsettias and holly leaves.
This class will include 3 soapy gifts.  On the left are bath salts packaged in test tubes and a cute package with 2  holes punched to hold the test tubes.  Middle is the Tin with flower soaps and on the right is Christmas hand sanitizer boxes.  I found several fun scents of the hand sanitizer for you to choose from to fill the little boxes for this class.

The class will be held on Dec 6 at 2:00PM or at 7:00 PM and will cost $15.  I hope you can come and clean up!

By the way, don't let the time on the great bargains run out, they are only good till the end of the month!  Save a  lot of money whether you are shopping for digital, fabric or stamping goodies and embellishments or if you want to start a fun new career.  There surely will never be a better deal!

I played with My Digital Studio today and made a couple of layouts.  I think you will like them, I tried to explore some new digital techniques I hadn't done before.  I reckon I have probably told you how much I enjoy creating in MDS  :~)

Monday, November 22, 2010

Online Spectacular


Did I ever tell you how much I love my job?  Not only do I get to have the fun of stamping at business meetings, getting a discount on wonderful quality Stampin' Up products and have classes in my home or in friends' (or future friends) homes, the company is always finding ways to make a fun job even easier.  Look at the great bargains you can get on the Online Spectacular specials!  No need to wait till Black Friday to start shopping and no crowds to fight (although I have a few friends who are nuts enough to enjoy the crowds).  Guess what is 50% off - MDS!!!!!!!!!!  You just can't get any better a price on this wonderful software to make creating cards, flyers and scrapbook pages so easy. 

And the best part, not only can you find great bargains on MDS, wood or clear mount ABS set, fabric, brads, ribbon, Decor Elements vinyl accents and lots of stamps and dies, besides FREE shipping, you can get hostess benefits! 

Here is what you can do:
Cick on the link in the picture below to see the bargains. 
Add a few items from the Clearance Rack on my website (if you go on my website you will get better pricing than the general Stampin' Up dot com site and you will be prompted to enter your hostess gift selections when your order gets over $150)
If your order isn't over $150 get a couple of friends to order with your order - you are the online hostess!  Easy peasy.


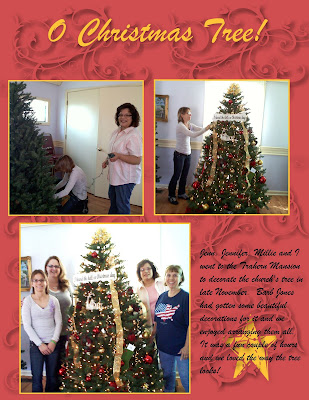
While you are here, see what I did today?  I had help from a few friends but there is a Christmas Tree display at the Smith-Trahern Mansion in Clarksville and we sat up and decorated the tree for our church today.  It was great fun, kind of like a practice run for doing my tree, and it turned out so pretty I just had to share.  I wish I had a better picture, I didn't take my camera with me so this was taken with my cell phone.

So that is what I did today instead of stamping.  Angela is the only one who posted a guess about what the shiny flowers were.  I'll post the finished project tomorrow after a workshop I'm doing but here is a hint:  To the left of the bowl of flowers is something that will be used in conjunction with the flowers.  Can you figure it out now?

Saturday, November 20, 2010

Cleanin' Up Class

Here is a sneak peek at one of my upcoming classes.  Can you guess what it is?  I found this wonderful idea and, of course, I figured out a way to package it with Stampin' Up products!  More to come later.  I'm finishing up the details for my classes for the rest of the year (Christmas is just 35 days away!!!) and will try to get them posted early next week.

Until then, what do you think this is?

Oh yes, have you been thinking about joining my Stampin' Up team?  The half price Demonstrator Starter Kit is such an amazing deal, how could you pass it up!   You choose your own stamp sets, ink and paper colors, it includes 3 wood-mount stamp sets, 1 clear-mount with clear block, 1 wheel with handle and ink cartridge, 4 ink pads and an ink refill, 1 versaMark ink pad, 2 markers, a blender pen, 2 cardstock packs, 1 pack of DSP, ribbon and assorted adhesives, Stampin' Scrub, cleaner and a decor Elements piece!  Wow, that's a lot of fun!  Don't you need all that for Christmas???  Then you can get 20% off all your Stampin' Up purchases, meet lots of new friends doing what you love and go to business meetings where you can stamp.  Did I ever tell you how much I love my job?  Think about it, I'd love to have you on my team. 

This special only goes until Nov 30 so contact me soon to make it happen!  wrightplace4@mindspring.com

Tuesday, November 16, 2010

Melting Snowman Card

Here is another card I got in the swap last week.  I love this whimisical card!   I'm not entirely certain if he is melting or if it is an aerial view and he is looking at the stars.  It uses the fun as well as beautiful Northern Flurry Embossing Folder for the Night of Navy background and look at Mr Snowman's arms - they are part of the snowflake punch!  Perfect for snowman arms.  This is just a fun card, wouldn't anyone love to get it? 

I got a sneak peek at the Sale-a-bration catalog and the Occasions Mini Catalog that will be coming out in Janurary.  I reckon I'll need a lot of the goodies these have to offer.  I already have great plans for the new Ice Cream Shop paper pack.  Gotta love free stuff!

Monday, November 15, 2010

Amazing offer - and 2 Christmas cards

For two short weeks, we’re making an offer to join the Stampin' Up family that you will find simply amazing! Starting November 15, and lasting until November 30, 2010, you can purchase the Standard or Digital + Starter Kits for only $87.50--that is 50 percent off the regular price of $175 (for over $310 worth of paper or digital crafting and business supplies!)  Did you notice the special at the top of my sidebar?  You can see a sample kit there and get other details.  You can choose which stamps and colors you get in your Demonstrator kit, what's not to love!
At this price, the Starter Kit would even make a great holiday gift that a spouse could give his paper craft-loving wife!  Learn more about this amazing offer, and get ready to share what you love, email me for a chance to join now at this great bargain price!  wrightplace4@mindspring.com  I'd love to have you join my team, the training always includes stamping technique training, what could be better than stamping at all your business meetings??  Signing up is quick and easy.  You can join online and send your payment with your debit card and just wait for the UPS man to bring the fun to your house!  I love easy. 

Another thing to consider, for those interested in My Digital Software...if they join Stampin' Up now, using this special and select the Digital Kit they'll in essence be getting the MDS software for free!!  How cool is that!  I love my MDS program and use it all the time, I used it just Saturday to make a poster about the Christmas dinner we are having at church next  month.  It's not just a scrapbooking program.

Here are 2 cards I got in a swap at our last Stampin' Up team meeting (see, you get to swap at our business meetings too  :~)  I love all the Christmas card ideas I'm seeing.  I haven't decided what I'm going to do for my own card yet.  These are both great possibilities though.  On the left is a great card in Night of Navy Very Vanilla and Cherry Cobbler that uses the Rejoicing in Christmas set that is in the Holiday Mini Catalog.  I love how she made the card with the Top Note Die as the base of her Nativity.  She didn't put her name on the back though so I don't know who to give credit for this beautiful card.

The card on the right is just gorgeous but I know the Northern Flurry Embossing Folder makes it quick and easy to create the base.  Add the Peace on Earth sentiment and a few pearls and it's finished!  Sue Erikson made this card, you can't tell from the picture but it also has shimmer mist on it so it is nice and shimmery and all of the snowflakes have a pearl in the center, even the 3 tiny ones.  I'm thinking I need to do a quick and easy card for Christmas, I reckon this one has distinct possibilities.


Sunday, November 14, 2010

Inlaid Embossing

These cards use a technique called Inlaid Embossing.  It is so quick and easy to do but is a great look.  For this one I used the Baroque Motifs stamp set to stamp the swirly background and the Thanks stamp from the Afterthoughts set.  After stamping these I adhered several flowers and ran the card fronts through the Big Shot with the Square Lattice Embossing Folder.  Done!

The second card I used basically the same colors but used Pumpkin Pie instead of Very Vanilla for the background color.  I cut the Pumpkin Pie piece to 5 1/4" X 4" before stamping and embossing and then adhered it to a Very Vanilla card.  I also reversed the side of the embossing folder so the squares are going up instead of in like the first card.  It does make a difference which way you place your paper in the folder, doesn't it?

I used this card for a swap and since it is fall, I used the fall colors.  I'm thinking that one with all red flowers but the Very Vanilla background and Old Olive swirls would make a great Christmas card.  

Wednesday, November 10, 2010

I CASEd Myself!


Do you ever CASE yourself? I made this card last Spring and really liked the way it turned out. The ribbon rose was a fun technique and looked great on the card. I came across the card this week and thought it would make a great cardmap for a Christmas card.  I used Deck The Halls DSP and Always Artichoke, Cherry Cobbler and Very Vanilla cardstock.  I stamped the Joy at Christmas from the Perfect Punches set in Versamark and embossed it with gold embossing powder.  Very elegant.  To continue the elegant touch, I gathered a 12" length of Cherry Cobbler seam binding in a zig zag patter
n to make a very full ruffle.  It is easy and only takes 10 minutes or so to stitch and gather. 

I used white thread on the example of how to do the zig zag stitches so you could see them better.  The Joy card uses red thread to gather the seam binding.  The last card uses white thread.  I actually like it both ways.  I used the same length of ribbon for both cards even though the ribbon covers almost twice the space in the second card.  You can see how it can look with a tight gathering and with it gathered more loosely.  Really, this technique looks great even if you don't get it exact or have a specific measurement to use.  I like it gathered more tightly like in the first card but it looks great more spread out like the last card.

Other products  I used on the second card are the Northern Flurry Embossing Folder, Music Notes wheel, Peaceful Season stamp set and Silver Shimmer Paint, applied on snowflakes with a sponge dauber and the dove is stamped by using the sponge dauber to add the paint directly to the stamp.  Besides the seam binding I also used Cherry Cobbler cardstock behind the dove image and punched with the Dotted Scallop Ribbon Border punch to highlight the music in the center of the card.  The dove is cut with the Scallop Rectangle Clearlit die.  I can't wait to see if we get more of the clearlit dies because it is great to be able to put the die on the stamped image and see where to center it so you can cut it in the right place. 

Last of all, I need to post the blog candy I offered during the blog tour.  The stamp set, ink pad, marker, Stampin' Around cartridge and reinker go to Amy Phelps!  Amy, email me with your mailing address so I can get your fun blog candy sent to you. 

Well, I reckon I need to fix supper.  My husband will be home in about a half hour and he seems to like to eat supper every night  :~)