Friday, September 30, 2011

Happy Birthday Brennan!

Fall is here.  The high for tomorrow is a chilly 62 and the low tomorrow night is supposed to get down to 37!  Burrrr!  I don't like cold weather so I'm not too excited about the forecast.  Today is my youngest grandchild's 2nd birthday.  He is an adorable little tow-headed boy who is full of enthusiasm and mischief.  Here he is with his favorite thing in the whole world, a stuffed dog named Scout that I gave him for Christmas last year.  It was definitely a good choice!

Speaking of cold weather, have you started making your Christmas cards yet?  I had requests for Christmas cards at my Sept stamp club so here are the cards I came up with.  They got to make 2 of each card.  One of the ladies needed thank you cards so I brought some thank you sentiments and the Lovely as a Tree set to substitute for the Christmas images on the cards.  It fit in the same space as the Wise Men on the first card and the single tree worked on the second card.  I should have taken pictures of the cards she made, I was so glad when I noticed that Lovely as a Tree would work on all of the cards.

For the first card I used the Come To Bethlehem set.  I really love that set, it is a great image of the nativity and the star makes a perfect place to put one of the Basic Rhinestones.  I used the Oh, come let us adore Him . . . quote under the image.  The background was embossed with the new Snow Burst embossing folder. 

The second card was first stamped with the full ink pad directly to the center of the card.  I used the Crumb Cake ink pad so it would be a muted background that wouldn't overwhelm the stamped image.  None of the ladies in the stamp club had ever tried this technique and were pleased with the results they got.  I love a technique that is fast and easy and doesn't require a lot of extra supplies!  The ornament from Delightful Decorations and was stamped in Cherry Cobbler ink.  It is impossible to tell in the picture but I swirled some Dazzling Details on the ornament for a little sparkle and then added 3 of the Basic Rhinestones to add a little dimension to the card.

Last is a fun gingerbread card using 3 stamp sets.  The background Soft Suede strip is stamped with the large swirl stamp from the Baroque Motifs set and the gingerbread man comes from the Got Treats set.  If you look closely at the ribbon you will see how beautiful the new Quilted Satin Ribbon is.  It is in the new Holiday Mini Catalog and comes in 2 colors, Cherry Cobbler and Early Espresso. 

If you are ready to start your Christmas cards, let me know!  I'll be doing Christmas card classes each month that will help you get ready for all the cards you want to send out to friends and family.  I also have gifts and treat ideas that I'll be teaching to help you prepare for the celebrations that are just around the corner.   

Tuesday, September 27, 2011

Fall is Definitely here!

 Fall is in the air!  It is chilly this morning and I find myself wearing sweaters and jackets nearly every time I go out.  The tulip poplar trees are quickly turning yellow and dogwood and sumac trees are going red.  It won't be long until the countryside will be glorious in color.  That part I like about Fall.  What I don't like is that it is bringing in the ice and cold weather of Winter.  I get cold easily so I don't look forward to Winter!  I can't believe that it will be October by the end of the week. 
Today I'm posting some of the Fall cards I got in a swap last week.  The firs one uses a great stamp set from the Holiday Mini Catalog called Always Thankful.  I love the pumpkin filled wheelbarrow!  This card was made by Cathy Maltby, didn't she do a great job coloring the pumpkins?  I like her card design and the polka dot ribbon is a great finishing touch.     

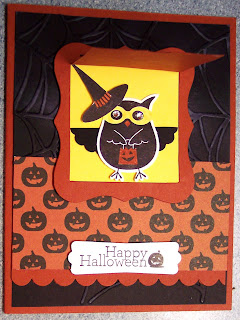
This Halloween card has a fun twist to it.  Michelle Hall had the great idea to use the new Peekaboo Frames die to cut a little window for the owl from Warmest of Wishes to hide behind.  What a great addition to a card.  And the window covering will protect the owl's rhinestone eyes from tearing the envelope when the card is sent through the mail!

Of course, the Spider Web embossing folder finishes off any Halloween card with a great touch and stamps from Wicked Cool and the Frightful Sight DSP are the perfect touches.  I love this card!
And last is a card made by Debbie Prante.  She used squares of the wonderful Spice Cake DSP to create a quilt like Top Note die that she embossed with the Snow Burst Embossing folder to give added texture.  Then she stamped leaves from the Gently Falling set to the background as well as 3 leaves in matching colors on top of the "quilt".  I can add any sentiment I want to or just send it as a note card to a friend.  This is a great card!

Thursday, September 22, 2011

Masculine/Feminine Challenge

I recently took on a challenge to create a masculine and a feminine card using the same stamp set.  I used one of my new favorites from the new catalog, So Soft for the floral image and the birthday stamps came from the Happiest Birthday Wishes set.  Both are the sets you can earn with the new and improved hostess benefits.  Have you looked at the new hostess program? Now if you have a workshop that goes over $400 you get to choose any item (including the Big Shot!) for half price.  Add just another 100 for a $500 workshop and you get 2 half price items!  There are some of the largest dies I would like and a really large Decor Elements tree I would like to get for half price.  If you want to rack up on half price items, give me a holler and we will get a workshop going for you! 


Oh yes, back to the card.  I used a technique that may have a name but I don't know what it is but I really like it.  LMK if you know what it is called so I can update my post with it.  You simply stamp and color your image, cut it into several pieces, sponge the edges and reassemble it onto a cardstock mat.  I love how the Crumb Cake card looks antique. 

I also used the new Lace Ribbon Border punch on the blue card and threaded some Old Olive Satin Ribbon through it.  That punch makes a great border.  That just wouldn't do for a man's card so I used a little bit of the Hemp Twine around the sentiment for the brown card.  Which one do you like best? 

This picture is of the hearse that carried the casket for a funeral I attended today.  It was very sad really, a group of Bikers Who Care had a rally last weekend for their annual toy run.  It was a hugely successful fund raiser this year and they collected 4 truckloads of toys for needy children!  They were camping out during the rally and the last night the generator wasn't hooked up right to one camper and 5 people in that camper were killed.  One was the son of some good friends that I have known all my life.  He was a great guy, eager to help out whenever he was needed and father to 3 children, the youngest is 9. 
This is what a motorcycle hearse looks like.  I wish I could have gotten a better picture but it was a beautiful sunny day here so there was a bit of a glare.

 
Let me tell you, the Bikers Who Care are an amazing group of people!  They came to support Timmy in huge numbers.  I don't know an exact count but there must have been at least 1000 people who came to the viewing last night, more then half of them on motorcycles and in Harley gear.  There were probably about 800 people there for the funeral today, much more than half were bikers.  And all of the bikers went to Timmy's funeral at 10 and then on to one of the other funerals at 1. 

What an emotional day!  Driving in the procession, I was touched by the display of respect throughout the community.  People were standing in front of their businesses with their hands over their hearts as we drove by.  Fire trucks were parked all along the route with the firemen in front paying their respects.  People stopped their cars to let us go by, some of them got out of their cars and stood with their hands over their hearts.  One man even stopped mowing his lawn and stood by his mower.

Perhaps the saddest funeral will be on Saturday when a young husband and wife who died will be buried in a double ceremony.  They have 15 month old twin boys.  She was an elementary school teacher.  I didn't know them so I won't be there but I know that will be a hard funeral for their family.

Sooooo, hug your kids, parents, brothers and sisters and tell them you love them!  Families are forever but we sure miss them when they go before us. 

Monday, September 19, 2011

Corner Punch Flower

I made this card Saturday and I really like how the flower turned out.  I make a little tutorial for you if you want to try this technique. 
 
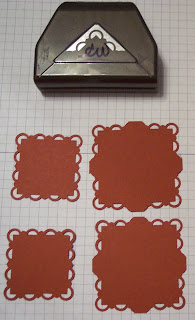
I used the Scallop Trim Corner Punch and punched the corners of two 2" Squares and two 2 1/2" squares.

 After punching all 4 corners of all 4 squares I clipped in on the middle of each side of the small squares and made a "v" shaped notch and clipped in from the center of that towards the middle on the larger squares.  Don't clip in too far so all 4 petals stay together.  If you do clip too far and a petal falls off it would be simple to attach it without it showing since they are layered and a large button or brad center covers the center.
 After clipping, fold from the edge of the punched out corner to the center  of the clipped square.  I turned down part of the scallops on the smaller squares but started just past the "v" shaped notch on the larger ones.  I hope that makes sense!
 I adhered the 2 large and 2 small ones together, alternating petals with glue dots.  Regular adhesive probably won't be strong enough to hold the flowers together.
 Put a brad or a button in the center and the flower is finished!  I used one of the beautiful Vintage Brads in the Cajun Craze flower above.
 You can add extra dimension to the flower with a little sponging around the petals. 
 Although these flowers have plenty of dimension!  They are a great addition to any project.
I just couldn't stop until I tried one that is multi-colored.  I reckon I need to go make some with DSP, those will be great!  I'm thinking a Cherry Cobbler flower with a little Dazzling Details will be a nice glittery Christmas accent.  I need to go play a little more with this technique!  Let me know if you try it too, I'd love to see your creations.

Saturday, September 17, 2011

2 Challenges in one

I belong to a yahoo group for Stampin' Up demonstrators and they have a weekly challenge.  This week it was to take a sketch and use it for a card using the 2011/12 In Colors.  I found a sketch on a site called Sketch Frenzy Friday and decided to use that.  It is a relatively simple sketch but that left room for a lot of creative interpretation  :~)

I used 2 of the In Colors, Island Indigo and Lucky Limeade.  The DSP is from the Paisley Petals pack and the stamp is one of the new hostess sets, Faith in Nature.

I changed the sketch up a little but not much.  I stretched out the middle rectangle and centered my sentiment.  As I'm looking at the card now I realize that I didn't use any ribbon, I nearly always use a bit of ribbon to finish off my cards!  I guess this one didn't need any.

I kept feeling like there was something wrong with the card, besides no ribbon. I finally decided it was too blue so I trimmed it down so you could see the white card back around the edges. Now I'm happier with the card. What do you think, does that make a difference?

There has definitely been a change in weather here in middle TN.  I did a lot of yard work yesterday afternoon and went out to do more today.  It is so nice not to have to get up at 6:30AM to do yard work before it gets too hot to be outside.  I'm not a cold weather lover though so I'm wishing these cooler days weren't going to lead to what I've heard is going to be a very cold, very long Winter.  I reckon I'll survive though, my brothers have cut me lots of firewood all Spring to keep me warm!  They love me  :~0

Friday, September 16, 2011

From Halloween to Thanksgiving to Christmas

I've shown you the Halloween and Thanksgiving projects we made at the Fall Retreat, now for the 2 Christmas ones.  I've been wanting to make one of the bookmark cards but just never got around to actually doing it.  I love the idea that after they open the card they have a bookmark they can use and remember you while they are reading their favorite book!  It's like the card that keeps on giving  :~)
This one uses the great Frostwood Lodge Designer Series Paper, isn't it beautiful?  This paper features lots of plaids and tree bark images.  It is so much fun to work with!  I enjoy it but I know it will make some great masculine cards that the men in your life will appreciate as well.

The second picture shows how the card looks with the bookmark removed.  I'm thinking I might have to move the trim and ribbon piece up a little next time so it doesn't look so bare when you remove the bookmark.  I'm obsessive that way. . .

The other Christmas project we did was this beautiful framed display of Christmas images.  We used a variety of punches and images to complete it as well as paper from the Letters To Santa Designer Series Paper pack.  It was a bit difficult to get a good picture of it since it is in a shadow box frame to allow room for the Basic Pearls we used on several of the images. 

First, the sentiment comes from the Bells and Boughs stamp set, the snowman from the Jolly Bingo Bits and the child placing the star on top of the tree from the Welcome Christmas set.    The second row features the reindeer from the Winter Post stamp set, a snowflake embossed with the Northern Flurry Embossing Folder and the cute tree from the Punch Pals set.  All put together it makes a beautiful Christmas display.  I feel a class coming on!


Wednesday, September 14, 2011

Thanksgiving is coming, right???

We did a couple of great Thanksgiving projects at the Fall Retreat last Saturday.  First up, a fun turkey card made using a Heart Treat Cup and the Build A Blossom punch.  Who'd a thunk it???  The background is stamped with the Circle Circus stamp set in Fall colors and the treat cup is filled with candy corn.  What a fun card to send to someone you are thankful for!  If you are wondering about the polka-dot paper, it is in the catalog too.  You might not notice it at first but it is the Patterns Designer Series Paper Stack on page 186 of the Idea Book and Catalog.  You get 40 sheets of patterned paper, 2 of each color in the color collection you choose.  In Colors come with 4 of each color since there are only 5 colors.

The second card is beautiful, I love the sentiment from the Hand Penned Holidays set in the Holiday Mini Catalog.  This set has 4 beautifully scripted sentiments.  

The card uses the Square Lattice Embossing Folder, I think it is perfect for Fall paper crafting, it just has that harvest feel to it.  A square of Spice Cake DSP adds a great touch, I love that paper!  We used one of the leaves from the new Gently Falling set.  I need that stamp set!  It is so pretty and very versatile.  We stamped the leaf, sponged on several colors with some sponge daubers and then cut it out before adding some Stampin' Dimensionals to add more depth to the card.  Then a length of Early Espresso Quilted Satin Ribbon finishes off the card perfectly.  Isn't that ribbon beautiful?  It comes in 2 colors, Early Espresso and Cherry Cobbler.  I'll be using more of both of these yummy ribbons on my upcoming holiday projects.

Someone asked about the "toe party" mentioned in a previous post.  Sometimes my friends and I need a little girl time so we go to my friend Christie's house.  We go about 8PM when her kids go to bed and we visit, paint our toenails and then she has the equipment to paint fun designs on our freshly painted toenails.  I chose the paisley last time but she has flowers, butterflies and many other designs.  The designs are etched into a mirror like circle and she smooths on permanent white paint and then uses a stamp thing that looks like a very large sponger dauber to pick up the painted image and roll it across the toenails.  Very cool.  And it is great to get together and visit.  I try to leave by midnight but it is usually after 1AM before we wind down!  It's almost as fun as a Stampin' Up workshop  :~)

Monday, September 12, 2011

Fall Retreat projects

Saturday I went to a Fall Retreat that my upline and her upline sponsored.  It was wonderful!  It was in Huntsville Alabama, about a 2 1/2 hour drive from my house.  In the morning we did a 20-page 6X6 mini album using the Christmas Lane Simply Scrapping Kit.  After a nice catered lunch we did 6 more projects, 2 each for Halloween, Thanksgiving and Christmas.  I loved every one of the projects!  It was so much fun to craft and visit with other Stampin' Up demonstrators all day.

These are all of the projects we did in the afternoon.  First though, I'll just show the Halloween projects so you can see the close-up photos of the individual projects.  This card uses a fold called the Center Step Card.  If you can't figure it out, head over to Split Coast Stampers for their tutorial.  It is a great fold and actually pretty easy to do.  What a way to send a card with impact! 

This card uses the Jack of All Trades stamp set and the Frightful Sight DSP.  I really like the pumpkin's hair although I got it kind of crooked on my card.  The ribbons used on the side are the Pear Pizzaz Stitched Poly Ribbon and the Basic Black 1/8" Taffeta Ribbon.  Just a few inches of each ribbon makes a big difference in this card, doesn't it?

The side view shows how it can stand on the receiver's desk or table for display.  I've only made a couple of cards with this fold but I reckon I'll be making more very soon!

Another fun Halloween project we made was this owl treat box.  You can't tell from the picture but it is made on a matchbox cut with the Matchbox die and the Big Shot.  You can put a fun Halloween treat in the drawer before giving this to a lucky recipient.  Can you recognize all the "parts" of our hooty friend?  We used the Top Note die as the base, the Bird Builder Punch for the "ears", the Scalloped Circle Punch for the belly and wings and one of the hearts from the Heart to Heart Punch for the beak and feet.  3 sizes of circle punches make the eyes, the Chocolate Chip one cut in half for the eyelids.  I inked the eyelids, beak, feet, belly and wings with Chocolate Chip ink before assembling.  I used snail for most of the project but used Sticky Strip to attach the Top Note die to the matchbox and also to attach the feet.  I didn't want the little feet to fall off!  Oh, and don't forget to use the Signo White Gel pen to add a twinkle to his eyes.

Wednesday, September 7, 2011

Chilly Days

The past few days have been a bit chilly.  It is a welcome change from the upper 90's we had last week.  It is also a reminder that Winter is coming.  I don't like to be cold so, as much as I love Fall, I have this dread of the long cold days of January and February.  I know lots of people love the cold weather but my fingers, nose and toes are always cold and make me so uncomfortable that I dread it.  Many a Winter day I am so thankful for my wood stove and my 3 brothers who cut wood for me all year.  I think I need to take some pictures of my woodpiles (all 3 of them) and scrapbook about my brothers!
Today, since I'm thinking about Winter and wood stoves, I'm going to post some cards I got some swap cards featuring the new set called Christmas Lodge.  It is on page 29 of the Holiday Mini Catalog.  If you don't already have this mini catalog, let me know and I'll get one sent out to you.  It is full of wonderful stamps, paper and other goodies to create great projects for Fall and Winter holidays.
The lodge stamp from this set is so beautiful!  It has so many possibilities for snow techniques on the roof.  All 4 of the cards I'm posting today use either Dazzling Diamonds or the new Dazzling Details which is basically Dazzling Diamonds added to clear glue like Crystal Effects in a small squeeze bottle that is easy to squeeze onto a project.  Much less messy than the glitter and glue!  It is a great new project that I'm sure I'll be using a lot.  What's not to love, bling and easy in the same bottle!

Although the Christmas Lodge set comes with 2 great sentiments, this first card made by Karen Monger goes with a more bold approach using a sentiment from the Merry and Type set.  This set makes it look a bit more manly.  Did you notice the wood grain DSP?  It comes from a paper pack called Frostwood Lodge, also in the Holiday Mini Catalog.  There are several wood grain papers in this set, including white birch and lots of plaid papers too.  It goes perfectly with the Christmas Lodge stamp set!  The stamp set also has a large fir tree, a small branch and a cute branch with 2 birds on it, a set of 6 stamps in all.

The next 3 card use the sentiment from the Christmas Lodge set that says "Sending Wishes of Happy Holidays to You and Yours".  I love the swirls and branches on this sentiment.  First is an easel card, isn't it beautiful!  I wish I could remember who made it, she did a great job but her name isn't on it.  I love the addition of embossing, Basic Pearls, Chantilly Lace and our new Lace Ribbon Border Punch.  The other sentiment on this card comes from the Boughs and Branches stamp set.

She also stamped the "back" so either way you fold the card, it looks nice.  I hadn't seen one that could fold either way so I though this was a great idea.  I love the easel fold cards!  Here are 2 views of the card folded each of  the 2 ways to show the difference.

This is a simple yet beautiful card made by Patti Keitzman who is in the same Stampin' Up team that I am on.  I love the simplicity of this card, the 2 colors used and the beautiful Velvet Stitched Ribbon, another new offering from the Holiday Mini Catalog.

Next is another card from our Stampin' Sisters team swap.  Kathy Brown made this beauty using Early Espresso, Cherry Cobbler and Very Vanilla cardstock and a bit of knotted Cherry Cobbler Seam Binding.  Of course, there is glitter on the rooftop!  I'm sad that it doesn't show well in the pictures.

The last card is a simple yet beautiful card made by Patti Keitzman who is in the same Stampin' Up team that I am on. I love the simplicity of this card, the 2 colors used and the beautiful Velvet Stitched Ribbon, another new offering from the Holiday Mini Catalog.

I had to throw a blanket on my bed in the wee hours, it got down in the mid 50's last night.  With a high not quite reaching 70 I will have to start out my day with a light jacket or sweater but it promises to be a great day.  I'm still snuggled under the blanket, I guess I should get some breakfast and get going on the day.  I went to a "toe party" last night at a friend's house and stayed past 1AM so I was glad I could sleep in this morning.  Then I woke up at 6:00 and couldn't go back to sleep!  I'll definitely need a nap today.  At least I have pretty toes.  It's too cold to wear sandals but I know how cute they are!

Saturday, September 3, 2011

Holiday Mini goes live!

 
Stampin' Up's new Holdiay Mini Catalog is live now! Have you seen it?  It is full of such great goodies, beautiful designs and new punches and dies!  We even carry a new scoring tool that I've heard is better than any of the other ones out there.  I'll let you know when mine gets here what I think of it.  I know that Stampin' Up always seems to think through all the crafty needs and come up with the most practical and versatile tools when they release something new. 

We are starting on the most holiday-filled time of the year with Halloween coming next month followed quickly by Thanksgiving, Christmas and Valentine's Day.  The Holiday Mini Catalog is full of things you can use to craft through all of these holidays.  The big Idea Book and Catalog has other products for all these holidays but the Mini Catalog focuses just on them and has some great new products that aren't in the big catalog.  There are adorable miniature jingle bells and mica flakes that will make any Winter scene sparkle!  I've already gotten the Stocking Die and punch in my pre-order and have been having fun creating with them. 

I love that there is a stamp set that coordinates with the Stocking Punch!  Here are a couple of samples with it.  The Silver Shimmer paper is new in this catalog too.  Now we can choose from red or silver when we want a little extra sparkle on our holiday projects.  I love the look that embossing gives to everything also.  Aren't the little embossed stockings adorable!  These 2 cards are ones I got in a swap at the team meeting and are made by Sue Erickson and Monica.

There is a link on my sidebar to the Holiday Mini Catalog.  Simply click on it and you will be able to see all the new goodies that are ready for holiday crafting.  I can't decide whether to work on Christmas or Halloween first!  I do have a Christmas card class coming up soon so I reckon I'll work on Christmas for a while.