Sunday, October 21, 2012

Halloween Treats Class

Tuesday, Oct 23 at 10:00 AM   

At my home.  

Come create amazing Halloween treats to share with your friends and families! We will make 5 great projects, bags and boxes and even little purses to hold Halloween treats as well as a great idea for those mini hand sanitizer bottles. All these fun projects for the low price of $15 per student.

Here are samples of the projects we will be making.  The Petite Purse gang is on the left, a close-up picture is at the bottom of this post.  To the right of them are the hand sanitizer covers, the push pop treat is in the back, and a fun glassine bag embossed with the spider web folder for you to fill with Halloween goodies.  In the front right is a coffin shaped treat holder.  The bat on the glassine bag and the mummy on the coffin have fun wiggle eyes on them for a final touch. 

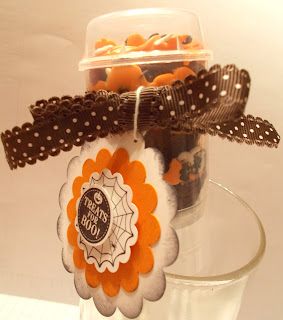
This is one of my favorite new ideas.  It uses a push pop container to hold mini brownies topped with orange frosting and Halloween sprinkles.  We will fill it and add the fun tag to make an irresistible Halloween treat.

Here are some ideas for the cute Petite Purses that I copied off the internet.  Aren't they adorable!  They will hold 4 of the Hershey nugget mini candy bars too.  That makes them an extra special treat.
Email me at wrightplace4 @ mindspring.com if you want to sign up for the class.  I'm sure looking forward to helping you create these fun treats to impress your family and friends on Halloween!

Saturday, October 13, 2012

A Few Puch Art Cards

I've had a busy few days, a quick trip to Memphis to visit my son and daughter-in-law where we rode horses, went to a fun place called Incredible Pizza that had yummy pizza as well as an amazing game area.  We played laser tag, black light golf, ski-ball, rode go carts and bumper cars and bowled.  The kids won some fun toys after all of us pooled our tickets.  Yesterday morning I helped my daughter-in-law do a scrapbook page from a leftover page kit.  She decided she wanted to learn to scrapbook and my son (bless his heart) is fully supportive.  He knows what she is getting into since he remembers me scrapbooking from the time he was in Middle School. 

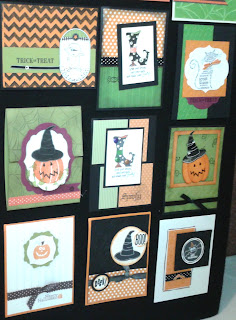
Other than helping her with that layout and cutting card stock for my card class that will be Tuesday I haven't had time to work on anything new.  I love punch art though and thought I would share some of the punch art cards from the project boards at the regional Stampin' Up meeting in Chattanooga last month.  First is half of a board full of punch art cards.  I love all the designs people can come up with using our punches. 
 
After driving home from Memphis yesterday I had a crop last night and then a meeting this morning from 9-12 and a Bridal shower from 12-3 and a baby shower from 3-5 and our yearly barn dance started at 7.  Whew!  Who planned EVERYTHING for the same day anyway!  Since the barn dance included a hay ride I thought I would include pictures of these cute tractor punch cards. 
I don't know if the same person made them, they both seem to use the same punches in the same way so they probably are.  They are very cute, I love the pink one and the Green one reminds me of my brothers.  They have lots of tractors, probably between 15 and 20 and we only have 35 acres!  I reckon you need several since different tractors are best for different jobs. 

Besides the tractors, I snapped the dog with an upside down heart for the muzzle and nose, I'm guessing his ears may be half of a heart and his arms are the wide short heart from the punch with 3 hearts on it.  Such a clever use of those punches!

I reckon I better hit the hay, and not all those bales of hay stacked in the barn we had the barn dance in.  It has been a long few days and I'm tired!

Wednesday, October 10, 2012

Halloween Card Class

I have 3 more classes left in October.  I have a Halloween Card Class on Oct 16, 10 AM or 7 PM.  We will be making 6 cards and a cute little treat purse for $15.  Let me know if you are interested and I'll add you to the class list!  Here are the cards, I'm saving the little purse for a fun surprise for the people who come to class.


My inspiration for the card with the door on it comes from Amanda Corbet.  She made a witch's cottage luminary that had a door with the spider web on it.

I also have a Halloween Treats Class on Oct 23 and a free Digital class on Oct 30.  You will be able to download a free trial version of My Digital Studio in this class and create several projects.  I was afraid I would never be able to figure out digital designing because I wasn't raised with computers but I have been delighted with how easy this program is.  I use it for making programs, invitations, recipe books and scrapbooking.  It is so versatile, come learn how fun it is in this free class!
I took this picture about a week ago.  There are a LOT more leaves in my yard now!  We will need to start raking them up soon.  We have a lot of trees.  Seriously, a lot!  I like to rake though so I don't mind it.  I love the Fall colors and the harvest time.  I've been putting up apples like crazy.  Our trees produced very well this year.  I started picking up the walnuts today.  We have plenty of them too.  I reckon I need to have the grandkids over so they can pick up the rest of them!

Monday, October 8, 2012

Nugget Box Tutorial

I said I would try to put up a tutorial for the nugget boxes the week after the Stampin' Up Convention.  I'm glad I didn't promise, it is more than 2 months since convention now and I am just now posting the tutorial!  I have been so busy and on the go and, of course, painting and replacing the floor in my stamp room.  I was so glad when I finished painting after 6 days of doing a little each day because I was anxious to put the room back together and get my stamp supplies organized so I can create again.  

Then I decided to put down laminate flooring and rip out the old red carpet.  After buying the flooring I was in a car accident and besides whiplash and horrible seat belt bruises (better my waist than my face) I hurt my thumb pretty badly.  I guess it was sprained, the x-rays showed no breaks.  After several weeks of my thumb being too painful, I hired someone to do the floor.  The more I think about it the more I think that was a good idea regardless of how my thumb felt!  The room is all finished now and I have started moving things back in it.  It still isn't ready to take pictures of but I'll be showing it in a week or so I hope.
This is me with Robin and Jeannie at the pre-convention class where we taught how to make the boxes.  It was great fun and they are such sweet ladies I totally enjoyed working with them.
 
There are 3 pieces to cut for the boxes, we used the beautiful Natural Composition Specialty Paper, a glossy, raised pattern printed on heavy-weight paper.  The pack comes with 12 sheets of paper, 2 each of 6 designs.  It is perfect for making boxes and bags since it is nice and thick.  You will also need a 2"X4" piece of a window sheet if you want to cover the window we cut with the Framelit from the Apothecary Accents set.  It fits the window perfectly, don't you think?
The top was cut from the Natural Compositions Specialty paper and the bottom and the dividers were cut from Crumb Cake Cardstock, the top and bottom both measure 4" X 6".  The divider is 2"X6", score marks are noted on the sample above. 
 
Score the bottom of the box piece at 1" on all 4 sides.  When scoring the top of the box, shift the piece slightly to the right when you put it on the Simply Scored Tool.  I found that even though the Simply Scored has groves every 1/8" (which is WONDERFUL!) even that small measurement will make the bottom way too small for the lid to fit on nicely.  You could also cut the paper about 1/16th of an inch smaller than the 4"X 6" I used.  Either way, the top needs to be slightly larger than the bottom so it fits nicely.
 
 
 Clip in 1" on the score line on the long sides of each box piece.  You could do it on the short ends but since the box is longer one way it will give it a little more stability if the flaps are attached to the long end of the box.  I hope that makes sense!
Sticky Strip is the best adhesive for putting the boxes together.  It holds so firmly that your box won't come apart.  I like to put a strip on the outside edges of the flaps and again on the inside edges so there are 2 layers per flap and the end of the flaps inside the box aren't loose and in the way.

If you can't tell well from the pictures, fold the box flaps in and look at where you need to put the strips. 
It will be slightly easier to add the Window Sheet to the box before you assemble it.  If you look closely at the above picture you can see the little circles of glue dots at the corners of the window sheet.  You may want to put another glue dot in the middle of the long sides but you will need to fold it in half to make sure it doesn't come out the edges and seal your lid on the box  :~)
 
When you score and fold the divider it will look like this.  You don't have to put adhesive on it if it fits snugly but I put adhesive so it wouldn't pop up in the middle.  Some of the dividers needed to be trimmed when the ladies were making them.  Depending on how you score you may need to trim a little off the ends to make it fit.  The divider piece is optional, of course but makes it a fun box if what you are putting in it will fit between the sections.

After your box is put together you can decorate it however you want to.  We used a Scalloped Circle Punch flower - 5 layers punched from the packing paper we get with our Stampin' Up orders.  Wad up each piece until all 5 are crumpled and then spread them out and pierce a hole in the center and hold together with a mini brad. 
It doesn't matter what color the brad is because it will be covered with the top flower.  Pull up one flower at a time and crumple it around the brad, crumpling a little less with each layer.
Add a few pearls and some Baker's Twine to tie a tag on and the box is finished and ready to present a small gift or some nuggets, they fit great in the box.
What a great little box this is to package those sweet small gifts in! Presentation is everything, right?  I really love the Natural Compositions paper for this project.


Saturday, October 6, 2012

Card Classes and Blog Candy reminder

I am offering blog candy this month along with the Treasure Hunt.  (check the August 25, Sept 5 and Sept 8 blog posts for details of the Treasure Hunt and win $150 worth of new Stampin' Up products!)  Anyone who buys at least $20 from my online store will be entered into my drawing for a free stamp set! The free stamp set will come from my supply of retired stamps and you will be able to choose your free set from at least 20 sets so you are sure to get something you like. Just place an order online or with me personally and I will enter your name in the drawing. Good luck and remember, you can also order from the Holiday Mini catalog so there are 2 great catalogs to order from!

Did you know that Stampin' Up will open for business in Austria and the Netherlands on October 8! It is great to see such a wonderful company grow, if you happen to live in these countries, check the Stampin' Up website to find information on finding a demonstrator or, better yet, how you can become a Stampin' Up demonstrator and have fun creating and sharing the business!

I'm working on the 2 Halloween Classes I have coming up.  Pictures should be up next week so you can see the samples but the classes are:
October 15, 10AM - Halloween Card Class.  We will make 2 each of 3 card designs and a cute little purse treat holder.  $15
October 23, 10AM - Halloween Treat Class.  In this class you will create 6 fun Halloween projects for sharing Halloween treats.  $15
Let me know if you want to sign up for 1 or both of these classes. 

Now, since I've been talking about my Halloween classes I reckon I should post some of the pictures I took of Halloween cards at the Stampin' Up Regional meeting in Chattanooga a couple of weeks ago.
 These 3 cards are so fun!  They feature a stamp set called Bootiful Occasions.  This one is the Halloween witch's boot but it also has a pretty Winter boot, a cute rain boot and a cowboy boot.  I just got this set in my last order.  I really needed it!  You will be seeing more of this set soon, I think I need to CASE the card with the broom for my Halloween class, don't you?  I've been looking for the Sixlets in the long tube but all I've seen are in a more square package.  I'll keep looking!
 
 Here is a section of one of the boards that had a lot of Halloween cards on it.  It is a little hard to see but you will notice 2 more cards with that adorable witch's boot.  I can't wait to get some ink on that stamp set!
 

Monday, October 1, 2012

Christmas Card Stamp a Stack Tuesday, Halloween Classes Coming Up!

I can't believe that I totally forgot to post about my Christmas Card Class that is tomorrow (Tuesday).  Well, these days I can believe that I forgot pretty much everything because it happens so often!  Here are the details and a picture:

Christmas Card Stamp A Stack, Tuesday, Oct 2
Get an early start on your handmade Christmas cards!
 In this class you will make 3 each of 4 different designs,
a dozen cards to get a start on all those cards you want to send.
 Class meets in the morning at 10:00 or in the evening at 6:30, sign up for the one that fits your schedule the best.
Cost is $20, that is less than $2.00 each! 
 I will have the paper pre-cut so you get the fun of stamping and putting the cards together without measuring anything.
Wow, sorry for the terrible picture.  I have to get a new camera soon, my cell phone just doesn't do these cards justice!
 

Other classes in October: 

Halloween is coming! Come to my
Halloween Cards and treats class
and make 6 cards, 3 each of 2 designs as well as the cutest little
 Halloween purse you've ever seen! All of this for the amazingly low price of $15.
Monday, Oct 15 at 10 AM
 
 
On October 23 I will have a Halloween Treats class
10:00 AM
 Come create amazing Halloween treats to share with your friends and families!
 We will make 5 great projects; bags and boxes and even little purses to hold
Halloween treats as well as a great idea for those mini hand sanitizer bottles.
 I'm really excited that I have some push pop containers that we will use to make a
fun layered Halloween treat in.   
All these fun projects for the low price of $15 per student
 
email  me to sign up for any of these classes, wrightplace4 @ mindspring dot com
 
I love the Holidays!  I get excited to decorate and use all the fun ideas I come across to make these Winter months fun and pass faster.  I really don't like the cold weather but since I have to stay inside to avoid it I'm so glad I can craft and create to help time pass. 
 
My reconstruction of my stamp room is finished.  I've been unpacking all the things I've had packed up and stored in other rooms.  I hope I can organize things so I can find things easier.  Organization isn't one of my strengths.  If I have a place for everything I reckon that I can usually remember to put everything back in it's place though.  I'll take more pictures soon to show you the difference.  The before pictures are very scary, kind of like Halloween  :~)