Saturday, October 31, 2009

Layout From Halloween Party Tonight

All of the grandkids were dressed up and ready for the Halloween party tonight. It was pretty cool to come home and whip out a double page layout of the festivities in less than a half an hour. Baby Brennan is 1 month old and makes a mighty cute lobster and Malia is the sweetest ballerina around! The superheros are ready for candy and we can't forget the Lightening McQueen pit crew member. Although his mom noticed that he was only in 1 picture so maybe we nearly forgot him!
By the way, in case you didn't know, tomorrow is November! Where did Oct go???

Friday, October 30, 2009

Pumpkins!

I've been seeing a lot of great ideas for pumpkins lately. I just can't resist a cute pumpkin! Here are 4 of my latest CASE's of pumpkins.

First, I can't remember which blog I saw this pumpkin on but I just love it! This adorable little pumpkin is 1 1/2 inches high. I used the round tab punch for my pumpkin but I've also seen the circle punches, oval and scalloped punches used. I used 8 punches but you could use more if you wanted to. First, I cut the paper into 2 inch strips and rolled them with the Baroque Borders wheel. Since it is a small wheel I had to roll it twice on each strip. Use any swirly wheel but if you use a large one you will only have to roll it once.

After rolling each strip I punched the Round Tab punches out and adhered each one to the next until I had all 8 attached to each other but didn't attach the final ends together. I made a square of Chocolate Chip cardstock about 1"X1 1/2" and rolled it up tightly, secured the end and adhered it to the center of all the punches. I cut thin strips of Old Olive cardstock and wrapped them around a stylus handle to get some curl started then I wrapped them around the metal tip of the stylus to get a tighter curl. I added these to the stem and then adhered the 2 ends of the pumpkin and that's all there is to these cute little guys!
For the card I made the pumpkin the same way only I used 7 punches instead of 8. There's no reason you couldn't use 8 again but it looked pretty full at 7 so I stopped there. I pretty much totally CASEd this card but I can't find it now to give the creator credit. If you know who's blog I found it on, let me know so I can give credit to her.
Next is a Top Note Die pumpkin. Again, I copied it from someone's blog but I didn't put their name under it in my Top Note document so I don't know who to say came up with the idea. Angie gave 2 sheets of Cast A Spell designer paper at a crop Thursday (she is soooo sweet!) and they were perfect for a pumpkin patch layout. I cut 4 of the Top Note Dies from Pumpkin Pie cardstock and sponged Pumpkin Pie ink around all edges. I overlapped the first two in the back of the third one so they extended nearly an inch on either side then I reinserted the last die into the machine to come up with the skinny middle. I didn't take any pictures when I was doing it but when you are trying to line it up there is pretty much one way to make it nice and rounded on the ends. After inking that last edge I put it in the middle and added a stem of Close to Cocoa punched with 2 of the Modern Label punch and curly q vines of thin strips of Old Olive like the Round Tab punch pumpkins in the first 2 projects.
The picture of the layout is a little blurry but I mounted the designer paper onto Close To Cocoa cardstock and stamped pumpkins from the Autumn Harvest stampset on the bottom. I designed the title in My Digital Studio and printed it out on Very Vanilla cardstock. I was amazed that the orange perfectly matches the Pumpkin Pie cardstock! My printer didn't fail me (for the first time in about 3 months). I'll have to see how it matches some of the other colors but now I know it matches Pumpkin Pie exactly.
A friend called me a traitor (hi michelle!) for doing digital layouts but I think I will use the program more for hybrid layouts and for designing layouts than I will for plain flat digital pages. I just love playing with my stamps and paper too much to totally go digital. I do love the My Digital Studio program though. I've learned how to use it to do flyers and I saw someone who did a picture video on it. I need to check that out and do a picture video to send to family with all the pictures I have of the grandkids. You can even have music playing with your videos! I'm sure I'll post when I figure it out so you can do videos with it too. I'm going to put my newsletter on the sidebar after I post this so you can keep up with the latest news from Stampin' Up and my class schedule too. I've been trying to figure out a good way to do a newsletter and My Design Studio is wonderful for them. I just need find out how to make it clickable so you won't have to email me for a copy of it!
The last pumpkin is one I did last year but it folds up flat to store through the un-pumpkin season so I just spread it out again and put it on the shelf above my stamp desk. It is from 1 1/2" strips of Pumpkin Pie cardstock, rolled with the same Baroque Borders wheel. I stacked 8 of the strips up and punched a hole with the Crop-a-dile. It is cool because it will go through all 8 layers with no problem at all! I put a large brad through both sets of holes and then pulled the strips apart, they just take on the round shape as you pull. I topped it off with a 5/8" bow of Old Olive ribbon.
One of the things I love about pumpkins (besides pumpkin bread) is that you can use them for Halloween decorations and then keep them out in November for Thanksgiving. I hope you enjoyed my pumpkin fest today!

Friday, October 23, 2009

I'm probably having fun!

Happy Friday! I'm in the Gatlinburg, TN area at Croptoberfest. This is my 10th year to go, goodness, it doesn't seem like that long! My friend Diana and I go every fall and it is a great get-away and a fun crop too. One year I got 2 pages done in the 4 days of the crop. Another year I did 32 pages. I'm thinking I will spend a lot of time doing pages with MDS this year. That will mean a lot less to pack and haul 250 miles.

The crop is in the mountains at a youth camp. It is beautiful and I'm thinking that the leaves will be in full color if the leaves around here are any indication. My daughter and I went to a pumpkin patch about 2 miles away Monday and she took some great pictures. Of course, my favorites are the ones with the grandkids in them but I really like this one. I like how it is still pretty green but the fall colors are starting to show and the pumpkins are laying thick in the patch.

Since I'm at Croptoberfest and we will be eating turkey in just over a month I thought I'd include the 2 Thanksgiving cards I got at the Stampin' Up Fall Retreat. These are the last of the swap cards from the retreat. I think I got 28 cards in all.
Do you recognize the punch that the acorn is made from? Yes, it's the Christmas Ornament punch! What a great idea for an acorn. I've seen so many ideas with that punch, I'd say it is a must have for your punch collection. Mary Ranger made this card and stamped the tree from The Season of Friendship set. The other fall
card didn't have a name on it but is beautiful as well. She used the Harvest Home stamp set and Fall Harvest wheel to make the card and tied it all up with raffia. I love the fall colors. If it wasn't for the cold winter that follows, I'd love fall best of all.

Wednesday, October 21, 2009

Last 5 Christmas Cards from Swap

There are 5 more Christmas cards left from the swap at the Stampin Up retreat. The first one is a big tag made by Thelma Collins using the snowman from the Simple Seasonal Thanks stamp. This is a giant snowman that usually says "Dear ____, thank you so much for the ______ . I like it a lot! Sincerley, ________ It is a great way to have your children send thank you cards for the Christmas presents they get.
It seems like sending thank you cards is becoming a lost art anymore so we should teach our children to stay thank you this year. She finished off her snowman by stamping it again on patterned paper and cutting out the hat and scarf and punching his buttons from the same paper. I think this is a nice touch.

The second card is a circle shaped ornament card. She used Merry Moments Designer Series paper for the bottom half and stamped her cardstock to make patterned paper for the top of her ornament and added a Round Tab punch for the top and a 5-petal punch to resemble a poinsettia. This very cool round card was made by Tracy Potenski.

This very beautiful card made by Nada Morgus uses the Christ is Born stamp set. She stamped the poinsettia from the set in real red and then stamped the verse in Versamark and embossed it in gold ink. It is on a Top Note die which is mounted on a piece of Real Red cardstock that was embossed with the Petals-A-Plenty embossing folder.
Another beautiful card shared by Marsha Hosner features the A Wish for Peace stamp set. You can kind of see the glittery Irridescent Ice Embossing Powder on the trees. It is quite simply a georgous card!

The last of the Christmas cards is certainly not the least! Pamela Kroeger used the Serene Snowflakes set along with Bermuda Bay cardstock to make this pretty card. She stamped the snowflakes lightly in the background with White Stazon ink and then stamped the largest snowflake in Versamark in the center of the card and embossed it with white embossing powder. After adding a Rhinestone brad to the center and tying on some white organza ribbon she mounted it on Shimmery White cardstock, a beautiful cardstock for anytime of year but it seems like it is extra perfect for Christmas cards.

Monday, October 19, 2009

Deals of the Week, Fall Corn Cards and blog candy winner

Whoo Hooo! Metal! I love metal embellishments and that is what is on sale this week, I'm so excited! I'll be stocking up, let me know if you want to order some too. Here is what the deals of the week for week #3 are:

Item # 114348 Catalog Page 179 - Basic Jumbo grommets
Regular $6.95, special $4.49
I need a couple of boxes of these! They are great for holding ribbon handles on the fun bags you can make with the Big Shot. There are 20 per package, 5 each of 4 colors; Whisper White, Basic Black, Silver and Very Vanilla
Item #109857 Catalog Page 179 - Mini Library clips
Regular $12.95, Special $8.99
These things are the cutest little dodads! The box holds 48 clips in 4 colors; Black, Silver, Antique Brass and Pewter.
Item #112571 Catalog Page 179 - Circle Designer brads
Regular $5.95, Special $3.99
This little box holds a great variety of brads, large and small. 16 pieces, 8 of each size.

Item #112581 Catalog Page 179 - 1/2" Library clips
Regular $6.95, Special $3.99
I love the colors in this package! It contains 28 clips, 8 of each of the 3 colors.
I saw this cool idea for corn on a blog somewhere (I should have noted where I saw it) where she had ran the cardstock through her diecut machine with a texture plate and made it into an ear of corn. The brands were different and I experimented with several of Stampin' Up's texture plates before I found one that had the look I wanted.
After running the Apricot Appeal cardstock through my Big Shot with the squares texturz plate I used Summer Sun, Pumpkin Pie and Old Olive ink and rubbed them directly across the textured paper. I hit some spots more with one ink pad than another so it would create Indian corn. I decided it needed some in the recessed areas so I rubbed More Mustard there and was satisfied with how it looked.
I punched "cobs" of corn using my Large Oval punch and also punched the "shucks" out of Old Olive cardstock. The card that I copied the corn from used the Small Oval punch so the squares she used were smaller. She used about 6 of them and formed them into a wreath for her card. Since my corn is bigger I decided to just put a couple of them on each card. Then it dawned on me that the grass from the Inspired By Nature stamp set would kind of look like corn stalks that I could use my ears of corn on. I was pretty pleased with how it turned out.
I stamped the corn stalks on Very Vanilla Cardstock and then matted it on Old Olive cardstock. I adhered some Pumpkin Pie 1/4" ribbon around it and tied a knot of 5/8" Old Olive ribbon with another short lenght of Pumpkin Pie ribbon tied in with it. The Happy Thanksgiving greeting is from the Teeny Tiny Wishes set (I just love that set!) and is punched with the Modern Label punch and then matted on the insert die for the Movers and Shapers die. I love how those labels all co-ordinate with our punches so they are the perfect mats. It makes scrapbooking and card making so much quicker and easier.
The next card I made with my corn was for a sketch challenge for the Late Night Stampers (see owl on the sidebar). I used the maple leaves and acorns from the Autumn Harvest stamp set for the background. I used the Rock and Roll technique to make the 2-toned leaves. After applying a double matted band of Pumpkin Pie and Old Olive cardstock across the middle I added the Give Thanks sentiment from the Holiday Best set and an ear of corn on either side. I mounted the whole thing on Chocolate Chip cardstock.
So, since my corn in my garden didn't do well, I was pleased to see my paper corn doing a little better :~)
I was going to post the rest of the Christmas cards I got from the swap at the Fall Retreat today but decided I wanted to share my corny cards first. We will go back to Christmas cards tomorrow! I also drew a name for the blog candy. Ashley, you won! I'll get it in the mail before I leave for Gatlinburg for a weekend crop Thursday morning. I think I will see if I can figure out how to put a post on hold to be posted on Fri or Sat while I'm away. I've heard that these new-fangled things can do that. It just tickles me when I figure something like that out.

Saturday, October 17, 2009

More Christmas Cards


As promised, here are 5 more Christmas cards I got from the swap at the Stampin' Up retreat I went to a couple of weeks ago. The first one is just beautiful! The artist didn't put her name on the back so I don't know who to give credit to but it is such a beautiful card I want to make more like it. I need to order the wedding paper though. See the blue patterned paper at the top of thte card? That is the Bride Speciality Paper shown on page 158 of the Stampin' Up 2009-2010 catalog. I know it just looks white in the catalog but if you brayer color over it, the embossed shiny part resists the ink and it comes out looking like the card. How cool is that??? She also added some platinum shimmer paint to the Delightful Decorations stamp to make it a great match to the embossed part of the Bride paper. The small rhinestone brad in the ornament is the perfect finishing touch along with the white organza ribbon.
The next card was made by Lauren Bialoskurski. She used the Patterned Pines stamp set, aren't those trees cool? The snowflakes in the background are also from the same set. They were stamped with the Platinum Shimmer Paint. It just looks white in the picture but in real life it is a beautiful silver.
Next up, another card made with the Patterned Pines stamp set (it's a hostess set so if you love it, you can get it for free). This card was made by Sharla Foy. She started with the Textured Impressions Folder from the Holiday Mini Catalog called Petals-A-Plenty. She made the white background with this folder and mounted it on an Old Olive card. The trees are stamped on Whisper White Cardstock in Old Olive ink and the edges are inked. This is adhered over the embossed paper and a ribbon is tied around it. Notice that the ribbon tied aroud the top is 1/4" wide but the knot is 5/8" wide ribbon. This is an interesting little touch that I like.
This card was made by Joann Wiemers from Alabama. She also used the Petals-A-Plenty textured impressions folder but she added an interesting touch to it. Notice that the middle isn't embossed? She used a wooden oval frame over the folder so that the middle wasn't embossed. I bought a wooden oval frame but realized when I got home with it that all of my embossing folders are only partially covered with flowers. I need to order the Petals-A-Plenty folder when I order that Bride paper! I'll show you how it is done when I can.
Joann used the trees from the Scenic Season set in the un-embossed area of her card, isn't that a beautiful set? She colored in the bird red with a Real Red marker, I just love how he pops out of the card like a beautiful cardinal stands out against a snowy day. She also added Dazzeling Diamonds to the trees which doesn't show in the picture. It is one of the most beautiful Christmas cards I've ever seen!

The last card for today is made by Annette Takko. It is another beautiful card and is stamped with the Gifts of Christmas stamp set and some Dazzling Diamonds added to the centers of the flowers. The Whisper White and Night of Navy color combination is a classic and is beautiful for Christmas cards.
Are you going to make your own Christmas cards this year? I have been making my Christmas cards for many years. I have to say, the ones I made last year were a lot better than the ones I made the first couple of years!
I'm going to draw a name Monday for the blog candy, look back a few posts and register if you haven't already registered for it. Good luck!

Friday, October 16, 2009

Christmas cards from the retreat swap

First of all, this is the card I made for the swap. I procrastinated as usual. I feel more and more like I'm not procrastinating the same way I used to. I used to procrastinate because I didn't want to do something. Now I'm just crazy busy and don't have time to do things and always end up doing them the last minute. I realized Friday night about 8 that I needed 30 swaps for the retreat the next day - AND I had to leave home at 5AM to get there. Hummm, not much sleep for me that night! I got the cards cut and stamped but added the ribbon and attached the snowflake piece to the card on the way to Huntsville. I drove to Nashville and rode the rest of the way with some of the other demonstrators in my group. It was about 2 more hours from Nashville.

The pictures aren't very good, too much rain around here lately to have natural light. You can't tell on my card that the background is embossed with the small dots Texturez Plate. It doesn't look quite as plain in real life as it does in the picture. I used the Serene Snowflakes set, one of the great sets featured in the Stampin' Up Holiday Mini catalog.

This next card was made by Sherry Pemberton and features theDasher stamp, one of the under $10 stamps in the back of the catalog. The silver snowflake is so cute tied with the ribbon. She also used the Fineal Press embossing folder on the red layer and you have to look close to see the glitter on his antlers, the perfect touch for this card.


Mary Robinson always does great cards. She stamped 4 of the little reindeer from the Winter Post set and embossed them with silver embossing powder. I love the way she tied on the Silver Cord at the top of the card.

Monica spent hours on these tags, I'm sure. For 30 people in the swap, she made 2 each of 1o designs. If I can manage to do some math this late, that is 600 punches! THEN she had to tie the gold and silver cord to each of those 600 tags. She even added some glitter and embossing to many of the tags. She makes me feel like a slacker!


Monica even packaged her tags into a great little bag with a Top Note die topper. Very nice gift!


The last card I'll share tonight is by Pam Vandever. She used the negative from the Top Note die to sponge on some blue ink, I think it is Bermuda Bay. I think that is a great look, I love how you can fade it out in the middle and around your stamped images. She also used the Serene Snowflakes set with the great Platinum Shimmer paint. That paint is so pretty, I'm loving using it. The bottles are small but they go a long way.

That is the first 5 of the Christmas cards that I got in the swap. I'll try to post 5 more tomorrow. I also have to dig the sweet potatoes, go to a wedding and a meeting so it will be a busy day. I guess that is what the hours between 10PM and midnight are for, right??

Monday, October 12, 2009

More Swaps and new Deals of the Week

I'm pretty excited about the Deals of the Week this week, there are 3 dies on sale!! All 3 are ones I don't have so I will need to get some. The prices are great too, nearly half price! These dies will be on sale from Oct 12 until the 18th.
115961 Perfect Setting Bigz XL die $25.99
114515 Flower Burst Embosslits die $5.99
116760 Pop-Up Three Tier Cake Bigz XL die $25.49
Let me know if you want to take advantage of this offer and I'll get your order placed. Or, you can place an online order and your dies will be at your door before you know it! If I had any of these dies I would post a picture of the projects I've made with them but since I don't have any of them I just have to post the pictures from the catalog and it is hard to tell how wonderful they are without seeing projects with them.
Next are some of the swaps I recieved at the Fall Retreat in Huntsville last week. Isn't this first one beautiful! Fran Kennedy made it using regular foil. She rad the foil through the big shot with the Finial Press Texturz Plate and the Hi Embosslit. Then she cut the Flower Blossom die from black cardstock and mounted strips cut from the embossed foil onto Basic Black cardstock. I was pleased that you can actually see the shine in the photo, sometimes that doesn't show up.
As much as I love the card with the embossed foil, I'm just crazy about the color combination on the second card. Kelley Bialoskurski used the great combination of Tempting Turquoise, Cameo Cra; and Certainly Celery to make her card. I also love the One of a Kind stamp set that she used to stamp the flowers. It is a very striking card, I just love it!
Next, Linda Hanson used the always beautiful Thoughts and Prayers stamp set along with the sentiment stamp from the Kind and Caring Thoughts set (a level 3 hostess set) to create a simply beautiful card. The color scheme of Very Vanilla, Basic Black and Basic Gray make this a great card to send to someone you have been thinking about.

The last card in this group is another Thinking of You card using the Kind and Caring Thoughts stamp set for both the sentiment and the flower. It is an easy to make card that is great looking. The yellow, pink and brown is another nice color combination. I love having punches that nest together so nicely and make it so quick and easy to make cards.
Don't forget to register for the blog candy on Saturday's post and also, don't forget my October special on pink items for breast cancer awareness month. I've seen a lot of people who are going to donate 10% from the pink items sold this month but my sweet mother-in-law was a breast cancer survivor for many years so I want to donate more. I'm going to donate 30% of anything pink that is ordered from me in October to the Susan B. Kommen Foundation.


Saturday, October 10, 2009

Swaps and Blog Candy for the 101st post

Wow, it's been a busy week and it's nearly gone by. Just another hour left for me! I'm going to post the Halloween swaps I got at the Stampin' Up! retreat last Saturday tonight and then will move on to the non-holiday ones before starting on the Christmas ones.

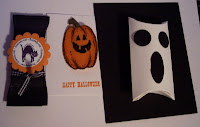
There were 5 Halloween projects in our swaps. First, the 2 cards: The top one was made by Tara Overstreet. She used the Frightful Fence wheel on vellum with some of the Halloween Frights stamps above the fence. She layered the stamped vellum over a piece of white cardstock that had been sponged with Pumpkin Pie, Gable Green and Lovely Lilac ink. Isn't that a fantastic idea to show through the vellum? It looks great irl.

The second Card was made by Karen Hurd of Birmingham, AL. I love the way she used just a 1" strip of Halloween designer paper on the background and had the cute (can they be cute) spider hanging down from it. The stamps she used are all from the Eat, Drink & Be Scary set.
The other 3 Halloween projects are (left to right) a cute candy wrapper made by Gail Eddlemon of Nashville, TN using black cardstock and the scaredy cat stamp from the Batty For You set. I think this is a wonderful way to wrap a mini candy bar. Have you ever thought it strange that they call the mini candy bars "fun size"? I'm thinking, the bigger the candy bar, the more the fun! Anyway, after putting adhesive around 3 sides of the black cardstock and wrapping it around the candy bar she stuck it in the back and at the top and bottom and then crimped the top and bottom edges so it looks kind of like what the candy bar does after coming out of the sealing machine.
The second one is a pumpkin pin made by Susan Jernigan from Tullahoma, TN. She stamped the tall pumpkin from the Autumn Harvest Stamp set onto Pumpkin Pie cardstock with black Staz-on ink. After coloring the stem with a Chocolate Chip marker she applied Crystal Effects all over the pumpkin to make it shiney and sturdy. There is a pin back on the back so I'll be wearing this when I want to look festive for Halloween events.

The last project is a ghost pillow box from Kristi Jaenisch who lives in Northern AL. She used the pillow box die cut from white cardstock and 2 punches to make this clever little ghost. He also shared the fun with a "fun size" pack of M&M's when you popped open the ends.

I was going to give some blog candy with my 100th post but I posted it without realizing it was the 100th. I knew I was close but just didn't pay attention when I posted. So, I'll give it away with my 101st post. I made a Christmas planner covered with Old Olive cardstock. It has tabs along one edge that say "Christmas", "Family", and "Friend" so you can record things about your Christmas plans and organize gift ideas. I made it last year so it has discontinued designer Christmas paper on the front but it is still very pretty paper :~) Just leave me a comment and tell me what one of your favorite projects that I have posted in the 101 posts is. Be sure to include your contact information so I can get the prize to you! Good luck and thanks so much reading of my blog!


Tuesday, October 6, 2009

More Retreat projects

Here is my favorite project from the Retreat Saturday. It is a little canvas tote bag that we decorated with the Build A Bear dies cut from felt. The background of the bag is stamped with the smaller stamps from the Delightful Decorations stamp set. I hadn't even noticed it had 3 small stamps in there, I was so amazed by how wonderful the ornament stamps were I totally overlooked the small ones. I think this set will rival the Medallion stamp as my favorite, at least until Dec 25!

I took the picture up so close that it is hard to tell it is a tote bag and has gold bells on the handle tied on with the gold elastic cord. I thought it was a great project and will definitely use it for something in my Christmas decorating. There is also a pumpkin outfit for the Build a Bear to wear. Better order it quick because Halloween is going to be here before we know it!

Now, on to the beautiful cards we made with the Delightful Decorations stamps. Pink and teal are unusual colors for a Christmas card but have been popular the past couple of years. They look great together on this one. You probably can't see the glitter on the star in the middle ornament but it adds a very nice touch to it. One of the best things about this stamp set is that there is a punch to match! I'd do it if I had to but I'm so glad I don't have to hand cut all of these out. I've seen some great punch art with the Ornament punch too.

I also love the colors on the next card. Along with the traditional red and green we added an ornament in Night of Navy. It looks great, doesn't it?? First we wheeled the new Sparkle and Shine wheel inked up with the Versamark Watermark ink pad. We punched a window in the card where the red ornament is so you can see into the inside of the card there. The Kraft cardstock is a nice neutral background for the stamps and the Sleigh Bells twill ribbon is so pretty with it's Real Red and Old Olive stitching.

Next is a bling-y card. Pale Plum is another color you don't think of first when you think of Christmas but it is beautiful here. We used the strikingly beautiful Silver cardstock for a mat and a Fire Rhinestone brad in the center of the card. I know the picture won't show this either but the ornament was stamped by inking it up with Perfect Plum and then daubbing some of the platinum shimmer paint, blending as we went. It makes the ornament look nice and shimmery. Of course, we had to use the Silver Elastic Cord to "hang" the ornament on the card to keep the bling going.

The 4th card we made is absolutely georgous! It is in more traditional Christmas colors, Real Red, Whisper White and Silver embossing powder. First we stamped the swirly stamp from the Baroque Motifs stamp set and a "Merry Christmas" sentiment and embossed it with Silver embossing powder. We stamped the ornament on the far right with Real Red ink and added some glitter to the center. The one on the far left was made from Real Red cardstock, embossed with the Petals A Plenty embossing folder and I also added glitter to the centers of the flowers.

Did you know that Stampin' Up had flocked paper? The middle ornament was made from the red and white print from the Christmas Cocoa Specialty paper pack. Isn't that a great card? I love it!

That's it for the cards we made Saturday afternoon. They will fill that little red box beautifully. I need to figure out how to set the camera to put the right date on the pictures. The pictures say August 30 instead of when I took them on October 3rd. At least the year is right. With my old camera the year was wrong too!