Saturday, October 30, 2010

November club layout

This is the layout we are doing for the November scrapbook club meeting.  We did have a couple of ladies who had to drop out so if you are interested, there is room for you!  I do a 12 X 12 layout every month and you come make the layout and place a $25 order.  Each month we rotate who is the hostess so you get a hostess set and at least $15 in free product each time you are hostess.  Email me if you would like to join before our November meeting so you can join us to make this layout!
We used the beautiful Deck the Halls paper from the Holiday Mini Catalog.  There are some great papers in this pack, 4 of which are full page prints.  I used 2 of these in these layouts, see how each one is unique even though the design is the same for both layouts?  This is such beautiful paper, I have another great project I'm working on for another class in Nov so be sure to keep checking back.

2 quick details of this layout, I used the fun, wonderful Waffle Paper.  It is a little thicker than tissue paper and has a great textured feel that is perfect for gathering.  I used silver on the first layout and used it at the bottom of the 5X7 mat and around the stamped Dec 25 image from the Tags Till Christmas stamp set.  This stamp matches the XL Decorative Label punch.  Doesn't it look great with the silver ruffle around it?  The ornament stamp I used for the background is another image in the Tags Till Christmas set.  I stamped in Cherry Cobbler on the first layout and in Crumb Cake.

The other embellishment is a pleated flower made with the XL Scalloped Circle punch and finished off with the beautiful Antique Brads that are featured in the big Idea Book and Catalog.  This flower is a little tricky but quick and easy and makes a great finishing touch.  Come learn how to make them in this class!

I might have to take some different pictures of these layouts.  I took them outside but the sun was starting to set so it is kind of shadowy.


This little bag uses the Fancy Favors die as the base and the Large Circle Punch.  After cutting the bag with the die I punched the circle in the front.  I also added the Sweet Treats Cup filled with glow in the dark spiders and put a square of Window Sheet on the back to hold the spiders in.  I placed this in the punched hole and adhered to the bag.  After doing that I was ready to assemble the bag.  The black lace from the Holiday Mini catalog was the perfect finishing touch.  I love how fine and beautiful this lace is.

You could fill the Sweet Treats Cup with anything small enough.  I like being able to see into the bag through the holes so you can tell what goodies await.  Tomorrow is the last day before Halloween and then we get into the Thanksgiving/Christmas season before we can barely blink our eyes!  I love these last 3 months of the year and all the fun crafting possibilities.  I can't wait to create some of the ideas I have been wanting to share. 

Wednesday, October 27, 2010

Spooooooky Luminaries

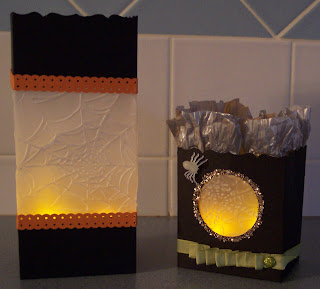
I have had fun using vellum in the Spider Web Embossing folder.  It is perfect for making luminaries.  I used the Fancy Favors box and Basic Black Cardstock to make both of these luminaries but I cut the box in half and inserted a 4" strip of vellum that I had embossed.  2 strips of Pumpkin Pie cardstock punched with the Dotted Scallop Ribbon Border punch are used to cover up the seam.  I could have added other embellishments but I really like it the way it is.  Of course, since the luminaries are made of paper I used the little battery operated candles.  I found 2-packs at the Dollar Tree so they aren't expensive at all.
The second Luminary is made with the 2 1/2 inch circle punched in the front and a square of vellum that was embossed with the Spider Web Embossing Folder placed behind the circle.  I used some of the gorgeous Chunky Glitter around the hole and added a Glimmer Brad to hold the ends of the pleated Pear Pizzaz 1/2" Stitched Poly Ribbon.  I gathered a piece of the fun new Waffle Paper to put around the top of the box.  I really love working with the Waffle Paper, it pleats and gathers so nicely and gives your projects the bling we love this time of year.  I know you will be seeing lots of it in the next couple of months!
The spider is from a package of glow in the dark plastic spiders I bought at the $$ store too.  Well, only a few days till Halloween and they will be a busy few days.  I may not get many more Halloween projects posted this year.  I enjoy the fun decorations and costumes but I think I'm ready to move on to Thanksgiving and Christmas!

Tuesday, October 26, 2010

Stamped Metal Embellishment

This is a card we made in my club several years ago.  I guess all the stamps I used are retired except for the Much Appreciated sentiment but I wanted to share it because I am getting several colors of metal sheets and they are going to be a lot of fun to create with.  On this card we stamped the pumpkin on the metal and then used an embossing stylus to raise the lines.  It is a fun technique that I will be doing in a class next month, along with several other metal ideas.  When I designed this card we didn't have the Big Shot machine or any embossing folders.  Even with those fun additions I still like the technique of stamping the metal and adding the texture with a stylus.  I'm also looking forward to running the metal through the Big Shot too!  It is going to be georgous! 

Friday, October 22, 2010

Spook House

I have a friend who was born in October and she loves all the decorations and goodies for Halloween more than anyone I know.  When I saw this haunted house on this blog I knew it would be perfect for her.  I did a few things differently but it is a nearly exact scraplift.  She has some more recent posts where she uses the same design for the house and used the Spider Web Embossing Folder for the roof and fun punch art critters on the front of the house. 

Now that I think about it, I should have used the candelabra from the Wicked Fun stamp set in the windows!  I put a bag of candy corn in the house when I gave it to my friend, that is the ultimate Halloween candy, right?  The spider is a plastic glow-in-the dark spider I bought a package of at a dollar store and adhered with a glue dot.The pumpkins are circle punches, from the largest circle on the owl punch and the stems are little snips of Stampin' Up's Hemp Twine.

BTW, I love the new 1/4" ribbon!

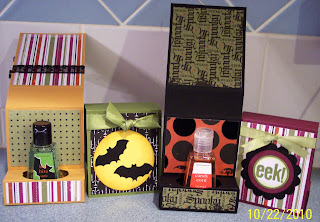
 I have some kits from the Tricks and Treats class left over.  Anybody interested?  I'll offer a 10 bag kit of the skinny bags, 2 each of 5 designs for $5.  All pieces are punched and a tutorial will be emailed to you.  Exact postage will be added to the price of the kits if they need to be mailed to you.  Skinny bags are included in the kits but candy and pencils aren't.

The hand sanitizer boxes would be $4 each, including the soap.  Again, all pieces are cut and scored, punched and ready to assemble and the tutorial will be emailed to you.  Only exact postage will be added if the kit needs to be mailed.

If you order a hand sanitizer box, specify which scent you want, they are (from left to right), Zombie Squad - Marshmallow; Candy Corn - Caramel; Bat Bite - Apple and  Vampire Blood - Plum. 

The last view shows 2 of the boxes open so you can see the inside.  The ribbon, lace or hemp twine are included with your kit.

Email your order to me and we can make arrangements to meet or I can send a paypal invoice after finding out what the postage will be.  wrightplace4@mindspring.com 

Tuesday, October 19, 2010

Halloween CASE's

Last week I had a day that I could spend a lot of time creating.  It was such a rare and fun day!  I had saved some pictures of cards I liked as I was looking online for Halloween card ideas so using those pictures I was able to quickly create 5 cards for my Halloween card class. 

I had also gotten the new Bitty Bat Punch so he was anxious to get used and added to the cards.  I used him a lot that day!  Isn't he great?  I also had the Wicked Cool stamp set that I won at Convention so I was glad to get more ink on that set.  I love all the looks you can get from that one set!

First, strips of Pumpkin Pie and Tangerine Tango cardstock make a bright background for 3 of the Bitty Bats.  Spider webs are accented with dots from the White Signo pen as well as eyes for the bats.  This card was originally designed by Dawn Griffith, I love the touches of the white pen that seem to add so much to the card.  The main difference between her card and mine is that she used Concord Grape Cardstock instead of Rich Razzleberry for the background of her card.

While I had my Bitty Bat Punch out, I added a few to this card using DSP from the Wicked Fun paper pack for the background.  This card was CASEd
from Connie Babbert, another talented designer and Stampin' Up demonstrator. 

My 3rd card was also inspired by Connie Babbert and uses the Wicked Fun paper again.  I love the fun design with the small scraps of patterned paper and the Witch's boots, another stamp in the Wicked Cool stamp set as are the bats and  "Spooky" stamp.

Have you ever seen the work of Michelle Zindorf?  She does amazing things with the brayer and sponges.  Well, don't expect this to look like one of hers but I was hoping.  Any time I try to use the brayer and sponges to get a background scenery it never turns out the way I wanted it to.  I was trying to find the card I CASEd this from but I actually designed it myself.  I'm not totally happy with it but it isn't the worst card I ever made either!

Last is a CASE of a tag that I made into a card instead.  Marie Shaughnessy made the tag and shared it on her blog.  The spider is like the ones from my Tricks and Treats class but the candy is M&Ms in a treat cup instead of the spider covering the mint patty.  I wonder who was the first person to imagine the photo corner punches as spider legs. 

I got some of my Halloween decorations out of the attic.  I wonder how long it will take me to get them put up!  Some days I stay so busy I hardly have time to think.  I don't think it will be today though.  I got up at 4:30AM and there is a nap in my immediate future! 


Saturday, October 16, 2010

Tricks and Treats Class

 
My second Tricks and Treats class is Tuesday night at 7:00.  This is a great class where you will make fun treats and tricky little projects for anyone you need to give Halloween treats to.  As you can see from the picture, you will come away with many great ideas to give to teachers, fellow employees and family members.  We will make 2 of the skinny bags, your choice and 1 of the soap holders and 1 Fancy Favors bag as well as a spider mint treat, matchbook lifesaver treat and scalloped top spider web bag.  The cost is only $15 for all that fun!  I hope you will come join me on Tuesday night.  Email me right away to register.  wrightplace4@mindspring.com 

Wednesday, October 13, 2010

Clean Halloween Fun!

This is a fun Halloween project that will be included in my Tricks and Treats class Saturday.  It would be such a nice gift for teachers, the mailman, your hairdresser - you get the idea, for everyone!  I love this project.  This is one of 4 designs for this little package to contain Halloween bottles of hand sanitizer.  This one is Bat Bite and there is also Candy Corn, Vampire Blood and Zombie Squad.  First come, first serve on your choice of scents. You will make one of these as well as some skinny bag treats, punched Spider treat, Fancy Favor spider web bag, and another goodie bag.  That's 6 projects in 1 class!  For only $15, that is a fun bargain.  Email me quickly if you want to come!  Saturday, Oct 16 at 10 and Tuesday, Oct 19 at 7:00.  wrightplace4@mindspring.com 

Tuesday, October 12, 2010

Pow Wow fun and Tricks and Treats class


I had a great time at the Pow Wow.  I learned so much and totally enjoyed the dancing, music and wonderful Indian regalia.  I was able to walk a portion of the Trail of Tears, that was very emotional since my great, great grandmother walked the Trail of Tears to Oklahama.  I had fun meeting people who came by my booth and I sold 15 mini albums and over 50 cards. 

Now that I can finally post pictures (I have no idea how that happened.  I couldn't Friday night until last night but could this morning) I want to post a few of my favorites from the Pow Wow.  I can post pictures but I can't make them go where I want them to.  Oh well, I'm thankful that I can at least post pictures again!

I have a fun and fabulous class coming up on Saturday and Tuesday night.  It is what I am calling my Tricks and Treats class.  We will be making 6 projects in the class, all fun and quick to put together.  Email me if you would like to sign up for one of the sessions of this great class at wrightplace4@mindspring.com
The pictures are to give you an idea of what the projects are.  I just might be convinced to post another picture tomorrow, do you want to see more???

Don't forget to check out the Clearance Rack, there are still lots of great Stampin' Up retired products left there!  http://www.stampinup.com/ECWeb/ItemList.aspx?categoryID=493

Friday, October 8, 2010

October Classes and Clearance Sale!

I have been trying to post something for a few days but my computer won't let me put a picture in my post.  I gave up trying and thought I would post a pictureless post.  First of all, there is a great clearance sale going on at Stampin' Up!  I finally got it to let me post the clearance rack picture so click on it to go get some great bargains!  Ink pads are only $2.29, spools of ribbon that were regularly $8.95 are going for $1.99!  Get some bargains before they are all gone!  Now that the new catalog has gone live in other countries, the retired colors that haven't sold out are finally available at bargain prices.  There are lots of other products that are being clearanced too.  Some are up to 80% off!  It's a great sale, I see several things I need myself.

Also, I have my classes up and I have some fun ones this month!   Email me if you are interested in any of my classes or if you have questions; wrightplace4@mindspring.com

Halloween Card class on Tuesday, Oct 12 at 10AM  10 cards for $15
Tricks and Treats Class on Saturday, Oct 16 at 10AM   6 fun projects for $15
                                  and Tuesday, Oct 19, 6PM
Christmas Card Class on Monday, Oct 18 at 6PM  10 cards for $15
Scrapbook Class on Thursday, Oct 21 at 10AM  2 page 12X12 layout for $10

Details of my classes are on the calendar on my website.  Until I can post pictures again, email me if you have questions about any of the classes.

I will be at the Indian Trail of Tears Pow Wow this Saturday at the Port Royal State Park.  I have made some 6X6 scrapbooks to sell there, be sure to drop by my booth if you come.  Feel free to email me with questions about this event too.  There will be a ceremony explaining the Trail of Tears as well as Native American dancing, music and buffalo burgers (yum!).  If you live close to Clarksville, TN, it will be well worth the trip.

Tuesday, October 5, 2010

Candy Cane Christmas


Santa in the stamp set, Jolly Old Saint Nick reminds me of the large plastic Santa that my mom hung on our front door every year when I was growing up.   Mom's Santa was even winking!  I wonder what happened to that Santa, he probably got so old that he warped and cracked beyond use after I grew up and moved away.

This card also features the Candy Cane Christmas Designer paper.  I don't know who made the card, it was one of the swaps I got at the Fall Retreat and she didn't put her name on the back.  It is a very nice clean and simple card.  You can't tell in the picture but there is a nice sprinkling of Dazzling Diamonds on his hat band, eyebrows and beard.  It is the perfect touch to finish off the card.
The second picture has 2 of the projects we made at the retreat.  Candy Cane Christmas paper was also used in these projects.  It is a great color combination for Christmas although the Baja Breeze and Blushing Bride are not traditional Christmas colors.   The snowman from the Tags till Christmas set and the huge button is from the Candy Cane Big Designer Buttons pack.  I love the scalloped top on our new Mini Lunch Sacks, cute little 3-1/2"X2 1/4"X6-5/8" size is perfect for gift giving or treats. 

The sweet little box is from the Bitty Box and Envelope die and is cut from Blushing Bride card stock and decorated with Candy Cane Christmas DSP and a punched stamp also from the Tags till Chrismas set.  Did you notice the Glimmer Brad in the center of the ornament?  They come in 4 different color sets and are a great way to add some sparkle and class to your holiday projects!


Saturday, October 2, 2010

Back to Christmas!


You just never know where I'm going next.  After a couple of Halloween posts I'm back to Christmas!  Here are 2 more of the swap cards I got last Saturday at the Fall Retreat.  First, a catalog CASE.  This is on page 35 of the Stampin' Up Idea Book and Catalog as an accent to a scrapbook page.  Just punch fewer Ornament punches and add it to a card for another great look!  Some of the ornaments were punched from Designer Series paper and some is cardstock stamped with the Delightful Decorations stamp set that matches the Ornament Punch.  I really like it when they make stamp sets that coordinate with punches to make it quicker to make great cards and scrapbook pages without having to do all that hand cutting.

Second is a card shared by Thelma Collins.  She always makes great cards and this swap was no different.  She embossed the great new Northern Flurry Embossing Folder onto Soft Suede cardstock and added a strip of DSP to adhere the squares stamped with 2 images from the Jolly Bingo Bits (a new set in the Holiday Mini) and 1 image from the Delightful Decorations set.  A punched border of Baja Breeze tops off the card perfectly!

Friday, October 1, 2010

Wicked Best Witches!

2 more Halloween cards today.  These are more swap cards from last Saturday's retreat.  First, I think this "Wicked" card is great!  I love the colors, Rich Razzlebery and Pear Pizzaz.  She added some bling in the form of Dazzling Diamonds to the spider web and a Shimmer Brad to the witch's hat brim.  The web and witch's hat as well as the Wicked saying are from the Wicked Cool stamp set.  I love it!  The greeting, "Wicked" is punched out with the Round Tab Punch and is peeking out from under the embossed Spider Web layer.  Fun, fun!  The ribbon is the 1/2" Stitched-Poly Ribbon, the perfect finishing touch for this Halloween card. 
Second, Best Witches by Kelley Bialoskurski.  She used the Halloween Hoot set with a Concord Crush, Basic Grey, Basic Black color scheme with touches of Pumpkin Pie and Old Olive to brighten it up.  I love how she adhered the Pumpkin Pie 1/4" ribbon on top of the Old Olive 5/8" ribbon for a nice border and the 2 Scallop circles cut from the #2 Scallop Circle die are placed so the Pumpkin Pie one shows between the black scallops.  What a great border for an image stamped and cut with the Circles #2 die. 
Today is October 1st, we only have a month for all the fun Halloween cards and decorations.  I have 3 Halloween classes this month, one will be a 12X12 layout class, one a Halloween card class and one will be a Halloween Treats class.  I'll be posting details in a day or 2 so come back to check it out!