As promised, here is the tutorial (finally) for the Explosion Box.
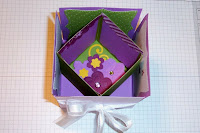
The inside of the box:
Using the pattern, cut a sheet of Old Olive cardstock. Score on all sides of the piece you cut from the pattern. I couldn't figure out a way to attach the pattern which I have in Adobe form so if you want it, email me at wrightplace4@mindspring.com and I'll email it to you.


 Ink up Medallion stamp with Whisper White Craft ink
 I cut several butterflies from the patterned paper and stacked 3 different sizes/patterns together with glue dots. I formed the body with a hat pin and beads from the pretties kit. The antennae are from 2 of the smallest flower centers. Adhere the body to the butterfly with glue dots and then adhere the butterfly onto the box lid with Stampin’ Dimensionals.


So there it is. It is a little involved but a very fun project that has quite an impact when it is opened.
4 or 5 years ago I was teaching in a scrapbook store. I had seen a project many years ago on The Carol Duvall Show that she called a “Falling Down Sewing Kit”. She made it from poster board and fabric. I made one when I saw it on her show and decided it would be great to use as a box to display photos instead of a sewing kit. Now there is a project very similar called an Explosion Box. The main difference between mine and the Explosion Box is that mine has the center section turned kitti-corner so that you can see all the pictures at once when you take the lid off.
Supplies:
2 sheets Orchard Opulence Cardstock
1 sheet Old Olive Cardstock
2 sheets Cottage Wall patterned paper
Big shot machine
Butterfly die, Top Note die, Scallop Circle die,
Birds and Blooms and Swirls and Scribbles Sizzlet
Simple Flower and Cherry Blossom embosslits
Pretties Kit
White Organza Ribbon
Iridescent Ice Embossing Powder
Eyelet Border Punch
Circle Ice Rhinestone Brads
Trimmer
Embossing Gun
Stampin’ Dimentionals
Glue Dots
Main Box:


Cut a 4” square out of each corner of the cardstock and/or patterned paper. For this project I used Orchard Opulence cardstock for the inside and Cottage Wall patterned paper for the outside.
Score on all sides to form flaps. Using a strong adhesive like Stampin' Up's sticky strip, adhere the pieces together back to back. Be sure to put adhesive around all outside edges and along score lines so that when the box is handled it doesn't come apart.


All pieces cut for box base


bottom 2 pieces, scored and ready to put together


The inside of the box:
Using the pattern, cut a sheet of Old Olive cardstock. Score on all sides of the piece you cut from the pattern. I couldn't figure out a way to attach the pattern which I have in Adobe form so if you want it, email me at wrightplace4@mindspring.com and I'll email it to you.


Place adhesive on all edges of the bottom square and place kitti-corner in the center of the Orchard Opulence cardstock piece.

Lid:
Cut a 6” square from Orchard Opulence cardstock. Score in 7/8’ around all
Cut a 6” square from Orchard Opulence cardstock. Score in 7/8’ around all
4 sides. Cut a slit in each corner, 7/8“ in and 7/8” deep. If you want an image stamped on the lid, di it at this point. After stamping, fold the flaps in and adhere to form the sides of the lid.

If desired, you can add a band of patterned paper around the lid by cutting 2 strips 12 X 7/8” and adhere it around the edge of the lid. It will take about one and a half of the strips.
 Ink up Medallion stamp with Whisper White Craft ink
Stamp the Medallion stamp onto the lid before shaping it into the lid. I used Whisper White Craft ink and then embossed it with Iridescent Ice Embossing Powder.
 I cut several butterflies from the patterned paper and stacked 3 different sizes/patterns together with glue dots. I formed the body with a hat pin and beads from the pretties kit. The antennae are from 2 of the smallest flower centers. Adhere the body to the butterfly with glue dots and then adhere the butterfly onto the box lid with Stampin’ Dimensionals.

To decorate the insides, cut leftover paper from the corners into mats for photos and journaling boxes.
 To create the mats for the top layer, I cut a piece of patterned paper with the Scallop Circle die and cut it into fourths. I adhered them to the top of an Orchard Opulence rectangle (3 ¾ X 2 1/2) and cut off the excess patterned paper. I used the Eyelet Border Punch along the bottom and placed one on each of the inner flaps.
 To create the mats for the top layer, I cut a piece of patterned paper with the Scallop Circle die and cut it into fourths. I adhered them to the top of an Orchard Opulence rectangle (3 ¾ X 2 1/2) and cut off the excess patterned paper. I used the Eyelet Border Punch along the bottom and placed one on each of the inner flaps.
To make the shaped mats for the bottom layer I placed the square on the Top Note die and cut once. Then I turned it sideways and cut again.


I cut flowers using the Embosslits and Sizzlets dies and used them to decorate the bottom of the box. Add other embellishments and decorations as desired.

Here is what the box will look like before placing the lid on it.

So there it is. It is a little involved but a very fun project that has quite an impact when it is opened.


No comments:
Post a Comment