Friday, December 30, 2011

Creative Withdrawals Conqured!

Hi everyone, I hope you are enjoying the day, it is beautiful here, the high is supposed to be 60 so I'm planning to spend some time outside.  It has been cold ever since we got here so today will be nice.  Can you believe I didn't pack a single stamp, ink pad or piece of cardstock???  I was starting to feel some creative withdrawals.  Then I pulled up my handy MDS program on my laptop and had fun getting creative with digital.  I'd still rather do paper and ink but the MDS program is so easy and quick that I enjoy it too.  I figured, no time like the present to start layouts of my trip so here are the first 2 pages.  They show a few pictures from the flight and from going to see the lights on Temple Square that evening. 


We are having a nice visit with my husband's brother and sister and nieces and great nieces and nephews.  The funeral was very nice, every speaker talked about how my father in law served others throughout his life.  He continued right up until he couldn't speak anymore.  The nurses in the care center said that they seldom get a resident who expressed their thanks so sincerely and often.  My father in law was just like that, when he could barely speak he still let others know how much he appreciated what they did.  I'm thankful to have had his example in my life.

Have a good weekend and safely welcome in 2012!

Saturday, December 24, 2011

Merry Christmas!

It's Christmas Eve and I am in Salt Lake City.  My father-in-law died last week so we came for the funeral.  We went to Temple Square tonight to see the lights.  It was 22 degrees so we were very cold but the lights were beautiful and we enjoyed the evening.  Here are a couple of pictures.


Merry Christmas!

Wednesday, December 21, 2011

Say It Isn't So!

Have you heard the news yet?  The Stocking Builder Punch is being discontinued with the end of the Holiday Mini Catalog.  I'm so disappointed, I love that punch!  I'm glad I bought it, I love the things I created with it.

I'll have it for Christmases to come and for baby booties on Congrats cards and hobby horses and sweaters and all those fun things Stampin' Up demonstrators figured out to make with this versatile punch.  If you were putting off ordering one, better head over to my website and order it before they are sold out.  While you are there you should check out the Clearance Rack and get some of those bargains too.  Unless you pay extra for expedited shipping it won't get there before Christmas though!


I can't believe it is only 4 days till Christmas.  It looks like I'll be having a white Christmas this year, it's been a while.  Here are a couple of cards made with the Stocking Builder Punch, some were swaps from the Birmingham AL Regional and some from the Louisville Regional. 

I'll have to be playing with the new punch and the dies I got from the Occasions Mini Catalog instead of the stockings.  You will be able to see all the goodies when the catalog goes live on Jan 4th.  I'll try to post more that I make with my new goodies if I get time before I leave for snowy places.

Friday, December 16, 2011

Apothecary Art Card and Clearance Rack Blitz!

There is a huge sale going on in the Clearance rack on my website but first I want to show you a couple of projects.

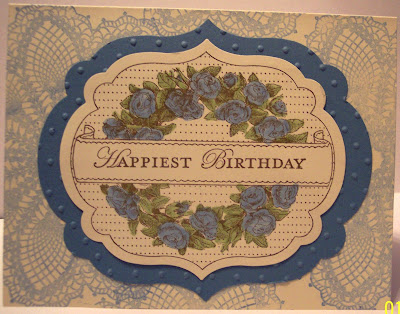
First is a card I made using one of the new stamp sets and dies from the upcoming Occasions Mini Catalog.  I love this set and I love that we have nesting "Framelits" dies to cut out these shapes.  We also have a heart Framelit set in this great new catalog!  I also used the Hello Doily stamp for the background of this card.


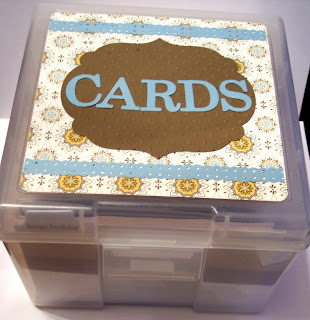
This is a box of cards I put together for a gift.  I used the Spice Cake DSP for the lid.  Inside I made dividers for various types of cards using the Round Tab Punch and mostly the Teeny Tiny Verses set.  I couldn't find a stamp that said miscellaneous or assorted so I just printed that one.  I hope the one who gets this card box will appreciate the time that goes into creating 40 handmade cards!

And last, your chance to save big!  Lots and lots (nearly 200) items have been added to the Clearance Rack with discounts of up to 80%!  Click to save now!  Hurry though, lots of people will be taking advantage of this sale.  And don't be shocked to see punches there.  I guess they are clearing out the old style punches so they will all be the new flatter style.  What a great chance to get the large punches for under $10!   Go grab some bargains, I reckon I'll take my advice and head on over there myself!

Also, click the "all" option under the number to show per page at the upper right corner and it will be much easier to shop instead of clicking through all those pages.  I like easier.

Tuesday, December 13, 2011

Christmas Gifts Class and Christmas Treats Class

I've scheduled 2 classes this week, a couple of last minute Christmas classes to help you get ready for the big day.  In the Christmas Gifts class we will make 3 gifts for $15.   We will make a desk post-it note/calendar holder that will be a great gift for any busy person, 2 flower pins, made of tapestry, lace or sheer fabrics, your choice as to the fabric, color and size.  These pins are beautiful for a lapel or to pin on the latest ribbon and bead style necklaces.  And finally, the set of 8 Monogram Cards make a great present for anyone.   The cards will include envelopes and be packaged in a great clear box that we will emboss to make it an even greater gift!

This class is scheduled at my house on Wednesday, Dec 14 at 7:00PM and Thursday, Dec 15 at 1:00PM.    Email me to sign up and get directions to my home!  wrightplace4@mindspring.com

The other class is a Christmas Treats class.  We will fill a nugget tin with yummy chocolate wrapped in beautiful Christmas paper and decorate the tin with the very popular medallion pleated flower.  Other fun projects will include the "skinny bags" decorated with Santas and stockings; a cute reindeer goodie bag and an adorable "purse" treat bag.  For stocking stuffers or treats for co-workers you can't beat these  great goodies.  Everyone loves a handmade gift so sign up and come create!

The Christmas Treat class will be Saturday, Dec 17 at 10:00 AM or 2:00PM  Cost is $15 Email me to sign up.   I hope you can make it to one or both of the classes!


Saturday, December 10, 2011

More Dec Club Projects


My daughter came to visit me from GA the past week and while they were here we went to Opryland Hotel in Nashville to see the Christmas lights and decorations.  I love the poinsetta trees they have there and we got our picture taken in front of one of them.  It's not the best picture of the kids but it's definitely natural!

As promised, here are the other 2 projects we did at our card club this week.  The Baja Breeze snowflake card would be a great card for Christmas or during the snowy months of January and February.  This picture was taken before I stamped the Merry Christmas sentiment but you could stamp a birthday greeting or a thinking of you sentiment to send over the Winter months.  We cut the cardstock 4 1/4 X 11" instead of the usual 5 1/2 X 4 1/4" size.  We folded it in half and then folded half of the front back across itself.  It is an interesting fold that is fun to design with.  The stamp set is the Serene Snowflakes set and we used all 4 of the stamps in the set.

The 4th project we did was a gift card holder.   We took a 12X12 sheet of cardstock and cut it at 5 1/2", nearly in half.  We scored the strip of cardstock at 4", 6" and 8" and folded it in a "W" before running it through the Big Shot Machine.  It was placed with the 2 folds just above the cutting blade at the bottom of the "purse" so it was still in one piece when cut out.

The inside sections were adhered together from the back of the card and then the folded edge was punched several times with the Word Window punch to make a slot long enough to insert a gift card.  We added some ribbon, a brad faux closure and a stocking from the Stocking Builders punch and the sentiment is from the Occasions Alphabet set.  The DSP is one of the designs in the Letters to Santa pack.

The last picture shows the inside, I thought I had a Christmas gift card but couldn't find it so I reckon we get pink tulips!

Friday, December 9, 2011

December Card Club

Hi, I hope you are keeping warm.  It's cold here tonight so I'm trying to stay inside and close to a heat source!  Yesterday was our December Card Club.  We did an extra project this time as part of my Christmas present for my ladies. 

I'll start with our bonus project, a little snowman treat bag made on the Fancy Favors Box die.  I borrowed the snowman idea from Lisa Young's blog, isn't he cute?  We used buttons for his earmuffs and the wide striped ribbon for his scarf.  I wasn't completely happy with his mouth but it was one of the last things I did on it so I'd have to practically redo the whole thing to redo the mouth.  I still love him!
How do you like my outdoors in my bush with red berries pictures?  They turned out pretty good but it wasn't easy to get the bush, shadows or gravity to cooperate!  Before I even went outside to take the pictures I dropped my camera on the kitchen floor.  Yikes!  It broke the latch on the battery compartment so I had to tape it closed with electrical tape.  Obviously, it still works but I have yet another redneck repair in my repertoire!

Another CASE, this one from Debra Courrier.  I loved the simplicity of the 3 strips of Silver Glimmer Paper.  I'm thinking I would add some embossing to the background Cherry Cobbler cardstock if I make more of them though.  We stamped the image in black and colored the heart on the house with a Cherry Cobbler marker to carry over the red from the background.  A snowflake cut with the Northern Flurry die strip secured with a colored Rhinestone brad finishes off the card. 
It's late and I reckon I better head to bed.  I'll post the other 2 projects tomorrow if I get time to.   You know how December is, you remember something you said you would do when there is barely enough time to get it done and end up rushing around all day! 

Tuesday, December 6, 2011

Snow?

There is a teeny tiny chance that we might possibly see a smidgen of snow tonight if we look out the window at  the right time.  It's funny how they seem to get all excited about it.  I'd just as soon never see another snowflake again unless it was on my crafting table and was paper!  Or better yet, glimmer paper!

I went to a shoebox swap last week and we did 2 snowman cards so I thought it would be a good time to share them with the snow in the forcast and all.  They are made with the Snow Much Fun set in the Holiday Mini catalog.  I love the snowmen and birds in the set.  The first one is an accordian fold card, I can't remember who brought this one but it is a fun card.

 This is what it looks like when you open it up.
 And this is the other snow card..   This one was shared by Becky Brunton but she said she had cased it somewhere.  I love the texture that the Snowburst Embossing Folder gives to the strip on the side and the Glimmer Paper snowflake is a great touch. 
I reckon I need to go peek out the window to see if that big snowstorm has hit yet!  Drive safe  :~)

Monday, November 28, 2011

I've been waiting to post this card because I can't find who I CASEd it from and was hoping I could find it so I could give her credit.  If it was you, please let me know!

We made this in our club meeting this month.  I used the tree from Lovely As A Tree because I didn't have the set she used.  We stamped it in Versamark and embossed it in white embossing powder.  After it was embossed we used Garden Green ink to sponge over it, start at the middle and work your way out so it isn't too dark around the edges.  That also prevents large circles of ink you get when you first dab the sponge on with fresh ink. 

We embossed the strip of Whisper White paper with the new Snowburst embossing folder which made it really easy to tear across the top and fold down. 

It is a good thing I had another card ready to blog with.  I have a sinus infection AND vertigo right now so I haven't felt like stamping for a couple of days.  I'm hoping to be feeling better tomorrow.  I reckon I better go drink another cup of yarrow tea before I go to bed.

Saturday, November 26, 2011

Christmas Countdown

I had a class today where they made these cute tin Christmas Advent countdown calendars.  We had originally wanted to make the one shown on page 36 of the Holiday Mini Catalog but I had heard other Demonstrators saying that the class took 7 hours to complete!  They are beautiful art pieces but when I saw a version in a tin I knew that was the one I wanted to make.  It only took about 2 hours and they are very cute so I'm glad I decided to go with the simpler version. 

We put pieces of the plaid paper from the Frostwood Lodge DSP pack on the cover and inside the tin.  The number stamps from 25 and Counting were stamped on Whisper White Cardstock and layered onto Cherry Cobbler and Garden Green Cardstock that had been punched with the Postage Stamp punch.  Magnets were put on the back of each one so they can be stored inside the tin and changed out each day.Mostly I alternated the numbers with red and green ink but when I got to Baby Jesus it was time to use red and I just couldn't stamp him in red!  I thought about it and decided that Soft Suede ink would be better.  Then I decided that the reindeer and cup of cocoa should be Soft Suede too.  Then the numbers with snow had to be blue.  I reckon I'm a little obsessive sometimes, right? 

Thursday, November 24, 2011

Between Bastings

Happy Thanksgiving! 
I thought I would take a few minutes between bastings to post a quick turkey, the symbol of this day of gratitude.  I have so much to be thankful for so I love Thanksgiving and the chance to concentrate on my blessings.  I was raised in a great family on a wonderful farm and learned the Gospel of Jesus Christ early in my life.  I had the opportunity to go to college, met and married a good man and we were blessed with 4 children.  There were, of course, trials that went along with all these blessings but those trials strengthened me and made me the person I am today. 

Thanksgiving dinner is nearly ready and we will be enjoying our dinner soon.  I hope your Thanksgiving dinner has been wonderful and you have had friends and family around to share it with.  Thanks to all of you who follow my blog and are my friends and customers.  I am thankful for all of you.

Here is a little turkey, made with the fan fold technique we all learned in elementary school.  I did the turkey's body with the owl punch and added him to the front of this multiple layer Spice Cake fan fold tail.  Enjoy him and have a Happy Thanksgiving!

Wednesday, November 23, 2011

Another Christmas Card from the Nov Club meeting

The ladies wanted to try embossing so I ordered some white embossing powder for this card.  Can you believe I ran out of white embossing powder!  I saw a card made by Ellen LaFever that I really liked and I copied it fairly close, just changed the colors and embellishments.  I used the tree stamp from Lovely As A Tree and stamped it in Versa Mark and embossed it with white embossing powder.  Then I took a sponge and sponged some Garden Green ink over it, starting in the middle and going out.  That way you don't get the too dark areas around the edges.  I used the Snowburst embossing folder for the dry embossing of the snow hill, tore it along the top and folded it down.

The red Glimmer Brad wrapped around it brightens the Merry Christmas sentiment but I kept thinking it would look better embossed in white too so I suggested it in class and once one of them did it that way it looked so much better that everyone else did.  I reckon that you will have to imagine it though because I didn't take any pictures!

Saturday, November 19, 2011

Watercolor Christmas Card

Here is one of the cards we made in our club meeting this week.  We used watercoloring to color in the image from the Tidings of Joy stamp set.  I've noticed that nearly all of my stamps are solid stamps that need no coloring so I wanted to do something a little different this month.  I like the Tidings of Joy stamp set so I ordered it to use to teach some watercoloring techniques.

We used a combination of Watercolor Crayons and Watercolor Pencils, both are Stampin' :Up products that make it fun to color a stamped image.  You can go bold or more subtle like I did on this card.  You can get some good shading if you take just a little time with it.  I was tired and in a hurry to get the card finished so I could go to bed so I didn't do as good a job of coloring as I could have. 

I love that image of Mary and Joseph and baby Jesus.  It is sweet and simple and everyone, including the animals look peaceful.  With just over a month left until Christmas I need to decide if I'm going to use this Tidings of Joy set for my Christmas cards or go with O Come Let Us Adore Him with the wisemen on it.  I don't have much time to decide and start getting them made!

Wednesday, November 16, 2011

White Embossed Doily

When I saw the Hello Doily stamp in the new catalog I knew it would be one of the first stamps I would order.  It is so pretty and reminds me of all the doilies my mom used to have under her vases and on the backs of chairs.  At the regional meetings I got 2 different swap cards using it with white embossing powder.  They are both gorgeous!  This first one was made by Any Linkel.  It is stamped on Concord Crush cardstock.  After embossing it in white all she had to do was tie a ribbon around, stamp and punch out the sentiment and add a Basic Pearl.  Very easy  but a beautiful card don't you think?


Second, Judy Fetters stamped Hello Doily on Whisper White cardstock and embossed with white embossing powder.  She took a sponge dauber and, starting at the center, applied Rich Razzleberry ink in a circular motion.  Starting at the center means that by the time you get to the edge of the doily the ink will be lighter and you won't get dark circles around the edges.  I reckon that would look as bad as dark circles under your eyes!

Again, tie a bow, add Basic Pearl and a sentiment and another wonderful card finished!  That is the great thing about a perfect stamp, you don't have to work as hard to get a beautiful project.  I really like quick and easy!  As busy as we all are these days we need all the quick and easy we can get.

Saturday, November 12, 2011

Scored Card

Here is another swap card I got at the Stampin' Up Regional meeting.  This one was made by Zoe Rhodes.   I love the look the scoring gives this card.  This look is so easy to achieve with the Simply Scored too.  You can add this dimension to many projects that don't need the scoring for folds like the pleated flowers that are so popular right now.  This card is nice and flat for mailing but carries that "WOW" factor we like to get out of our projects.

This is a quick and easy card, the soft colors combine with the scoring technique to create a great card.

Wednesday, November 9, 2011

Fall Cards

  Happy Harvest!  I love Fall.  The only thing I don't like about it is that Winter follows and I don't like the cold weather or the bare trees.  Funny how much I enjoy seeing the leaves change color and watching them fall and I even enjoy raking them but I don't like the bare trees all that leaves behind.  I think I enjoy raking leaves is because we had so much fun with it when we were kids.  Not only did we rake huge piles to jump into and crawl and hide in, we raked piles into our play houses and raked roads from my sister's house to mine and then on to our other sister's "house".  It was great fun and filled many a Fall afternoon.  If you remember the picture I posted of  my house last week, the home I grew up in is just through the woods and also had a large yard with lots of trees so the leaves were ample.   

Anyway, these pretty cards are some of the swap cards I got at either the Birmingham or the Louisville Stampin' Up Regional meetings.  These all use the amazing 2-step set, Gently Falling.  I've seen so many beautiful Fall cards made with this set.  They are all great but I wanted to show a close up of 2 of the cards.  This great Fall card from my talented friend, Mary Robinson features a fun and easy technique where you stamp a background for your stamping with one of the clear blocks.  Just ink up the block without a stamp on it and stamp on your cardstock.  It leaves a nice shadow as a base for your focal image.  I love the Fall colors.  I reckon I might have told yall how much I like Fall, right?

The other card uses the masking technique.  Although it takes a little more time to get ready it is a relatively easy technique.  In this sample it requires a bit of cutting but once you have a mask cut out you can use it quite a few times so it is really worth the time.  This card was made by Janice Jones.  She stamped one of the leaves from the Gently Falling set onto a post-it note and cut it out.  Then she placed it on a piece of Very Vanilla cardstock and sponged over it with Soft Suede and Pool Party ink.  The En Frances background stamp could be stamped before or after the sponging, just do it without the mask.  Layering the artwork on Soft Suede and Pool Party cardstock and tying a bit of torn Spice Cake fabric around it finishes off this card very nicely.  Fabric makes a nice, inexpensive bow on your stamping projects and I love that Stampin' Up has fabric to match some of it's Designer Series Paper.  It's great when they introduce products that makes our stamping easier and more versatile.

Monday, November 7, 2011

Easy Woven Card Technique

So, did you get to download the free Digital files and play with them over the weekend?  There were some great files!  I went to a weekend crop at a camp in Land Between The Lakes in KY.  It was very nice and I slept much better than I was expecting to.  I taught a Christmas Treats class there that I will be teaching again soon, I'll post when so you can sign up if you can come.

I haven't added the sentiment yet but I finished up this card Saturday and wanted to share.  I'm thinking it will be a Happy Thanksgiving card for my Sister in Law.  I like to leave the sentiment off sometimes and add it when I need a card.  Since Stampin' Up papers and inks all match I can easily stamp a sentiment in Soft Suede ink and it will be complete!   I reckon I need to sponge a little ink around the Word Window punch so it fits with the card better.

I have see several of these woven cards lately and since I have been a basket weaver I love the look and needed to try it myself.  If you haven't done this technique, it is easy and fairly quick.  I stamped the image from Lovely As A Tree 3 times.  One I left whole and I cut the other 2 into strips, one horizontally and the other vertically.  Then I picked a few of the strips and matched them up to the main piece and attached them.  I had enough strips left to do another card too so you might want to stamp 4 images in the first place and leave 2 whole.  When I first made the card it looked bare so I pulled off the strips and sponged some Soft Suede ink around all the edges.  Perfect touch!

Here is another card I made Saturday.  Again, no sentiment and very simple.  I still haven't decided if it is finished or not.  I'm wanting to add ribbon but I'm thinking I need to move the flower up about a half inch and then put the ribbon between it and the sentiment.  Or maybe I will put the ribbon under the sentiment and not need to move the flower.  If you look closely you can see that the flower  is outlined in the Dazzling Details glitter glue that is new in the Holiday Mini Catalog.  I thought about spongine some Not Quite Navy ink around the flower petals but haven't decided if that would help or not.  What do you think?

Friday, November 4, 2011

Celebrate Digital Scrapbooking Day with Stampin' Up! for a four-day online event designed to introduce more of our demonstrators and customers to our digital content. Digital Scrapbooking Day is November 5, but we'll keep the celebration going from November 4-7! The event will include free downloads, blog posts with exciting project ideas all weekend long, and the announcement of the 2011 My Digital Studio Contest winners.


This event is for everyone, if you have never tried digital projects, there are free downloads you can get to "test drive" this fun way to create.  If you already do digital work, the downloads are free for you too!  What have you got to lose?  This is a great time to try our digital program without spending the money to buy it.  Of course, if you love it and want to buy MDS, I'll be glad to help you out with that!

Join us this weekend for:

FREE digital downloads
Project ideas
Announcement of 2011 My Digital Studio Contest winners

I downloaded the free digital products and created this layout.
I love the torn tape look for this layout!  I'm thinking I'll use that digital download a lot.  It comes in the Crumb Cake color that I used as well as clear, Whisper White and Very Vanilla and Basic Grey.  I'm thinking duct tape too!  My niece made a duct tape prom dress a few years ago, she needs that download!
What's included in the free downloads?  127 digital images in all!  FREE!!!  Come on and play along.  I'd love to see what you create with your free downloads!  After getting your free downloads – take a moment to complete a survey at  My Digital Studio.   After completing the survey you will have access to FREE DIGITAL DOWNLOADS
Why complete the Survey
– Because it will help us continue to provide top quality digital products to meet your needs.
– Because it could mean even more FREE downloads – If we get 5,000 customers to fill out the survey and get the free downloads, we’ll give everyone another FREE download. Want to make sure you get it? Then encourage your friends, family, coworkers, and other contacts to go to MyDigitalStudio.net  between November 4-7 to fill out the short survey and get their FREE downloads. Spread the word by sharing the link from My Digital Studio’s Facebook page and “like” us while you’re there.

Don't own My Digital Studio?  That’s ok – you can use our Digital Downloads with any program you already own.

Wednesday, November 2, 2011

Another Beautiful Fall Day

I love days like today!  The weather was perfect, sunny and warm.  After some very cold days the last couple of weeks you really appreciate a perfect day more.  It is supposed to rain tomorrow, but the Fall rain helps with the gardens in the Spring so I don't mind a rainy day now and then.   I have several Fall cards to share with you now.

Here is a swap card from Sue Erickson.  I love everything about this card!  She used the French Foliage stamp set with fall colors that speak to me  :~)

I don't know who this card is from, she put the instructions for making it on the back of her card but didn't add her name.  Sounds like something  I would forget to do too.  She used the Give Thanks stamp from It's a Wrap Holidays stamp set.  I like that she found another way to use the set besides wrapping it around a mini candy bar.  The card has lots of texture with the Texturz Plate and punch art.

Last is another card with Fall colors but not a typically Fall stamp set.  It is from Bobbi Simpson and uses the floral stamp from the Love and Sympathy set.  Then she added texture with the Square Lattice embossing folder and copper brads.

I hope you have a beautiful day wherever you are!

Tuesday, November 1, 2011

It's November!

Fall is in full swing, the weather goes from being beautiful one day to freezing the next.  We just have to keep checking the weather to be prepared or we end up like I was today, wearing a sweatshirt when it is 70 degrees!

I had a workshop today and it was great, we did a punch art turkey and Santa.  The turkey was on a skinny bag and the Santa covered a Hershey Nugget.  The ladies enjoyed the punch art, it is one of my favorite things to do.  I'm so glad Stampin' Up has such great punches and there are so many creative demonstrators who share their ideas so I can look good at workshops!

Here is a beautiful Fall swap card from Shirley Hotop.  It features the glitter window technique.  See how the Dazzling Diamonds are in the middle of the circle?  It is a great technique that will surely come to a class I teach real soon.  It would be great for a Christmas card too, hummm, which stamp set can I use???

There wasn't a name on the back of this swap and I can't seem to get the colors right in the new photo program so it is kind of washed out but it is very pretty in person. 
Here it is opened.  It is a mini post-it notes easel card.  It is so cute and is a great way to let someone know you are thinking of them.

I thought I'd share a picture of my house.  It is in there somewhere!  This picture was taken a couple of weeks ago when the leaves were just starting to change.  They have nearly all fallen off now so if I had remembered to take a picture today you cold actually see the house there among the trees.  My husband spent quite a bit of time raking the yard Saturday.  I reckon I know what he will be doing again this weekend!
Happy Fall Yall!

Monday, October 31, 2011

Free Big Shot Offer Extended! Happy Halloween!

Today was scheduled to be the last day for the FREE Big Shot but it has been extended until Nov 11!  There is still time if you want to sign up to be a Stampin' Up Demonstrator and get a Big Shot die cut machine or $100 free merchandise.  You can go to my website and sign up online quickly and easily with a Credit or Debit card.  I'd love to have you on my team so hurry!  Let me know if you have any questions.  I love being a Stampin' Up Demonstrator, I think you will too.

It is finally Halloween!  I love Fall colors so I enjoy the fun of decorating for Halloween and Thanksgiving.  I have a few projects from various swaps and a Halloween card I made a while ago but haven't posted to share today to wish you a happy Halloween.  First, the card I CASE'd from somewhere:
Please excuse the poor editing of the pictures.  I got Windows 8 on my computer while I was gone and I haven't figured out the new photo program very well.  It takes 3 times as long to edit each picture so I've GOT to find a better way!  I just love technology . .  .

Here are a couple of fun Halloween treats I got as swaps from the Stampin' Up Regional meeting I went to Saturday in Louisville.  The little bag with the EEK! stamp from the It's A Wrap Holidays set was from MaryJo Marshal of Ohio.  There wasn't a name on the back of the pleated flower skinny bag treat, I think there once was but it got lost with all the goodies I had in my big bag of swaps.  It is so cool and I really love the witch hat made from an oval and pennant punch. 

This 3-D card is one I got at the Birmingham Regional I think.  It is from Kelley Bialoskurski.  She used the House of Haunts stamp set and the Spider Web embossing folder and lots of Dazzling Diamonds to make it extra fun.

This is a great little treat bag that folds into a purse-like folder.  It looks purple here due to my lack of ability with the new photo program but it is really black.  It is stamped with the Wicked Cool stamp set.

Ah, the right colors here!  There is a mini paper bag inside that holds a fun size candy bar.  Somehow I'm thinking that is the wrong name for those little candy bars. I reckon I'd call them the skimpy size and the great big ones would be fun size!