Friday, September 25, 2009

Digital Scrapbooking

I first heard about digital scrapbooking several years ago. I had been playing with paper, ribbon, buttons and stamps in my scrapbooks for 15 years and I had no plans of changing. I began to see some beautiful pages in online galleries and then they started to filter into the scrapbook magazines. It was so aggrivating to see a beautiful page and to read how it was done and see that it was a digital! I didn't have any idea about all those computer terms they used and I'm computer challenged enough that I was too intimidated to even attempt a digital page.

Fast forward a few years. I'm sitting at the 2009 Stampin' Up convention and everyone is all excited that Stampin' Up is coming out with digital scrapbooking software. I was SO not interested! [Insert big yawn here.] Then Mark Jessen got on stage and did a demonstration of the software. What he was doing on his computer screen showed on the jumbo tron screens so we could tell what he was doing.
OK, I'm very impressed. I didn't want to be. I wasn't going to even consider ordering the software. I don't want to do digital pages, etc, etc, etc.

The more I watched, the more I realized that this wasn't intimidating at all, it was easy! And quick! I could actually do this with my limited computer knowledge. Hey, I figured out how to do a blog, didn't I???

I ordered My Digital Studio and anxiously awaited it coming. That is when my computer crashed. The day after MDS came I couldn't stand to wait any longer so I went out and bought a new computer. I didn't want to try to load it on my old computer even after it was fixed, I needed a new computer for this new program. Makes total sense to me :~)

I got the MDS loaded on my new computer without any trouble at all. I opened it up and tried to remember what Mark had showed us at convention. I made a page in less than 10 minutes! How cool is that in this busy world?! This page with my son in law and grandson is the first page I made with MDS.

I've been having a lot of fun playing with My Digital Studio. I've made quite a few pages and am working on a wedding album from my son's wedding last Saturday. It's nearly finished, I've never finished an album so quickly! I still haven't finished stitching the last leg on the turtle of the blanket I made him when he was a baby. He doesn't let me forget that either. Hey, the blanket kept him warm all those years without any problem.

Stampin' Up has contracted with a printer who has their inks calibrated to match Stampin' Up's colors so I'm going to send the album there to be printed when I'm finished, which should be in another day or 2. Then I'm going to oogle it and drool over it when it comes for a day or so and mail it to him. Actually, I think I'll order 2 of them and I can keep one to show off to my friends and send one to him. He won't believe how quickly I got it done. It's just not in my nature (remember yesterday's tutorial that I promised several weeks ago?)
OK, so you aren't interested in doing digital pages? I have realized something wonderful about My Digital Studio. It is so quick and easy to design a page using it that you could use it for your page design and then use real paper to make the page. Have you ever sat there with a stack of pictures and some paper and embellishments and couldn't quite get a page to form? I know I have spent hours and hours in that exact situation (spaced out over time, of course). I am amazed at how quickly a page comes together when you can do it digitally first. I will probably make most of my pages out of "real" paper instead of printing them off but MDS will definitely make the design of those pages easier!
I'm sure I'll be posting more digital pages in the future. If you don't want to do digital you can still use the pages as a basis for a "real" paper scrapbook page. I know I'll be doing that too. If you want to order the My Digital Studio, I'm here to help you :~) It will be available beginning Oct 1st. If you want to get it for HALF PRICE, there will be a hostess special starting Oct 1st also. LMK and I'll work with you to earn the discount. wrightplace4@mindspring.com


Explosion Box Tutorial

Well, the baby was due Sunday and still no baby. The Dr wants to induce but my daughter doesn't want to go that route so she is waiting a few more days. We are hoping the little guy will decide it's time and come on his own.

As promised, here is the tutorial (finally) for the Explosion Box.

4 or 5 years ago I was teaching in a scrapbook store. I had seen a project many years ago on The Carol Duvall Show that she called a “Falling Down Sewing Kit”. She made it from poster board and fabric. I made one when I saw it on her show and decided it would be great to use as a box to display photos instead of a sewing kit. Now there is a project very similar called an Explosion Box. The main difference between mine and the Explosion Box is that mine has the center section turned kitti-corner so that you can see all the pictures at once when you take the lid off.

Supplies:
2 sheets Orchard Opulence Cardstock
1 sheet Old Olive Cardstock
2 sheets Cottage Wall patterned paper
Big shot machine
Butterfly die, Top Note die, Scallop Circle die,
Birds and Blooms and Swirls and Scribbles Sizzlet
Simple Flower and Cherry Blossom embosslits
Pretties Kit
White Organza Ribbon
Iridescent Ice Embossing Powder
Eyelet Border Punch
Circle Ice Rhinestone Brads
Trimmer
Embossing Gun
Stampin’ Dimentionals
Glue Dots

Main Box:

Cut a 4” square out of each corner of the cardstock and/or patterned paper. For this project I used Orchard Opulence cardstock for the inside and Cottage Wall patterned paper for the outside.


Score on all sides to form flaps. Using a strong adhesive like Stampin' Up's sticky strip, adhere the pieces together back to back. Be sure to put adhesive around all outside edges and along score lines so that when the box is handled it doesn't come apart.


All pieces cut for box base


bottom 2 pieces, scored and ready to put together


The inside of the box:
Using the pattern, cut a sheet of Old Olive cardstock. Score on all sides of the piece you cut from the pattern. I couldn't figure out a way to attach the pattern which I have in Adobe form so if you want it, email me at wrightplace4@mindspring.com and I'll email it to you.


Place adhesive on all edges of the bottom square and place kitti-corner in the center of the Orchard Opulence cardstock piece.


Lid:
Cut a 6” square from Orchard Opulence cardstock. Score in 7/8’ around all

4 sides. Cut a slit in each corner, 7/8“ in and 7/8” deep. If you want an image stamped on the lid, di it at this point. After stamping, fold the flaps in and adhere to form the sides of the lid.


If desired, you can add a band of patterned paper around the lid by cutting 2 strips 12 X 7/8” and adhere it around the edge of the lid. It will take about one and a half of the strips.


Ink up Medallion stamp with Whisper White Craft ink


Stamp the Medallion stamp onto the lid before shaping it into the lid. I used Whisper White Craft ink and then embossed it with Iridescent Ice Embossing Powder.


I cut several butterflies from the patterned paper and stacked 3 different sizes/patterns together with glue dots. I formed the body with a hat pin and beads from the pretties kit. The antennae are from 2 of the smallest flower centers. Adhere the body to the butterfly with glue dots and then adhere the butterfly onto the box lid with Stampin’ Dimensionals.


To decorate the insides, cut leftover paper from the corners into mats for photos and journaling boxes.

To create the mats for the top layer, I cut a piece of patterned paper with the Scallop Circle die and cut it into fourths. I adhered them to the top of an Orchard Opulence rectangle (3 ¾ X 2 1/2) and cut off the excess patterned paper. I used the Eyelet Border Punch along the bottom and placed one on each of the inner flaps.
To make the shaped mats for the bottom layer I placed the square on the Top Note die and cut once. Then I turned it sideways and cut again.


I cut flowers using the Embosslits and Sizzlets dies and used them to decorate the bottom of the box. Add other embellishments and decorations as desired.

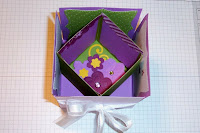
Here is what the box will look like before placing the lid on it.

So there it is. It is a little involved but a very fun project that has quite an impact when it is opened.

Monday, September 21, 2009

Tee Hee

I had this idea in my head for a couple of weeks but have been too busy with wedding plans and other things to get it done until today. I love it when what is in my head actually turns out good!
I used a Sweet Treat cup for Roudolph's face :~)

I cut a 5 1/4" X 4" piece of Bella Bleu Designer Series Paper and matted it on a 5 1/2 X 4 1/4" piece of Chocolate Chip Cardstock I punched the 1 3/4" holes in them and lined them up on the Very Vanilla Cardstock base and punched another hole. I adhered the Sweet Treat cup on the Very Vanilla, centering it over the hole and then put adhesive on the back of the Chocolate Chip and slipped it over the treat cup and adheared it.

I cut 2 "antlers" with the Swirls Scribbles Sizzlits Die and used the Dotto adhesive to place it on the card. The Dotto is great for small pieces because it comes off in little glue dots and the extra glue goes on your graph paper so you don't have to try to get little bits of adhesive on those tiny pieces.
I stamped the Merry Christmas sentiment from the Teeny Tiny Phrases stamp set and punched it out with the Word Window punch. I layered it on the Modern Label punch. I used the Round Tab punch for the pull tab on the tag. I made the back like the spider card, with a tag to pull out to get the candy. I was going to use a red hole punch for the nose but decided a red M&M would be fun in the middle of the brown ones. I attached the eyes with Crystal Effects. Fun stuff! What do you think, am I brilliant???
Did you notice his eyes on the card? I set it up to take a picture before the Crystal Effects dried and they slid down a little. It doesn't take long to dry but I was really anxious to take a picture of my fun creation. Tee Hee on me!
I haven't had much time to look online at other Sweet Treat projects. Maybe someone had the same inspiration and posted a reindeer before me. I hope I have more time the next few days to have some "me computer time" and get caught up on everything I've been putting off to get ready for the wedding. Did I tell you how much I hate shopping for clothes and shoes? I thought I'd never find something to wear to the wedding!

Wedding Bells!


This is just a quick post to tell you a little about the wedding. We went to Memphis this weekend for our son's wedding. His fiancee is from Memphis but it is only a 3 hour drive so it wasn't too bad. It did rain most of the way there Friday and most of the way home Saturday though. It wasn't so bad going but coming home it was dark most of the way and the rain made it harder to see.


Anyway, the wedding was beautiful and my new daughter-in-law was beautiful and my sons looked great in their tuxedos. Here is a picture of the wedding party. I'll post a project tomorrow unless my daughter's baby decides to come. It was due today (Sunday, it's a bit after midnight now so I guess it was due yesterday) but may not make it for a couple of more days. I'll have pictures of that to share later this week. Oh, the wedding and baby pages I'll be cranking out on My Digital Studio! I've already made 5 or 6 pages of the wedding today when lightening struck a tree and our power pole and we were without electricty for 4 hours. I couldn't get online so I played with the program.


Wednesday, September 16, 2009

Is it Monday yet?

I promised I would draw a name for the blog candy on Monday. I just realized it is Wednesday. The week has zipped by! My son is getting married Saturday so I've been even busier than usual trying to get things organized and getting wedding programs designed and made. OK, so I have one completely made. I still have 2 days until the wedding!

Anyway, I drew a name and Angela won the 2 stamp sets. Congratulations Angela! Thanks for being one of my most loyal blog followers. I'll get the stamps to you ASAP.

I've made 5 scrapbook pages with My Digital Studio software. They are so easy and quick! I'm loving this program. If someone as computer challenged as I am can figure it out it must be easy! I have to find out how to place some of the pages on my blog, it's telling me I can't.
I'm posting 3 of the projects I made at our Stampin' Up Team meeting today. We did 9 projects and they were all wonderful. 4 of them were Halloween projects. I love that little (actually, it's pretty big) spider. It is made from the Scalloped Circle punch, the Photo Corner punch and some small circle punches. He is a fun little guy. I stamped the speckles on the green paper with the Itty Bitty Backgrounds stamp. It makes a great background without having to use patterned paper. The Happy Halloween sentiment stamp is from the Teeny Tiny Wishes stamp set and it was punched with the Modern Label punch.
The cute little skeleton is from the Scary Skeleton set. I don't think he is scary at all! He's adorable. We used all 4 of the stamps in this set for this card. Notice the bats on the background and the sentiment and cat on the Modern Label punched piece.
The last one is like a popper, if you pull the ends it opens up so you can put goodies inside. It was slightly difficult but not terribly hard to score and fold all the lines but it was worth it, it's such a cute little treat box. The tag was stamped with the Eat Drink and be Scary stamp set.
I was trying to write the names of the creators on the backs of each card as I made them but I forgot on all 3 of these. Maybe when I post the Christmas ones I'll have several with names so I can give credit to them. The 4th Halloween project was the one I posted the other day with the Sweet Centers stamp set. I'm going to have to do a class with some of the ideas I've found for that set and the idea of having the candy on the card. It is just too fun!
I haven't forgotten that I promised to post the tutorial for the explosion box. It has a lot of pictures so it will take a long time to load and describe all of them. I'll work on that on the way to Memphis and back this weekend (while my husband is driving silly!). I may let him drive all the way so I can do that and play with My Digital Studio some more.

Saturday, September 12, 2009

Halloween Sweet Center Card

It dawned on me that you might like to see the Sweet Centers stamp set if you don't have a copy of the Holiday Mini Catalog so I took a picture of it. Not the greatest picture (like any of mine are since I don't have a great digital camera) but you can see the stamps in it.
I used the Halloween stamp for the card I did today. I stamped it in black and let it dry for a while before I used markers to color in the white areas. It looks fine with them white but I like them colored in too.
On this card I just made an X for the reciepent to pull open to get the candy. There are 2 things I figured out about this way to do it. Notice in the picture when I am cutting with the hobby blade, I only have one layer that I am cutting through. Since the adhesive is on the rim of the cup you can add that last so be sure to cut through all layers at once and then add the candy. You may have to do several passes but if you only do one layer like I did, it will be impossible to get the other layers to line up with the first one. Aren't you glad I share my goofs with you so you can save time and not do them yourself?
The second thing I thought about was that you want to make sure not to pull any of the corners back so that they lay down better. This is not the voice of experience this time, I just thought about it when I was cutting the X's.
I'm thinking that it would be nice if real life let me spend more time in my studio every day. I need to get a few extra projects ahead in the next few days because my son is getting married Saturday and my daughter is expecting a baby next Sunday so I'm going to have a busy week or 2 coming up. Like my weeks aren't busy already! I know that there is a way to do a post and have it post later, I'll have to see if I can figure it out. I'm always amazed when I figure out a new thing on the computer.
I did go and buy a new computer and I'm really enjoying it! I loaded the My Digital Studio on it and made a layout in about 15-20 minutes last night. Boy howdy, it that software great!!! I'll be sharing the layout later, I wanted to share this card with the Sweet Centers Set and I still have the tutorial I promised for the explosion box to post. I'll try to do that Monday and then I can post the digital layouts next week when I'm sure to be frantically busy.
Oh yes, I wanted to share a blog candy opportunity I saw on a blog called Scrappin' Out Loud, isn't that a great name for a blog? Head on over there and let me know if you win (although I'm cheering for myself to win)! I love the second card with the snowmen on it.


Friday, September 11, 2009

Another Sweet Centers Card


I posted a card using the Sweet Centers stamp set yesterday without the Sweet Treat Cup. You really have to see it with this clever candy cup to realize how fun this set is.
Today I made a card with the hot air balloon stamp from the set. It didn't turn out as well as I would have liked it to but I didn't have time to make another one so I'll go ahead and post it. I wanted a "sky" and some "grass" so it would be like a scene with the hot air balloon floating in the sky so I put a 1" strip of Old Olive cardstock across the bottom of the Bashful Blue card front after punching it with the eyelet border punch.
I punched holes in all layers with the 1 3/4" circle punch since that is the size that matches the opening in the Sweet Treet Cups.
I saw several ideas for ways to get the candy out of the plastic cup but this one seems to be the best. I thought I would add a warning on the tag so they would know that the candy will spill out when you pull the tag. I cut a 3X3" square of the Old Olive cardstock and made a tag with a 2 1/4 " X 3 1/4" piece of Bashful Blue cardstock.
I put Sticky Strips around 3 sides of the blue and punched a circle in the middle. For the tag I punched the top with the Double Rectangle punch and tied a piece of Old Olive 1/4" ribbon through it. I inserted it in the square piece over the candy and then wrote the warning note so it would show in the middle of the circle. I'm thinking I should type this using a fun font on the computer so it will look nicer. I've always hated my handwriting!
Another way of making the card that I saw was simular to this method but they put the tag on the front instead of in the middle of the card. The main problem with this great idea is that the person will probably pull the tag out without knowing that the candy is now going to be loose and it will spill all over the place. Another way that I think would work well is to cut a big X in the back of the candy so the lucky reciepient can just pull the points back to get to the candy. That sounds a bit easier and would work good.
I made this one a "Thinking of You" card. Whoever gets this will at least remember that I'm thinking them until the candy runs out! I think it would be a great idea for a birthday card too. What fun for the birthday boy or girl to have an extra special treat besides the card.
I'm trying to decide if I want to make a Christmas card or a Halloween card tomorrow. Or maybe I'll jump ahead and make a Valentine's card! Can you tell that I'm really enjoying this set??

Thursday, September 10, 2009

Sweet Centers card and blog candy reminder

What a week! My computer crashed royally. I asked my computer tech (OK, so he happens to be my son, he has a computer repair business) if I had closer to 20 or 80 viruses. He said I had way OVER 80! Yikes! I wonder how I managed that. I hope I never go there agian, wherever it was.

My old computer hasn't been officially declared dead, he thinks he can fix it but it is like 6 or 7 years old and I just got the My Digital Studio software yesterday so I'm thinking I need a new computer. Great logic, huh? Anyway, I did manage to get a card made and took a couple of pictures and thought I would share that with you today and I'll try to get the tutorial to the explosion box posted soon. All the pictures (at least 20) are on my old computer and I should hopefully be able to get to them within the next few days.

This card was made with the Circle Circus and Sweet Centers stamp set. The Sweet Centers set is in the new Holiday Mini Catalog and is such a cool set, it has little plastic containers you can put in the middle and fill with M&M's or other such candies. For this card I didn't use the center part because I didn't have any candy to fill it with. Whether the tutorial gets posted tomorrow, I'll be making more cards with this wonderful stamp set to share.

Besides the flower petals it also has a hot air balloon, a christmas ornament as well as Valentine's and Halloween stamps. It is just the coolest set! BTW, you can get it for only $10 if you host a workshop that is $250 AND you also get a hostess set or 2 and $25 in free merchandise. Can't beat that! Email me (http://www.wrightplace4@mindspring.com) if you live in Clarksville or are within 60 miles or so from me and I'd be glad to come share some fun projects with you and your friends so you can get in on this great hostess deal.

Anyway, back to the project, I stamped the flower petals in Tempting Turquoise and then did the "kiss" technique, I pressed an uninked stamp from the Circle Circus stamp set onto the petal which cleaned off the ink in the design of the circle stamp. When I stamped the flower petal onto white cardstock it looked like a patterned stamp! Easy and fun. Be sure to clean the circle stamp between each stamping so it cleans off the ink better with each petal. Without doing the kiss technique the petals are smooth like the leaves, still a pretty look but I wanted to add something to this card since I didn't add the candy.

The center is another stamp from Circle Circus, stamped in Summer Sun, it is where you would put the candy cup if you had candy. . .

I added the leaves stamped in Glorious Green, a Tempting Tourquoise ribbon and a Scalloped Oval punch from Summer Sun with the "Hello" greeting from the Hello Again stamp set stamped in Tempting Tourquoise on white cardstock and punched with the Large Oval punch. It was really a very easy card to make.

Don't forget to reply to my last post to be entered to win 2 stamp sets. NOONE who has replied so far has left an email so I can contact them if they win so if you already entered, go back and add your email address in case you are the lucky winner. I'll draw a name Monday so you have a few more days to enter. Be sure to include your contact info! I wouldn't want you to lose because I couldn't get ahold of you.

Now my son needs his laptop that he has been loaning me to go fix someone else's computer. I guess paying customers rate over his own mother :~)

Friday, September 4, 2009

Blog candy: 10,000 visitors AND I'm a featured artist!

What a great day! My counter that I added in May says I've had just over 10,000 hits, thanks to all my blog viewers! I think that deserves some blog candy, right??? Leave a comment to this post with your contact information and a lucky reader will win 2 stamp sets! They will be a Congratulations set (because I'm congratulating MYSELF!) and a Note of Thanks notecard set with 2 stamps and 4 notecards with envelopes because I'm thanking YOU!

Also, my friend Sherrill Graff chose me as one of her featured artists on her blog Wednesday. I sent her 2 projects that I haven't posted here. The explosion box is on it's way to being a tutorial here soon though. I do my explosion boxes a little differently though, so you can see all the pictures when it is opened instead of having to lift all the flaps. Here is the link!

I've been canning pears, I spent hours yesterday cutting, peeling and coring. All the jars sealed too, they look so pretty. I have lots more pears to can though so I'll be busy the next week! Then my son is getting married 2 weeks from tomorrow so I'll be busy getting ready for that, I'll be doing some centerpieces for the rehearsal dinner and the programs for the wedding. It is a fall theme so I will enjoy that, I've always loved the fall colors. Life is good :~)


Here is a picture of one of the project boards at the Stampin' Up convention. The projects all use the All In The Family stamp set. The upper right one is to announce a new baby and has a little pull out with the baby on it. Too cute! Wendy, want to make them for your new little guy? I thought the doghouse one was very funny. I think I wouldn't need to put a magnet on the back of my husband's picture though. I could just permanently glue him in the doghouse since he stays there all the time anyway!

Tuesday, September 1, 2009

New Catalog and Sweet Deal!

Hi! It is September 1st and the Holiday Mini Catalog begins today. This amazing little catalog is full of great stamp sets, designer paper and supplies, even a new punch and dies! This card is using a stamp from the set Wandering Words from the new mini catalog. This set had 3 stamps, one for Thanksgiving (although it would be a good thank you card stamp too), one for Christmas and one for Valentines that also would be a great thinking of you card any time of year.

There is so much to be excited about and one of the best goodies is for the hostesses. There is a hostess special from September 1 - November 30 that makes ME want be a hostess! If you have a workshop that reaches $250 (a very easy amount) during that time, you get to pick any item in the mini catalog (except the digital studio or hostess sets) for only $10! There are dies in there for over $40 and beautiful stamp sets that you can save nearly $20 on. That is in addition to the regular hostess set and $25 in free merchandise that you would get on a $250 order. If you want in on this wonderful deal, contact me and I'll get a Holiday Mini Catalog to you and help plan your workshop. wrightplace4@mindspring.com

To make it even better though, beginning October 1st, My Digital Studio will become available. This is the digital scrapbook program I mentioned earlier that has Stampin' Up stamp sets, punches, accessories and colors as well as tons of digital design components. You can make scrapbook pages, cards, calendar pages and mini albums using My Digital Studio. You can print your creations at home or have them printed in book form and delivered right to your door. If you are hostess to a $400 workshop between October 1 and November 30, you can not only get the previously mentioned one item from the mini catalog for $10, you can also get the My Digital Studio CD for half price! That is a $79.95 value for $39.97!

I'm thinking that one workshop wouldn't be enough! You might consider hosting a workshop in September and get one of the $10 deals besides your regular hostess gifts and then host another in Oct or Nov and get ANOTHER $10 deal, the regular hostess gifts ($45 in free merchandise at the $400 level) AND the half price My Digital Studio!

There are several bling items in the mini catalog too. I need to order some of them so I can show some projects using them. Let me just say "Shimmer Paint"! I'll be posting lots of projects with these bling items over the next few months coming up to Christmas.

Another new thing in the Holiday Mini Catalog is that Stampin' Up has teamed up with Build-A-Bear Workshop so we now have stamp sets and Sizzix dies that will be great for your scrapbook pages and invitations to Build-A-Bear Workshops and birthday parties! Here is a picture of the bears I die-cut and put together at the Convention. They even have special paper to cut the clothes out of which includes some blue jean looking paper as well as lots of smaller prints and plaids perfect for cutting these little clothes. Check out the link for the mini catalog to see the other clothes available, a cute witch and pumpkin and an irresistable Mr. and Mrs. Clause.

This is a great mini catalog and there are great hostess deals, what better reason to get started on your Christmas cards and Christmas shopping right away??