Tuesday, April 28, 2009

Slider Card Tutorial and drawing

Good morning! Thanks so much to those of you who visited my blog yesterday for the Blog Tour. What did you think about it? I think I will join another one soon.
Here is the slider train I showed you yesterday and promised I would post a tutorial today.

First, I cut the window sheet 1 ½” X 4 ¼” and rounded the corners so they wouldn’t be too sharp. I stamped the train cars in StazOn permanent black ink since I was stamping on the window sheet. Stamp down carefully and pull straight up. Don’t wiggle the stamp at all on this slippery surface or it will smear.
I used an Old Olive background for the card and Baja Breeze for the top part. On the Baja Breeze I stamped a row of trees with the Trendy Trees stamp set. They just seem to go perfectly with the Choo Choo set. I wanted some of the trees to be taller than others so I stamped above the first image on two of the leafy ones.

For the clouds I punched a scalloped oval from scrap paper and sponged on Baja Breeze ink using the punch as a mask. After sponging the Baja Breeze I sponged some Pacific Point ink over it. After sponging some Old Olive across the bottom of the blue strip and adding 3 star brads on the top left corner I was ready to adhere it to the Old Olive card front.
How do you like my snazzy sponge handle? Someone who taught a class at our stamp retreat last week had seen these somewhere and shared with us. Isn't that a fun idea, just punch the round tab punch in the color you plan to use the sponge for and staple it on a piece of sponge cut into forths. I think it is a brilliant idea! I'm going to start by buying 1 pack of sponges which will make 12 sponge applicators and choose the colors I am most likely to sponge with. Later I'll buy another pack and make 12 more and on and on until I have one for every color.

After rolling the Right on Track wheel across the bottom of the Old Olive I was ready for the fun yet tricky part. I used the Word Window punch to punch 2 pieces from the middle of the card (save these pieces). I trimmed off the little notch out of the middle so the pennies don’t get snagged on them when you slide the train. It really bugged me (perfectionist that I am) that some white showed through on the first card so I placed the green card front on the white card and marked where the ends of the slot were. Then I adhered a strip of green cardstock there so there wouldn’t be any white showing through. Like a 3 year old is going to notice. . .

I took the 2 green pieces that I punched out and trimmed a little off each end and glued them end to end to the back of the train to hide where I am going to put the pennies. Seriously, if white can’t show through, why would the pennies be able to show through??? Besides, if the child knows they are there the card may have to come apart! Place a Stampin’ Dimensional to this strip about 3/4” from each end.

Place the word window train strip over the slot you punched and flip the card front over. Peel off the backs of the Dimensionals and stick the pennies to them. Now I use a ton of the Dimensionals to adhere the card front to the card. Usually I’m pretty chintzy with them but you want this project to stick and be sturdy since a little one is going to be tugging on it so I used over a dozen! Peel all the backs off and center it on the card front. Done! See, it really is pretty easy!

I printed out and cut up all those names for the drawing. There were a lot who didn't post their email addresses. I hope most of them were Stampin' Up demonstrators who just wanted to comment and didn't want a prize. The 2 winners will have their choice of one of the Sale-a-bration stamp sets. I will email them seperately to get their addresses but you all want to know who won so their names are Terri H. and Denise KF!
Congratulations!
This last picture shows the 2 cards side by side so you can see why I placed the green strip of cardstock behind the slot I punched. That white showing through really bugged me!


Elaine

Sunday, April 26, 2009

The Big Day is here!!!

Hello blog tour passengers! This part of your tour brings you down Interstate 24 though Tennessee. You will notice the dogwoods blooming and lots of green grass and leaves as we are fully into spring. Welcome to the Stampin’ Up! Blog of Elaine Wright, tour # 4, stop #12. I’m showcasing the Choo Choo stamp set and companion Right On Track wheel from page 18 of the Occasions Mini Catalog. I’ve made 2 cards and a scrapbook page to share with you today. The first card is a sliding card but if you want to see another fun, interactive card, visit Saturday’s blog post for a spiral pop-up card. Both are fun cards to send to anyone, but a child will really enjoy them when made using the Choo Choo set from the Occasions Mini Catalog.
Just a quick tip here, when you get a stamp that has a lot of solid parts, sand it with a fine grain sanding block or even an emeory board before stamping with it. This gives the rubber some "tooth" and you will get smoother, more evenly colored images.

The trains for the sliding card are stamped on the new window sheets; I thought that would be best since it is sturdy enough for the many times little fingers are sure to want to pull it back and forth! You could certainly do it on cardstock also but Stampin’ Up! now has acetate they call window sheets in medium and heavy weight. The medium will be heavy enough for this card. The heavy weight is thick enough to make mini albums out of. These are shown on page 10 of the Occasions Mini catalog as well as a printed window sheet.

I want to keep the post short today so you will have plenty of time to check out the other blogs on the tour but I will post a tutorial for the sliding card tomorrow so check back if you want to see how to make the train move back and forth on the card. Fun, fun!

Don’t forget the Get Connected special Stampin Up has going on this month. If you buy $40 from the Occasions Mini Catalog you get one of the stamps on page 208 of the Spring and Summer Catalog free. I’m adding to that special, if you order $40 from my website today I will send you either a classic stamp pad or a 24 sheet pack of 8 ½ X 11 cardstock in the color of your choice. This will not be added to your order if you order online, you will need to email me wrightplace4@mindspring.com your preference and I will send it to you separately. It's your choice, a free stamp and ink pad or a free stamp and paper!

I had to do a scrapbook page for those precious train pictures. I used the Bashful Blue Designer Series Paper, Pacific Point and Very Vanilla Cardstock, 1 ½” Twill Tape, Choo Choo Stamp set, Right on Track Wheel, and the Big Shot Top Note Die.
I punched out the trains with the 1 3/4" circle punch just to get out of cutting out the individual trains. I added some "coal" to the flat cars with the smoke cloud stamp that comes with the stamp set. I thought it looked a lot like a pile of coal! With the Basic Black ink cartridge I rolled the Right on Track Wheel on the twill before attaching it to the bottom of the page. I also used the Enjoy Life stamp set for the title. Now I just need to get the pictures printed and add some journaling to one of the top note dies. I included a close up so you could see some of the detail and the beautiful designer paper.

***Blog Candy *** I have 2 stamp sets I'm going to be giving away today. I will actually have the drawing tomorrow so leave a comment for me (be sure to include your email address so I can get in touch with you if you win) and you will be entered in the drawing.

I made this last card Saturday and haven't decided if I like it or not. I think it needs some of the train squares to be orange also. What do you think?
I hope you enjoyed your visit to my blog. Don't forget to leave a comment with your email address for the blog candy! Thanks for stopping by and come back soon, you know how that Southern hospitality is, yall are welcome to stop by anytime, I’ll leave the back door open for you!
Hi, today has been a beautiful Sunday. I learned a lot and felt a wonderful spirit at church and then my husband and I took a long walk down to the river this afternoon. The weather is almost perfect for a walk but it was a little warm for that walk back up the hill! I love living in the country.

Tomorrow is the big day. Don't forget to check back so you can go on the blog tour! I will be linking my blog to Cindy's blog. I'll see you tomorrow!

Saturday, April 25, 2009

Choo Choo Preview

I'm gearing up for Monday's blog tour! I made several cards today and thought I would go ahead and post one tonight.

I bought the Choo Choo set because my grandchildren love trains and I needed to make some train pages. As I was thinking about what I could do besides scrapbook pages I thought that interactive cards would be great with this set. This card is called a spiral pop up card. From the front it looks like a regular card. I punched the trees with the new scalloped oval punch that is in the Occasions Mini Catalog (page 8) and stamped the trunks with the tree trunks from the Trendy Trees set (Spring and Summer Catalog, page 91). I wanted one of the trees to be shorter so I reinserted it into the punch and trimmed about a half inch off.

I rolled the Right On Track wheel across the bottom of the card because every train needs a track. I stamped the train stamps on white cardstock in Real Red, Pacific Point and Summer Sun and then cut them out. I didn't go into all the crevices or cut out windows. I stamped and cut out additional train cars which I used inside the card. After adding the train cars with Stampin' Dimentionals I sponged some Bali Breeze for the sky and Old Olive for the grass and stamped the puffs of smoke for the train with Basic Black.


The fun comes with the inside. Mount the card front onto a 5 1/2 X 4 1/4" folded card of Bali Breeze cardstock.

Punch 3 circles with the 1 3/4" circle punch. Start cutting about 1/8" in as you spiral around the entire circle to the center as shown. Roll a mini glue dot and adhere to the beginning tip and place onto the bottom of the card. Roll another mini glue dot and place in the center of the circle and close the card so it stickes to the top. Do this again with the other 2 circles. Use the rest of the trains that you stamped and cut out to adhere to the front of the spirals. You will need to be sure to roll the glue dots so that none is off the narrow spiral-cut piece so it won't stick together and ruin the fun when the card is opened.

This is a great technique to use for flowers and butterflies as well. You would even have time to try it for a Mother's Day card!

Thursday, April 23, 2009

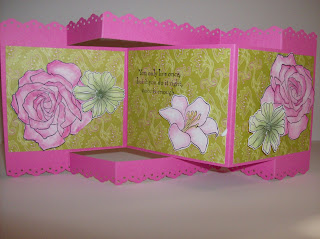
Tonight I'm posting a card made by Shelly Smarzik. She featured me on her blog last Monday and I wanted to feature her on my blog so she sent a picture of this great card for me to share. You can click on the link to her blog at the end of the post and see some of her other work. I love the card she posted Wednesday, I really need that stamp set!

As far as the card posted here, it is called a tri-fold card. It is a clever fold and actually pretty easy. I think Shelly did a great job with it and the Fifth Avenue Flowers stamp set she used is a beautiful set that I haven't broken down and bought yet. That is one of the great things about featuring other Stampin' Up artists on your blog, they have stamp sets I don't have so you get to see more of what you can do with different sets. I love the way Shelly shaded and highlighted the flowers on her card. Very nice. I was planning to do a card fold like this with the Choo Choo set that I am using Monday for the blog tour so I will post a tutorial of how to do the fold when I get it made. Now, on to Shelly's intro:

Hi,
My name is Shelly Smarzik. I live in Rock Hill, SC where I am married to my wonderful husband of 20 years! We have two boys 12 and 10 years old. I have been stamping for 14 years but just celebrated my 6 year anniversary as a Stampin' Up! Demonstrator this month! Over the years my stamping style has changed but my love for Stampin' Up! has not! I am always learning new techniques and love to share them with "my girls" in my stamp club. And now, I am sharing them with anyone who visits my blog as well! I recently started doing stamping video's and am having a lot of fun with those. You can check them out on youtube by doing a search for stampmomx2sc.
I would like to thank Elaine for featuring me on her blog. It is an honor! Until next time... GO GET YOUR FINGERS INKY!
Shelly
Shelly Smarzik's blog: http://www.imstuckonstampinup.blogspot.com/

Tuesday, April 21, 2009

Six More Days Until the Blog Tour!

It is only 6 more days until the blog tour. I think this will be a lot of fun and it will be interesting to see how many people visit my little ol' blog next Monday.

Its the first ever in the history of Stampin' Up! (well, at least that I know of), and you have a free ticket. Mark April 27th on your calendars! That's the date when you can hop onto my blog to see examples of projects made with the Occasions Mini Catalog stamp "Choo Choo." I'll also be offering some blog candy and some other specials. But you have to stop by and enter that day to win!

But wait, there's more. After you browse my examples, you'll find a link to my friend Cindy Beach's blog. She'll be showing you some ideas using the super cute Forest Friends stamp set from the Occasions Mini Catalog! I have visited her blog and she posts a lot of nice cards. She isn't a slacker like me, she posts a new project nearly every day. I'm doing good to get 3 posts a week! She must be able to spend more time in her craft room than I do. Or maybe her craft room is better organized than mine (chances are pretty good it is).

But wait, there's even more. On Cindy's blog, you'll find a link to yet another blog and examples from a different stamp set in the mini! There will be a banquet of ideas and beautiful projects. There are 16 stops on this tour, and you won't want to miss a single one. The links will be available only on April 27th, so please don't miss the bus.

But wait, yes, you guessed it, there's more. I feel like an infomercial!

Because Stampin' Up's "Getting Connected" promotion will still be running, spend $40 on Occasions Mini Catalog products and choose any one item from the "Under $10" on page 208 in the Spring-Summer 2009 Idea Book & Catalog for Free. You will see so many ideas with the sets in the Occasions Mini Catalog that you will need some of the sets anyway!
Stay tuned, because there is more to come! It's an event not to be missed! This tour will take you all over the place! Be sure to hop on at my stop and then travel the road laid out for you! More surprises to come, so keep checking back!
Pack your bags on April 27th! You're going to love the trip, and you won't even have to leave your home.

Monday, April 20, 2009

Lots of swaps!

Here is what over 50 card swaps look like. There are actually 3 bookmarks along the left hand side and a couple of dominoes at the top too.


Here are a few of my favorite cards. I had a lot of favorites. I'll post some more later. It is hard to capture in a picture but the one with the trees in the lower left corner has some gold in the background. I asked Monica who created the card how she did it. She said that she used Glossy White cardstock (plain cardstock won't work) reinkers and a cotton ball. She put a drop of 2 different shades of green ink and a drop of the gold reinker for the Gold Encore inkpad onto the cotton ball (the silver reinker would be great too). She swipped this onto the Glossy White cardstock until she had the look she wanted. Then she stamped the trees from the Lovely As A Tree set over it in black ink and embossed them. It is hard to tell by the picture but it is a fantastic look! I finally managed to get a picture where the flash didn't glare on the glossy cardstock.

I feel a tutorial coming on. . .

Saturday, April 18, 2009

Purses Swap Card

I went to a Stampin' Up Retreat today that was sponsored by my next 2 uplines and my 3rd upline came up from Atlanta too. I wanted to join the card swap because there are always so many great ideas shared. When we got the swap information, we found out we needed to make 54 cards! This is my card above.

If you ever doubted my sanity you will be assured that I am completely crazy when you see the card I decided to make. A normal person would make one that was relatively simple and wouldn't take too long to make when they are making so many. Nope, not me! I love this card, I found it on someone's blog and cut and pasted into a file I call "Caseable Cards". There are about a dozen pages in that file now of great cards I want to copy when I have time. Unfortunately, the information for the blog I got it from is too small for me to read and when I enlarged the card it got too blurry to read so if this looks like a copy of your card, LMK so I can give credit where credit is due.
I used 4 punches to make the purses. The picture on the left shows where I cut each punch. The Round Tab punch that I used for the bottom of the purses was simply cut in half right in the middle. The Scalloped Square punch was used for 2 types of purse flaps. First I cut off the top and bottom (green) 3 scallops. Then I cut the remaining long piece into 2 other cute flaps and threw away the rectangle piece from the middle.
The handles and pink flap were made with the Large Oval punch and the Scalloped Oval punch. There was also a rectangular piece left over from this one.

I double punched these oval punches. First punch the Large Oval punch but leave enough space around it to punch the next punch.


Center the Scalloped Oval punch around the Large Oval punch carefully to punch out the handle. Since I was making so many punch pieces, I ran the paper through my Xyron machine before punching it so I could just peal and stick the purse parts onto the card and not have to keep applying adhesive. This is especially
helpful on this skinny little handle!
These are the 3 pieces for the purse on the left. The other 2 are done the same way but with a different flap. After assembling the purses, add the brads to act as closures and then add the layers of the card together. There are 2 reasons to add the brads before putting the card together. First, there will be fewer layers to punch the brad through and second, the prongs of the brad will be hidden between the layers instead of on the inside of the card where they will be seen when the card is opened. But you knew that, right??
I got some great cards in return for the swap. I'll post some more later but I think I need to post the projects we made at the retreat first. There were some great ones, I have a Mother's Day class ready to go, I just have to figure out a date for it. Mother's Day is less than a month away!
I'll post the first set of projects Monday.

Monday, April 13, 2009

RAK and I'm a Featured Artist


Have you ever gotten a RAK? If you have never heard of one, it stands for Random Act of Kindness. I got one last week, a beautiful hand-stamped card from a fellow Stampin' Up! demonstrator. I have never met her but I sure enjoyed the card. Isn't it pretty? You can't tell from the picture but the background is textured with the dots texture plate. Nice touch!
If you read yesterday's post, you know I needed some random kindness!
Then I was asked to be a featured artist on Shelly Smarzik's blog. What an honor! If you want to check out her post, go to http://imstuckonstampinup.blogspot.com/2009/04/monday-featured-artist.html
I have been enjoying her blog for a while now and she has simular taste to mine so I love her projects. I hope you will enjoy them too. I asked her if I could feature her also so you will see a special post later this week. It's so fun to share!

Sunday, April 12, 2009

Happy Easter and Dental Woes

Happy Easter! I hope you were able to go to church and think of our Savior and His Atonement and Resurrection today. I got to substitute for the 4 year old class at church this morning. There were 7 students there and they had lots of energy. I suspect some of them ate Easter candy before they came to church today!


The picture is of my 4 year old granddaughter. This was taken a few weeks ago (in the produce section) of her doing her fairy dance, she is very serious about it all. Notice the bright pink cowboy boots. She loves those things! She wants to wear them all the time.
Here she is in her beautiful Easter dress, all lacy, organdy and pastel colors and those boots! I don't know what everyone else thought but grandma thought she was adorable.

I have been going the dental rounds the past week. I went to get a root canal (I can't tell you how much I was looking forward to that!) last Friday and the dentist couldn't get into the 3rd canal so I was referred to an Endodontist in Nashville. I got an appt for the following Tuesday and went all excited by yet more shots in the roof of my mouth. When she got into the root she said something about it hemorrhaging and I'm laying there with my mouth wide open thinking about how that didn't sound good at all. She got the bleeding stopped and told me that they couldn't save the tooth, they could do the root canal but it probably wouldn't last another year. Well, as much as I wanted to invest over $1000 on something that wouldn't last, I agreed that I would make an appt with my dentist to have the tooth pulled.

I called as soon as I got home and was sooooo happy to learn that he had a cancellation the following day! More shots in my mouth, my favorite thing in the world! Did I mention how much I enjoy the shots in the roof of my mouth? This tooth was not anxious to stop creating trouble for me. After trying for 20 or 30 minutes to get the thing to budge he mentioned how the roots were going 3 different directions. That would make it though to pull, huh. He finally drilled and drilled (on the list of things I like least, drilling is 3rd, after shots in the roof of my mouth and shots in general) and drilled. . . enough that part of it came out. He referred to that root as a corkscrew root. He worked on that tooth for over an hour, Owie! After he was finished he had the tech take xrays and true to the nature of this tooth, there was still a piece of the root there so he had to dig back up in there to get that out. By this time, the shots are beginning to wear off. I felt every stitch he put in but I wasn't going to ask for another shot!

The next day there wasn't any pain but now I need to decide if I want to spring for an implant because they said a partial doesn't often work out well where the tooth was pulled.

Saturday, April 11, 2009

Blog Tour

Want to go on a FREE stampin trip with me?


April 27th All Day Long
I would love to have ALL of you join me on this virtual trip! The trip is loaded with fabulous stops that will offer many ideas to use with the new Stampin' Up! Occasion Mini products. Each stop will have a different product on showcase so you don't want to miss any of them.

The event will take place on April 27th and you can hop on the bus right here! I will be showcasing the fun new set Choo Choo. A great children’s set. I realized that I didn’t have any sets for children’s birthday cards so I bought this one and it is a fun set. After you browse my examples, you'll find a link to my friend and colleague Krystal De Leeuw's blog. She'll be showing you how to use the wheel that goes so well with the Choo Choo set, "Right on Track" from the Occasions mini!


The little basket shown here is from a post Krystal shared on her blog. She has amazing talent and I know you will enjoy seeing what she does with that little wheel! On Krystal’s blog, you'll find a link to yet another blog and examples from a different stamp set! This will be a banquet of ideas and beautiful projects. There are 20 stops on this tour, and you won't want to miss a single one!! The links will be available only on April 27th, so please don't miss out!

I can't wait, there will be so many fabulous 100% Stampin Up! ideas. So be sure to pack your bags and maybe a treat or two and come along for the ride! We will meet right here on April 27 and of course you will end here too! More details to come, just wanted to be sure you have your bags packed and you are ready!

Monday, April 6, 2009

Time Flies Layout


This is the layout we are doing for the April scrapbook club meeting. I have 2 openings in the club that just came up so if you live near Clarksville, we would love to have you join us. I used the new Sense of Time stamp set that is in the Occasions Mini Catalog and Trendy Trees in the Spring-Summer Catalog.

The white cardstock was cut to 1 inch along the top and sides and 3 inches across the bottom to allow for the stamping of the tree border. I used the technique for cutting out the center like I did the Matting a Whole Page blog post from the middle of March. I just put it on top of the layout instead of using it behind for this layout.
Then I punched all 4 sides with the eyelet border punch. If you have an even number of inches it will work out to be right to the edge of the punch when you get to the end of the row. There will still be a corner that is not punched but you could leave it plain or cover it as I did here with the quotes from the Sense of Time set and the gears. I stamped 12 of the gears stamp and cut out 6 of them and punched the largest gear of the remaining 6 with the 1" circle punch and the next largest with the 1/2" circle punch. Then I used Stampin' Dimentionals to add these to the ones I cut out to give the gear stamp some added interest. I also used them behind the quotes. It is hard to see in the pictures but it gives a great look to the finished layout.


I used 2 stamp sets for the title, "Time" was stamped on a scrap of the Bella Bleu Designer Paper using the Jumbo Outline Alphabet set. I cut out each letter and adhered it to the corner of the 5X7 mat. "Flies" was stamped using the Short Order Alphabet set on a piece of Whisper White cardstock, monuted on a mat of Not Quite Navy.
I stamped the clock on one of the transparency sheets with black Staz-on ink and cut it out and mounted it with a rhinestone brad over "time". I'm really going to enjoy using these clear transparencys! A mini album is going on in my head, hopefully it won't take too long to get it out of there and made IRL. They are introduced in the new Occasions Mini Catalog but I think they will still be carried in the regular catalog when it is released the beginning of August. I hope we will still carry them!
I used a sponge to apply Not Quite Navy ink around the edges of the layout, mats and quotes. I usually do direct to paper inking but wanted a softer look with the delicate Eyelet Border Punch.
I couldn't do a whole layout without using my Big Shot so I cut a little birdie to emphasise the "flies" part of the title. I think he is adorable! I'm thinking that this will be a great layout for heritage photos but time flies for us all and I might put a few pictures of the grandkids showing their growth so quickly over a year's time.

Wednesday, April 1, 2009

Bird Card

I used that cute Good Morning Sunshine paper I had left over from my Feb class layout for this card as well as the Birds and Branches die and eyelet lace border punch. I cut a 1 1/2" X 5 1/4" strip of the bird paper, 1 3/4" X 5 1/4" strip of Pacific Point cardstock and 2 1/2" X 5 1/4" piece of white cardstock which I punched on both long sides with the eyelet lace border punch. After layering these I adhered them to a 4" X 5 1/4" piece of the yellow checked paper, leaving room at the top for the birds and one piece of the tree branch diecut. I stamped the "Thinking of You" sentiment from the Trendy Trees stamp set that I got from the Man in Brown yesterday. I need to find some more time to play with that set tomorrow, I love it! I trimmed the white strip down and matted it on a small scrap of Pacific Point. I adhered the branch and then added the birds using Stampin' Dimentionals. This really was a pretty quick card. That Big Shot machine is making card making and scrapbooking so fast. I'm going to start a Big Shot Club soon. I'll be posting details of that soon.