Some of the new paper Stampin' Up is releasing on Jan 5 is called Sweet Pea. It is beautiful paper and I'm having fun playing with it. I finished the layout at nearly midnight but it was a cloudy day so I don't guess it would have been a good day for taking pictures if I had finished it earlier. I was going to use the butterlies from the Beautiful Wings Embosslit die but the felt flowers from the Sweet Pea Stitched Felt wanted to be on it too. So, what do you think, should I use the butterflies or the felt??
This is my blog where I share things I create with my Stampin' Up products and stamps. I love to make cards, 3-D projects and scrapbook pages.
Thursday, December 31, 2009
Tuesday, December 29, 2009
Brand new goodies!
I've been so busy with Christmas and life in general that I haven't had much time to play with my new supplies from Stampin' Up's upcoming new catalogs. I made 2 projects with the new butterfly sizzlets die (I'm just crazy about that die) but it needs to be used a LOT more! I will be posting some new projects soon but today is another busy day so hopefully tomorrow. The die is called Beautiful Wings and it has 5 different butterflies on it, what a great value! They are all embossed with different designs and they are just beautiful! So quick and easy to cut them out and add to your cards or pages. I love, love, love these little butterflies!
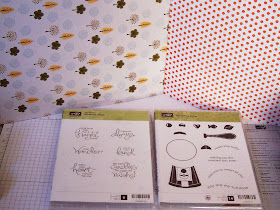
For today, let me share some pictures of a few of the new products I got. The paper in the background of these pictures is from the new Sweet Pea Designer Series Paper. It is a thick pad of paper, like the slabs from other companies and it is just beautiful! It has 2 each of 24 double sided papers for 48 sheets in all. I'm just itching to get a layout done from this paper. It is speaking to me but I haven't had the time to listen!
First, most of you have probably heard about the acrylic mount stamps that are now available. I like the idea although I really love the wood but the packaging is a deal-sealer to me! Look how it has a full size picture of each stamp on the front of the package (a sturdy DVD case) and not only the name of the set but thumbnails of the stamps on the side. Can we say, space saving storage that is super easy to see??? One of the things I don't like about my stamp storage in a drawer is trying to see the set that is in the case if I'm not sure from the name of the set. Now I can see them all without having to dig! Another really great thing about the clear mount stamps is that they cost less! They are made from the same great quality rubber with our deeply etched designs for smooth stamping but without the price of the wood you save money too. It doesn't get much better than that!
How about these punches?? Yet another new design that will make storage and locating what you are looking for easier. They have thumbnails on the sides and lock closed for more compact storage. There are 8 new punches coming out when the Occasions Mini catalog goes active on Jan 5! One of them (the border set used to punch the white square is going to be free! During Sale-a-Bration (Jan 5-March 31) you can get this border punch free with a $50 order. More about Sale-a-Bration later.
Look at the Sweet Pea Stitched Felt in the middle of the top picture. I haven't been a fan of felt on my scrapbook pages but this beautiful set is quickly changing my mind. I love the bright colors and they match the Sweet Pea Designer paper perfectly. There are 52 pieces in this package! I'm anxious to see what I can do with them.
I also have a shaped board book that is very cool. I'll be working on something wonderful with it. There are 3 mini board books in the Occasions Mini catalog that are going to be fun to create with.
Saturday, December 26, 2009
MDS Memory Game
I keep coming up with more ideas for using My Digital Studio. Stampin' Up calls it a "digital crafting solution", not a scrapbook program and they are so right! I realized on Christmas Eve that I hadn't gotten a thing for my son (slacker mom that I am). OK, he is 33 so it isn't like it's a little 3 year old that I forgot but still, how could I have forgotten?? So I thought and thought and decided I'd give him a gift card to the local office supply store so he could use it toward the new office chair he has been needing. I went online but they said it wasn't available for our zip code. WHAT??? It's a stinkin' gift card, the recipent can drive in to the nearest store to use it! Anyway, I decided to make my own gift card and MDS made it so easy. It looked so good that he actually asked if they had mailed it to him. When he figured out that I had made it he said, "I don't think they will honor this." Tee Hee
I used my MDS for another Christmas gift. I made memory gifts for the grandchildren. When you open the program up for an 8 1/2 X 11 scrapbook page, option #5 has a template for 12 square pictures. I just looked through my pictures and picked out 12 per page. I chose pictures to include grandparents, cousins and aunts and uncles as well as some pictures of fun memories, like getting to sit in the General Lee.
I made 3 pages but that is probably way too many. With younger children I would probably only put out 5 or 6 pairs. With my 5 and 7 year old grandchildren last night we used 10 pairs and it seemed like a good amount. I enjoyed it about as much as they did. I even made a match now and then. Of course, I let a few matches go by so they could win them.
I also personalized the backs of the card. I changed all the photo boxes to text boxes and put the family name on the back along with a "stamped" image from the many stamp sets available on MDS. Since they are exact on the programs I just printed the game titles on the back of the pictures and they matched up perfectly. I laminated them and cut them out and it was so quick and easy! Gotta love that. I used the same design from the backs to make a larger game title piece to cover the box. I looked around for the perfect box and found that the smallest stamp case fit the game perfectly. I like that it snaps closed securely so the game pieces are safe inside. Of course, who knows how safe they will be in the hands of the 2 year old! Have I ever told you how much I love this program???
Wednesday, December 23, 2009
Three Cards
I took the time today to finish up 2 cards and make a third one.
Don't look too close at the card though. I made it with the other side of the DSP first but it seemed too busy so I peeled it off, rubbed off the adhesive and flipped it over. I liked the stripes so much better but there are a couple of scuffs from peeling it off! I do need to make 4 of these cards for the grandkids to put on their Christmas cards. They will love getting the M&M's.
Second, this is a simple card and is also quick and easy. I used some of the Merry Moments Designer paper along with the Tree Trimmings stamp set for the strings and bows. Don't look closely at the string on the far right, I goofed up that one :~)
The first card uses the Sweet Centers stamp set. I hadn't used the Christmas ornament hook from that set yet so I needed to use it before Christmas. I wanted to put the Real Red cardstock through the Big Shot with the Petals a Plenty embossing folder but I wan't sure if the heat embossed ornament hook stamp would look ok after the dry embossing, would the embossing powder chip or flake off? I tried it both ways, look at the picture on the right, the Top Note die on the left was embossed with the embossing folder first and the one on the right was heat embossed first and then dry embossed. It looks better to heat emboss first.
Don't look too close at the card though. I made it with the other side of the DSP first but it seemed too busy so I peeled it off, rubbed off the adhesive and flipped it over. I liked the stripes so much better but there are a couple of scuffs from peeling it off! I do need to make 4 of these cards for the grandkids to put on their Christmas cards. They will love getting the M&M's.
Second, this is a simple card and is also quick and easy. I used some of the Merry Moments Designer paper along with the Tree Trimmings stamp set for the strings and bows. Don't look closely at the string on the far right, I goofed up that one :~)
The wide oval punch works great with the Merry Christmas stamp from the Holiday Best set but I didn't have a bigger punch to mat it on. I tried the scalloped oval die from the Magnetic Movers and Shapers Punch Window set and it was just barely peeking around the edges of the Wide Oval. I decided to cut 2 of them and they matted it perfectly. I added 3 buttons from the Button Latte Designer Buttons to imitate ornaments before mounting it on Old Olive cardstock.
The last card I finished up today isn't a Christmas card but a birthday card. I ran half of the front of the card through the Big Shot with the Petals a Plenty embossing folder and stamped on the top half of it. Other than the ribbon, there are no layers on this card. Simple, quick and pretty.
I reckon I'll head to bed. Tomorrow will be a busy day!
Tuesday, December 22, 2009
Scallop Envelope Box, Tent treat holder
I had some time to play with stamps and paper today. First, here is a box I made with the Scallop Envelope die. I made 4 of the envelopes and cut off one tab from the side of each and adhered all the remaining tabs together to form a square box. Then I wove some 1/2" strips of Naturals Ivory cardstock to make it look like a little basket. I folded the sides (actually the envelope flaps) down and punched a hole in each side. I tied them together with the Sleigh Bells twill ribbon from the Holiday Mini Catalog. This very cool ribbon is only available until Jan 4. I was going to add a stamped image to one of the flaps but decided it was finished when I got to this point.
Another quick project that is perfect for an extra stocking stuffer, gift at a table setting, gift tag or even an ornament for the tree. I cut 2 of the folding tag and adhered the 2 short flaps together. Add a small bag of candy, either glued in or punch a hole and tie it in with the ribbon in the holes at the top of the cardstock. The stamped image is from the Berry Christmas set, also featured in the Holiday Mini Catalog. You could make dozens of these very quickly if you were using them for a table setting or Christmas ornaments.
I can't believe Christmas is so close! As always, it will be here and gone before we realize it. I have done nearly everything to prepare so I can relax and sit back and invite the spirit of Christ into my heart and home. I have enjoyed watching the grandchildren play with the Fisher Price nativity set I got them. It's nice for them to be able to act out the nativity without having to worry about porcelain pieces getting broken. My favorite configuration I have seen them put it in was the baby Jesus in the middle with the animals and people all circled around Him as close as they could.
Monday, December 21, 2009
Paper bag?
Are you giving any of your Christmas gifts in a brown paper bag? Well, add a little cardstock, patterned paper and stamps and you won't be embarrassed to! I measured the bag and cut it square. I cut 2 pieces of Real Red cardstock a smidge smaller (about 1/8") for the front but added 2" to one side of the back for the flap. Then I cut the designer paper 1/4" smaller than the cardstock. After adhering these pieces to the bag I stamped the Santa's sleigh stamp from the Wantering Words set (only available till Jan 4) onto Very Vanilla cardstock and punched the corners with Stampin' Up's new corner punch, the Scallop Trim Corner.
After stamping the sleigh and punching 2 corners I matted it on Real Red cardstock and adhered it to the front of the bag. I stamped some snowflakes from the Serene Snowflakes set on another piece of Very Vanilla cardstock and matted it on Real Red and adhered to the flap to finish off the bag. I added a velcro dot closure. It won't prevent peeking but it will hold the bag closed!
Don't you love the Scallop Trim Corner punch? It isn't available for purchase until Jan 5 when the new (and amazing) Occasions Mini Catalog goes active. You want to know what is even better? There is a matching border punch that is free!!!! It will be in the Sale-a-bration catalog along with some great stamp sets and a paper pad. Sale-a-bration runs longer this year, nearly a month longer! I'll be giving more details soon, it is much better than ever before.
Saturday, December 19, 2009
Hybrid Card, Way to Go!
I made another hybrid card using Stampin' Up's digital program. Have I ever told you how much I love that program??? I have another project I'm working on that I am really excited to finish. I'll be sharing that soon.
Today's share needed to be a special card. It is for the Seminary students who completed their reading, memorization and had good attendance, etc for the first quarter of the school year. It didn't seem like Congratulations would be the right sentiment since the requirements benefit them and are all things they should be doing anyway. I remembered the balloon stamp in the Sweet Treats set and thought about using the balloon for the "O" in Way to Go.
I printed out Way to G ! in MDS and added the "All Abord" image in the corner. I printed one out to make sure the space for the O would be big enough. It was the right height but I hadn't put enough spaces between the G and the exclaimation point. I added a few more spaces and it was the right size. I printed off 4 per page and cut them into 4 X 5 1/4" squares. I had to eventually trim them a bit smaller to punch the circle in the card part though. I stamped the basket and added the Sweet Treat cups. I think they will like getting the candy along with their cards.
I thought of 2 tips for saving paper while I was making these cards. I had a scrap left from trimming the red cardstock that was just big enough to punch the Round Tab Punch from. Problem, there was not enough of a scrap for me to hold onto a corner to get it centered in the punch. I took another scrap and placed a bit of adhesive on it. I adhered that to the scrap and was able to fit it into the punch with no problem.
Another option if you don't have a scrap big enough to punch the desired shape, punch it from a part of your card or scrapbook page that will be covered by a mat. No one will know there is a punch from under there and you will save cutting into a full piece of paper or waiting till you order more of the right color paper to finish your project!
Wednesday, December 16, 2009
Flower Pin kits
Fabric Flower Pins
I have kits for these great flower pins. You will get enough die-cut fabric flowers to make one pin, 2 buttons (I'll pick out 2 that I feel match and you can choose which one you think match the best when you make the pin) and a pin back. I have listed various color combinations but if you want something different, let me know and I'll put a kit together in the colors you want.
Some of the kits use one fabric for the whole flower and others use 2 different fabrics that coordinate. Most are of drapery or upholstry fabric and some are taffeta or simullar fabrics.
The flower kits are $6.50 each which includes postage and handling. If you want the flower already put together it will be $12 which also includes postage. There will be a $1 discount on each additional pin for multiple orders. If you order one of the kits you will get a full, step by step tutorial with lots of pictures.
Just email me (mailto:wrightplace4@mindspring%20dot%20com) with the kit/pin you want and I'll send a paypal invoice or information for mailing payment. I'll have other colors soon.
#1 Red
#2 Blue
#3 Blue and cream
#4 Blue Taffeta and Cream print drapery
#5 Blue Taffeta and blue/pink upholstry
Tuesday, December 15, 2009
Boxes, Bags and Tags Class
I'm doing a class Thursday, Dec 17 called Boxes, Bags and Tags. It will be at 10:00AM and 2:00PM. Here is a sample of some of the things you can make to package some of your smaller Christmas presents in. Email me for information if you live close enough to Clarksville, TN to come to the class.
I have lots of patterns if you want to trace one or two off for your packages and I also have a couple of dies for the Big Shot machine that you can use. I'll have Christmas stamp sets you can use to decorate your creations as well as lots of dies and punches you are welcomed to use. Stay a while and create a bunch or just stop by and create a few, it's up to you!
I'm doing another class Saturday. Come learn how to make the fabric flower pins I posted on Dec 3rd. You can make more than one if you have time or buy a couple of kits to take home and finish after you learn how to put them together. If you live too far away to come to the class, I'm putting a tutorial with lots of pictures together to sell with the kits. I'll have them available for purchase tomorrow.
Saturday, December 12, 2009
3-D ornament card
I've had the idea for this card in my brain for several weeks but hadn't found time to sit down and do it. I was at a craft fair last week and during a lull I put it together. I loved it, so did a customer and she bought it before I thought to take a picture. I know this one isn't the same because I didn't have my embossing gun with me at the craft fair but it's pretty close. I used Real Red and the Brushed Silver cardstock. The sentiment is from the Christmas Greetings set. I like the way the silver embossed looks on the silver cardstock. The ornaments are from the Delightful Decorations set. That's the one I love with the matching punch that makes it so fast. I stamped and punched 9 in all, 7 for the 3-D part and the other 2, one has a rhinestone brad in the center and the other is mounted on Stampin' Dimentionals to raise it up a little. I guess you could send it in an envelope but the receiver would have to poof it back up. It would be great as a tag on a gift. Hey, I'll be back in a minute, gotta run with that idea!
OK, I'm back. I got a gift tag made and pictures taken so I can post it also. I used the Brushed Silver cardstock again and cut out the tag from the Two Tags die. I stamped all the Delightful Decorations on white with Real Red ink. I tied a piece of elastic silver cord around the "To: From" tag and another on the 3-D ornament once I got them all stuck together. Now I have to find a very special gift to put this tag on!
Those of you who know me know that I pretty much always procrastinate and I hate to go shopping, especially when there are tons of people out like there always are in Dec. I like to go at 6AM when there aren't many people out. I am making quite a few of my Christmas presents (in my spare time) so hopefully I can get the actual shopping over with soon. I've been throwing logs on the fire these days since it has been getting down into the lower 20's and teens here lately. We have been having Jan/Feb weather lately! That's another thing I don't like, cold weather. Burrrr!
Friday, December 11, 2009
12 Days of Christmas sale!
Big savings on Big Shot dies and vinyl! For the next 12 days you can save big on Big Shot dies and Stampin' Up's vinyl sheets. Choose alphabet, 3-D dies, even the tiny Sizzlet dies. Click on the picture at the right to check this sale out.
Don't have a Big Shot?? You know you need one! Stampin' Up is guaranteeing Christmas delivery if you order your Big Shot by Dec. 15th. What a great Christmas present for your mom, sister husband or BFF to give you! So, from now till Dec 15, everyone who orders a Big Shot machine ($99.95) from me will get a $20 gift certificate from me free! But wait, if you are that close, remember that a $150 order qualifies for hostess rewards! So you will get a free hostess set AND another $15 worth of great Stampin' Up products! This offer is available only through me so email me with your order and make your holidays so much more merry :~)
Here are 2 more Christmas cards I want to share. The first one was made by Mary Robinson. Isn't it great? It is so simple yet just beautiful. She stamped the dasher stamp in the corner, added a little glitter to his antlers, stamped a sentiment and drew straight lines with her Signo White Gel pen. Isn't it a great card???
The card beneath it is also a simple card. The colors aren't the traditional Christmas colors but they look great for a Christmas card. The Serene Snowflake set is a great set that is very versatile.
If you want to give or get a Stampin' Up gift certificate for Christmas, let me know. Stampin' Up is a great gift for the person who loves to craft and you know they will be able to pick out something they love with it. Hummm, how can we put the word out to our hubbies?????
Thursday, December 10, 2009
I still have several swap cards from Stampin' Up's regional meeting in Chattanooga in Oct. that I haven't posted yet.
First, this blue card shows how pretty and shiney the Shimmer Paint is. I love the look the Shimmer Paint gives to your projects and Chrismas time is the best time to make things shine! I need to find more time to play with my Shimmer Paints. So far I have only used the sponge daubers to apply it directly to the stamp and put some in a small spray bottle to make a glimmer mist-type spray. That gives a wonderful look to a project by the way.
The second card uses the Yuletide Christmas set from the Holiday Mini Catalog and the Itty Bitty Backgrounds set from the regular catalog. The Yuletide Christmas set is a beautiful, old fashioned set that is so pretty. The Merry Christmas sentiment from that set is just wonderful! Besides the Garden Green and Real Red cardstock she used the Merry Moments Designer Series Paper. It all comes together for a very pretty card made by Kay Barker.
Next is a card using my favorite punch and my favorite paper. Katie Ferguson used the Bride Specialty Paper for the ornaments. She brayered the colors onto the paper and it looks great because the ink sticks to the paper but not to the embossed parts. The embossed parts shine too so that makes this a very nice card.
The last card also uses the ornament punch and the Delightful Decorations stamp set. I love the ease of being able to just stamp, punch and adhere. The cards come together so quickly when you use these tools.
Monday, December 7, 2009
MDS Christmas Card
I decided I wanted to send a few pictures with my Christmas card this year and the more I thought, the more I knew that MDS (My Digital Studio) would be the perfect way. I made what is called a hybrid card, one that uses digital images as well as paper, ribbon and other embellishments. A hybrid project is the best of both worlds! I can use the Stampin' Up digital program that I love to play with and print it out and then move on to the wonderful cardstock and goodies I love to use making cards and scrapbook layouts.
Since I'm going to be sending out quite a few of these cards I wanted the last part to be quick to achieve. I made my digital layout, exported it to jpeg form and printed it out with 4 per page. Very easy, even for this computer challenged grandma!
I cut each of the 4 card fronts out with my trimmer and mounted them on a square of Always Artichoke cardstock. I punched 2 holes at the top with my 1/16" circle punch and tied a length of silver cord through them. I mounted that on a card base and it's done. Well, not really, I have to write up a Christmas letter to print on the insides. What, did you think I was actually going to hand write it all??? Another thing I love about MDS is that they have spell check so it underlines misspelled words in red so you know you goofed. Way cool! Especially when you tend to get creative with your spelling like I sometimes do.
I got some very creative suggestions (although they were all very wrong) about what I was doing in the picture with the jumbo eyelet and crop-a-dile last week. Now, for the rest of the story. . .
Both mine and my husband's cars had gotten the little plastic stopper for the seat belt broken off when they got stuck in the door as it closed. The buckle part would slide all the way down to the floor and was a pain to get a hold of to buckle whenever we got in the car. I was thinking about sewing buttons on there but worried that they would just break again. Then I had the bright idea to use the Stampin' Up Jumbo eyelets. I used the Crop-a-dile to punch the hole in the seat belt and attach the eyelets. It works like a charm! I did it a couple of weeks ago, so far so good.
How about you, have you ever used scrapbook supplies to do a repair? A few years ago Diana and I were going to a weekend crop and it was raining. One of her windshield wipers started slipping out and we didn't want to loose it so we stopped under an overpass and tied it on with some fiber. That worked perfectly until we could get home (after a wonderful weekend) and her husband could fix it right. We laughed about it but hey, if it works. . .